LogoLogo
Tutorial VideosScripting DocumentationLegalHome
Breakroom
Breakroom
  • Welcome to Breakroom
  • GETTING STARTED
    • Helpful terms
    • UI tour
    • Keyboard shortcuts
    • Customizing your avatar
      • Choosing a starter avatar
      • Editing avatars in the Outfit window
      • Using the Sine Wave Shop
    • Controlling your avatar
    • Controlling your camera
    • Communicating with other users
    • Using the conference system
      • Troubleshooting audio and video issues
    • Using Breakroom for Training
    • Settings
    • Language and accessibility
    • Reporting issues
  • EXPLORING BREAKROOM
    • Region navigation tools
    • Bookmarks and teleport invites
    • Using the Explore window
    • Using the Meetings window
    • Networking with other users
      • People
      • Groups
    • Snapshots
  • BUILDING NEW WORLDS
    • Breakroom Dashboard tour
    • Creating and managing Regions
    • Default Landing and Orientation Regions
    • Region settings
    • Region template descriptions
  • CREATING CUSTOM EXPERIENCES
    • Branding tools
    • UI customization options
    • Filtering the Sine Wave Shop
    • Selecting default avatars
      • Default avatar collections
    • Using the Region Editor
      • Editing and moving objects
      • Editing terrain and sky
      • The Region Editor ADVANCED window
    • Exploring the Breakroom Toolkit
      • Breakroom Video Player
      • Breakroom Web Browser
      • Breakroom Image Viewer
      • Breakroom Info Kiosk
      • Breakroom Teleport Portal
      • Breakroom Web Collab
      • Breakroom Note Board
      • Breakroom Games
      • Breakroom Reactives
      • Breakroom Orientation Quest
      • Breakroom Tour Cameras
      • Conference rooms and booths
      • Add-on seats
      • Breakroom Start Here UI
      • Breakroom Basic Emojis
      • Breakroom 360° Video Player
    • Managing your Media Library
  • OPENING THE DOORS
    • Seats and concurrency
    • Creating and managing user accounts
      • World-level user permissions
      • Region-level user permissions
      • Single sign-on
      • Eventbrite integration
    • World Stream
      • Purchasing and managing World Credits
      • Pre-allocation campaigns
      • World Stream viewer toolbars
      • World Stream keyboard shortcuts
      • Troubleshooting World Stream issues on Chrome
      • Troubleshooting World Stream issues on macOS
    • Desktop viewers
    • Privacy Policies, EULAs, and data collection
    • Analytics
    • Toggling World availability
  • RUNNING YOUR EVENT
    • Understanding the conference system
      • Voice zones, zone types, and conference permissions
      • Voice chat and spatial audio
    • Customizing the conference system components
      • Adding breakout areas
      • Creating custom voice zones
      • Setting up Presenter and Audience zones
      • Designating triage zones
      • Troubleshooting duplicate zone errors
      • The RoomFurniture component
    • Setting up Breakroom for Training courses
    • Moderator tools
      • Broadcast messages
      • Crowd management
      • Audience questions
      • Raised hands
      • Presentation controls
      • Hidden UI toggle
      • Participation
      • Audio streams
  • TIPS FOR SUCCESS
    • Region Editor best practices
    • Onboarding new users
  • ADVANCED TUTORIALS
    • Uploading your own Region
      • Installing Unity and the Breakroom SDK
      • Reducing poly counts on CAD files
      • Uploading a Region from Unity to Breakroom
      • Creating and uploading custom chairs
      • Testing items on the preview server
      • Pushing items to the live server
      • Installing the conference system components
    • Uploading your own virtual objects
    • Uploading your own virtual clothing
    • Creating and copying avatar shapes
    • Installing the Quest System
    • Registration and grid APIs
    • Video streaming
    • Sinespace scripting documentation
  • HELP
    • Where to find support
    • Tutorial video playlists
      • Platform basics
      • Dashboard
      • Moderator tools
      • Breakroom Games
      • Creator Core
      • Breakroom for Training - Students
      • Breakroom for Training - Instructors
      • Breakroom for Training - Dashboard and Backend
    • Account management
    • System requirements
    • Troubleshooting network ports and firewalls
  • RELEASE NOTES
    • Breakroom SDK
    • Breakroom Viewer
    • Breakroom Dashboard
Powered by GitBook

©2008-2024 Sine Wave Entertainment Ltd. All Rights Reserved.

On this page
  • Overview
  • Broadcast provider (streaming server)
  • OBS Studio (streaming software)
  • OBS Studio settings
  • Entering the stream address and key
  • Managing video quality
  • Managing audio quality
  • Managing video resolution
  • Streaming video in-world
Export as PDF
  1. ADVANCED TUTORIALS

Video streaming

Breakroom allows you to stream live video directly into your virtual World. Here you'll find information about setting up and managing live video feeds.

PreviousRegistration and grid APIsNextWhere to find support

Last updated 8 months ago

Overview

Breakroom gives you the tools you need to stream live video to your guests. This can be achieved either by using the located within the , or by entering an RTMP or HLS streaming address into a object.

HLS streaming is the preferred method of streaming live video, as it is "lighter-weight" and offers increased compatibility with client video players.

Broadcast provider (streaming server)

To stream live video content to your guests, you will need to source an RTMP/HLS broadcast provider. There are many providers to choose from, and you can easily search for them online. Your broadcast provider will supply you with a stream address and login key, which you will need to enter into your streaming software of choice.

Broadcast providers charge an upfront fee for their services. It is possible to set up a broadcast server on your own hardware, but this is generally inadvisable unless you have an extremely robust Internet connection.

HLS streams sometimes need to be requested prior to use, and can take 24-48 hours to set up depending on your provider.

OBS Studio (streaming software)

OBS Studio is a free open-source video recording/streaming software suite available for both Windows and macOS. It contains the toolset you will need to capture your webcam, film your desktop, or collect images, all of which can then be streamed to your clients.

OBS Studio settings

Settings for OBS Studio can be found by clicking the Settings button in the right control panel.

In the settings panel, you will need to adjust or customize several streaming factors using the instructions provided below.

Entering the stream address and key

  1. Click on the Stream tab in the left-hand panel.

  2. Select Custom from the Service drop-down menu that appears in the center of the screen.

  3. Enter the stream address and key into the relevant fields.

  4. Click Apply to save your changes.

Managing video quality

The quality of your streaming video will vary depending on your use case. For a high-quality HD stream, we would recommend using the x264 encoder with a constant bit rate set at 3500 to 5000 Kbps and a key frame of 2. To manage these settings in OBS Studio, follow these steps.

  1. Click on the Output tab in the settings panel.

  2. Select Advanced in the Output Mode drop-down menu.

  3. Enter the settings depicted in the image above.

  4. Click Apply to save your changes.

Managing audio quality

Audio settings can also be found under the Output tab, by clicking the Audio tab in the center window. We recommend using an audio bitrate of 128 Kbps. To change this setting, follow the steps below.

  1. Click on the Output tab in the settings panel.

  2. Click the Audio tab in the center window.

  3. Select Advanced in the Output Mode drop-down menu.

  4. Set the audio tracks you will be using to 128 kbps.

  5. Click Apply to save your changes.

Managing video resolution

Video resolution will depend on your use case. For a high-quality HD stream, we would recommend using 1920x1080 at 30 frames per second. You can adjust these details by following the steps below.

  1. Click on the Video tab in the settings panel.

  2. Enter the settings depicted in the image above.

  3. Click Apply to save your changes.

Now that you have OBS Studio configured, you can use the Start Streaming button in the right control panel to stream your live video.

Streaming video in-world

In the settings panel, you will need to enter the stream address and key generated by your . To do so, follow these steps.

Your broadcast provider will supply you with an external viewing address. This address can be entered into either the or the built into the conference system. Please consult the linked documentation for step-by-step instructions.

Breakroom Video Player
presentation controls
broadcast provider
presentation controls
moderator tools
Breakroom Video Player
Pictured: An example of an RTMP streaming address and streaming key, taken from the broadcast provider Castr.
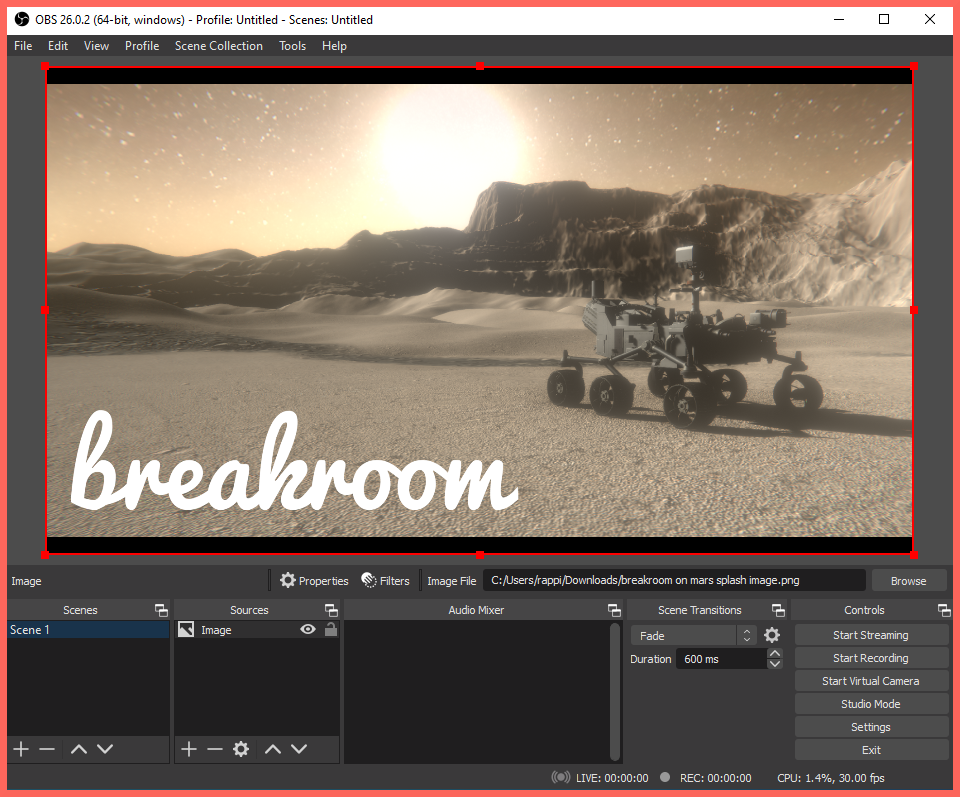
Pictured: The OBS Studio main window.
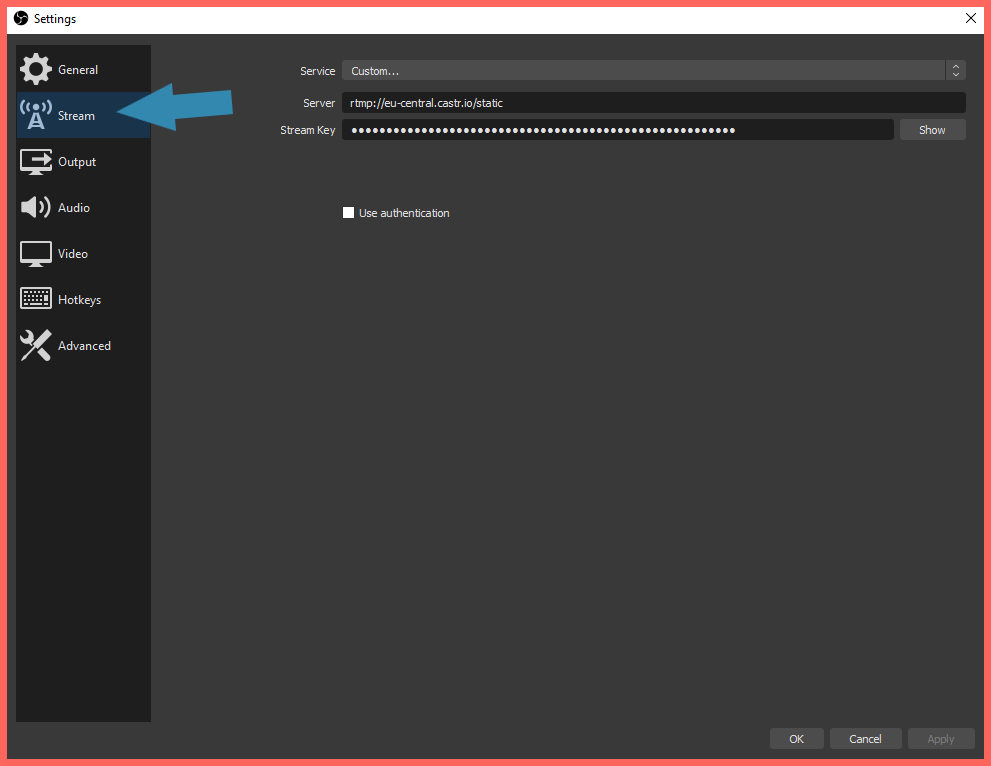
Highlighted: The location of the Settings > Stream tab.
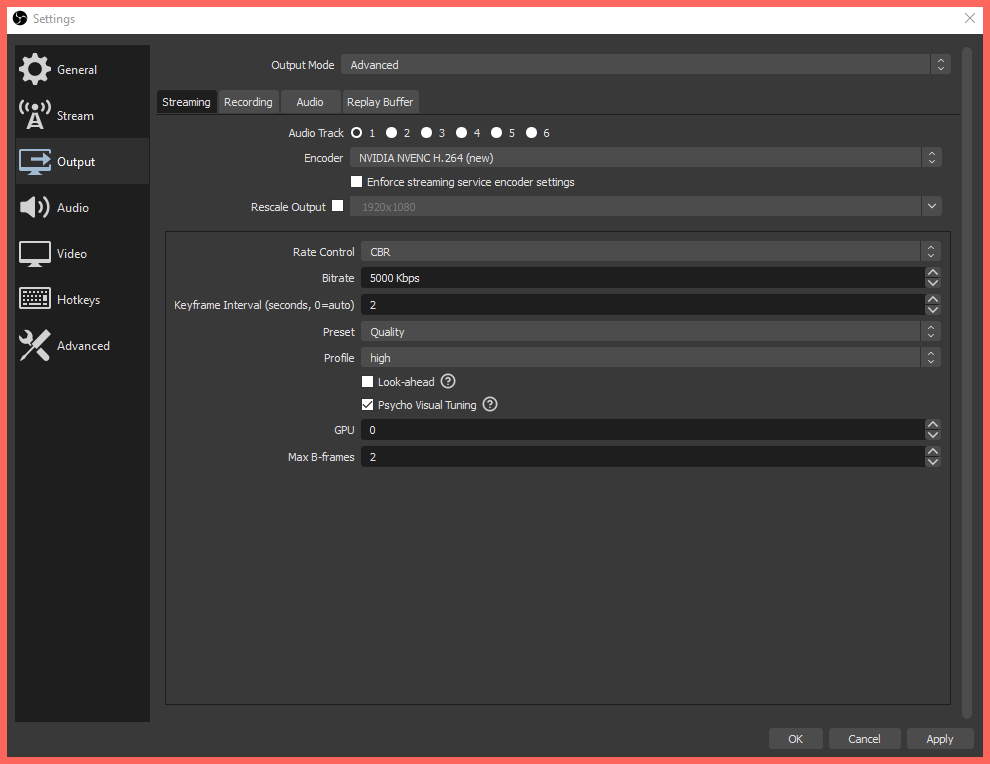
Pictured: The Settings > Output tab.
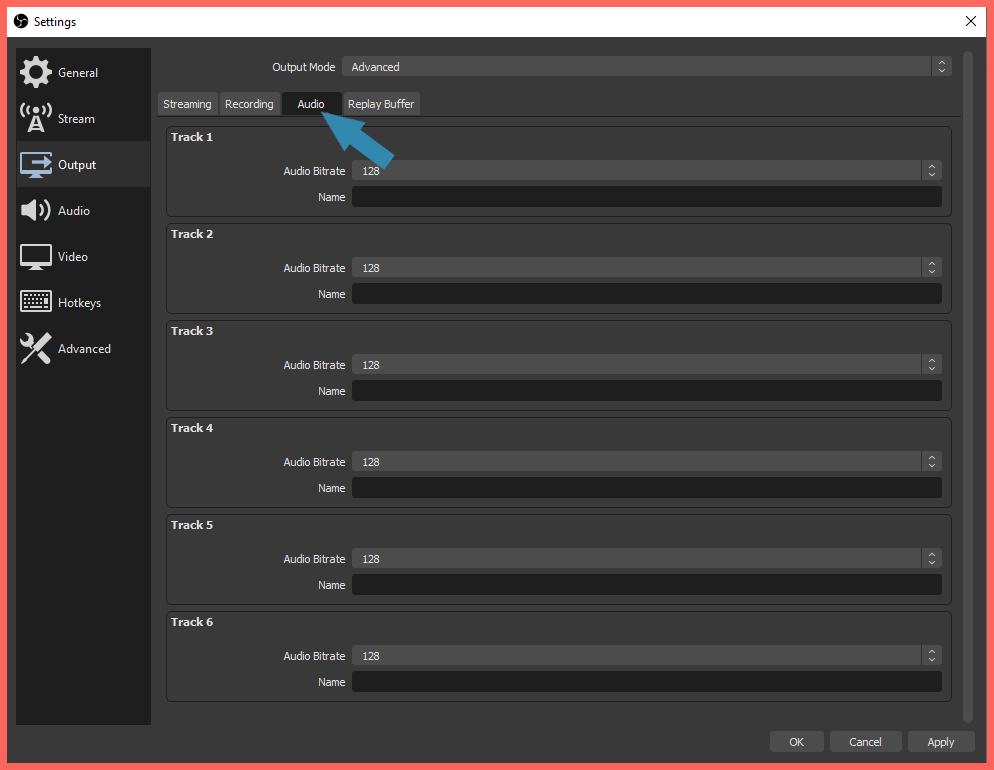
Highlighted: The location of the Settings > Output tab > Audio tab.
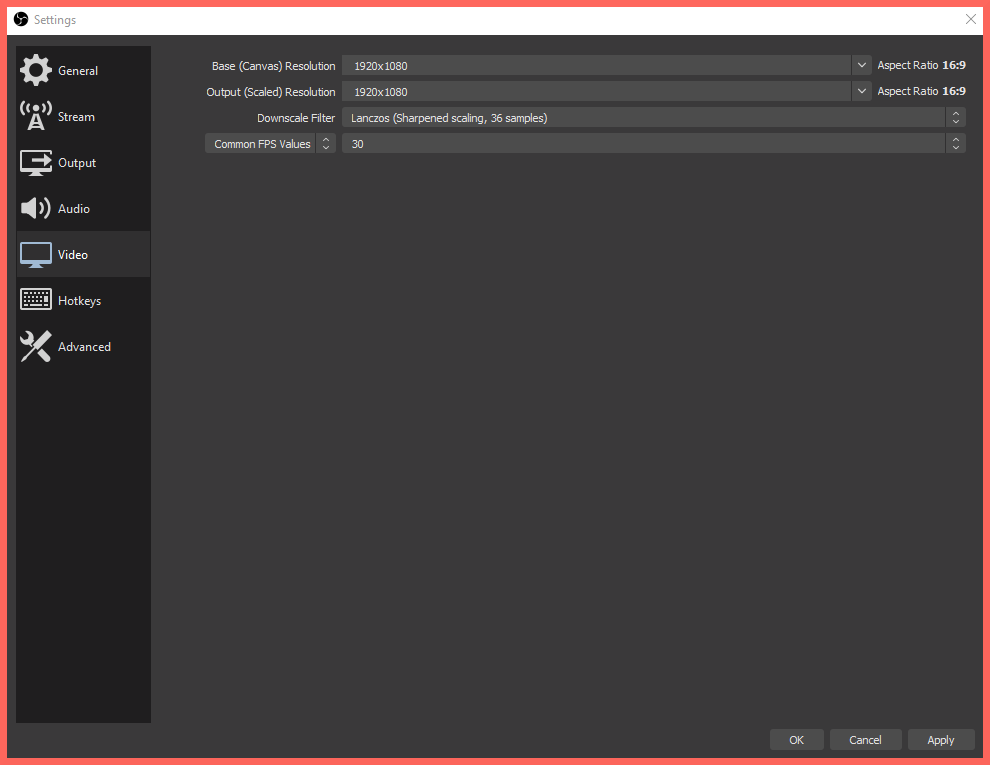
Pictured: The location of the Settings > Video tab.
Highlighted: The location of the Start Streaming button.
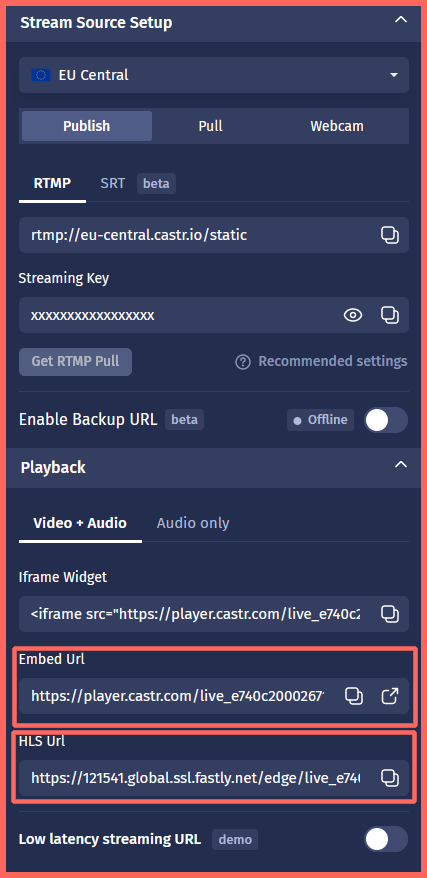
Highlighted: An example of RTMP and HLS external addresses taken from Castr.