Creating and managing Regions
Overview
Every Breakroom World consists of one or more Regions, or self-contained virtual "rooms." To help you get started, we offer a variety of plug-and-play Region templates that come fully equipped with decorations, signage, and Breakroom's robust conference system. World Owners and World Administrators can create and manage these Regions via the Dashboard.
Once you understand how to deploy pre-built Regions, you can customize them by adding your own virtual objects and media. Breakroom provides a Toolkit of in-world branding and media components such as video players, free-standing browser panels, interactive posters, and more.
Viewing your Regions

Pictured: The Dashboard > World Customization > Regions tab.
You can view all of the Regions you have created under the Dashboard > World Customization > Regions tab.
When you purchase a Breakroom subscription, your World will be activated and populated by a single Default Landing Region. Because your subscription includes an unlimited number of Regions, you can add and enable additional Regions as needed. Featuring your Regions will make them easy for your users to find.
By default, Regions can accommodate up to 500 simultaneous users.
Creating a new Region

Pictured: The Create Region panel.
To create a new Region, follow these steps.
- Navigate to your Dashboard.
- Click on the World Customization > Regions tab.
- Click the Create Region button. This will launch the Create Region panel.
- In the Create Region panel, start by giving your Region a name and a description.
- Next, choose a Region template. If you have uploaded any custom Regions, you can find them by using the Template drop-down menu to show All Templates or Uploaded Templates. (Tip: You can also use the search bar to locate a Region template by name.)
- Finally, if you want to replace the loading image (which will be displayed in the Explore window and appear while users are teleporting to the Region), you can do so by clicking the Browse button. This will launch a standard file import window. Find the image you want to use on your computer, click on it to select it, and then click the Open button.
- When you are finished, scroll down and click the Create button.
It's important to note that new Regions created through the Dashboard are not enabled or featured by default, which means that users—including the World Owner—will not be able to locate or access them when logged in. To make Regions accessible, you will need to enable and/or feature them.
Breakroom supports JPG and PNG images. The recommended dimensions for loading images are 1920x1080, or a 2:1 ratio, with a maximum file size of 5MB.
Note: You can use the Dashboard to create multiple Regions that use the same base template. However, once you customize a Region, those details will not copy over to new Regions made from the same template.
Editing Region details
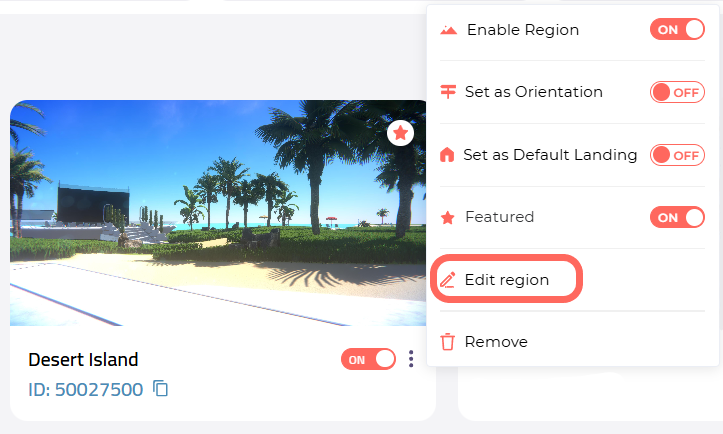
Highlighted: The Edit Region button.
To make changes to a Region after you have created it, follow these steps.
- Navigate to your Dashboard.
- Click on the World Customization > Regions tab.
- Locate the Region you want to edit and click on the vertical ellipses icon in the Region card.
- In the action menu that appears, click Edit Region. This will take you back to the Create Region panel.
- Perform your desired changes. You can enter a new name, edit the description, upload a new loading image, or select a new Region template.
- When you are finished, click the Save button.
If you use the Edit Region function to change a Region's default template, all changes made to the previous template will be deleted. Your deleted changes will be unrecoverable. Please think carefully before taking this step.
Locating a Region ID
Each Region in your World has a unique ID number. If you need to locate and copy this number, you can do so by following these steps.
- Navigate to your Dashboard.
- Click on the World Customization > Regions tab.
- Locate the Region ID you need. This number is displayed in the associated Region card.
- To copy a Region ID to your clipboard, click the copy icon located to the right of the ID number.
Enabling a Region

Pictured: A brand new Region. Note how it is not enabled, featured, or set as a Default Landing Region.
When Regions are first created, they are not automatically enabled. In order to access a Region or make it available to other users, you will first need to enable it through the Dashboard or the Breakroom viewer.
Once enabled, users can search for a Region if they know it exists, but may not otherwise be able to easily discover it. This can prove useful—for example, if you want to set up private areas for VIP functions. To make a Region easier for users to find, you may want to feature it.
Through the Dashboard
You can enable a Region through the Dashboard by following these steps.
- Navigate to your Dashboard.
- Click on the World Customization > Regions tab.
- Locate the Region you want to enable. In the lower right corner of the Region card, you will see the "Enable Region" toggle.
- Click this toggle on to enable the Region. You will see the Region loading image display in full color to indicate that the Region is enabled and accessible.
Through the viewer
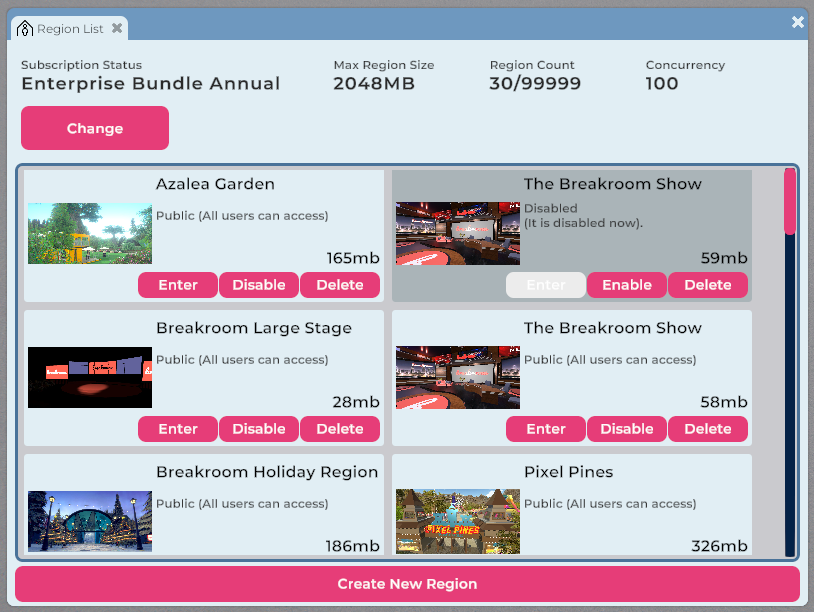
Pictured: An example of how the Region List window may appear.
You can enable a Region through the viewer by following these steps.
- Click on the Regions button located in the top toolbar. This will launch the Region List window.
- Locate the Region you want to enable and click the Enable button. You will see the Enter button display in full color to indicate that the Region is now enabled and accessible.
Disabling a Region
To disable a Region through the Dashboard, repeat the steps outlined above. After you toggle the "Enable Region" option off, you will see the Region loading image desaturate and the toggle return to white. These visual cues indicate that the Region is now disabled.
To disable a Region through the viewer, repeat the steps outlined above and click the Disable button in the Region List window.
Any custom changes you make to a Region will be preserved if you disable it without deleting it. This gives you the ability to create, store and activate custom Regions as necessary.
Featuring a Region
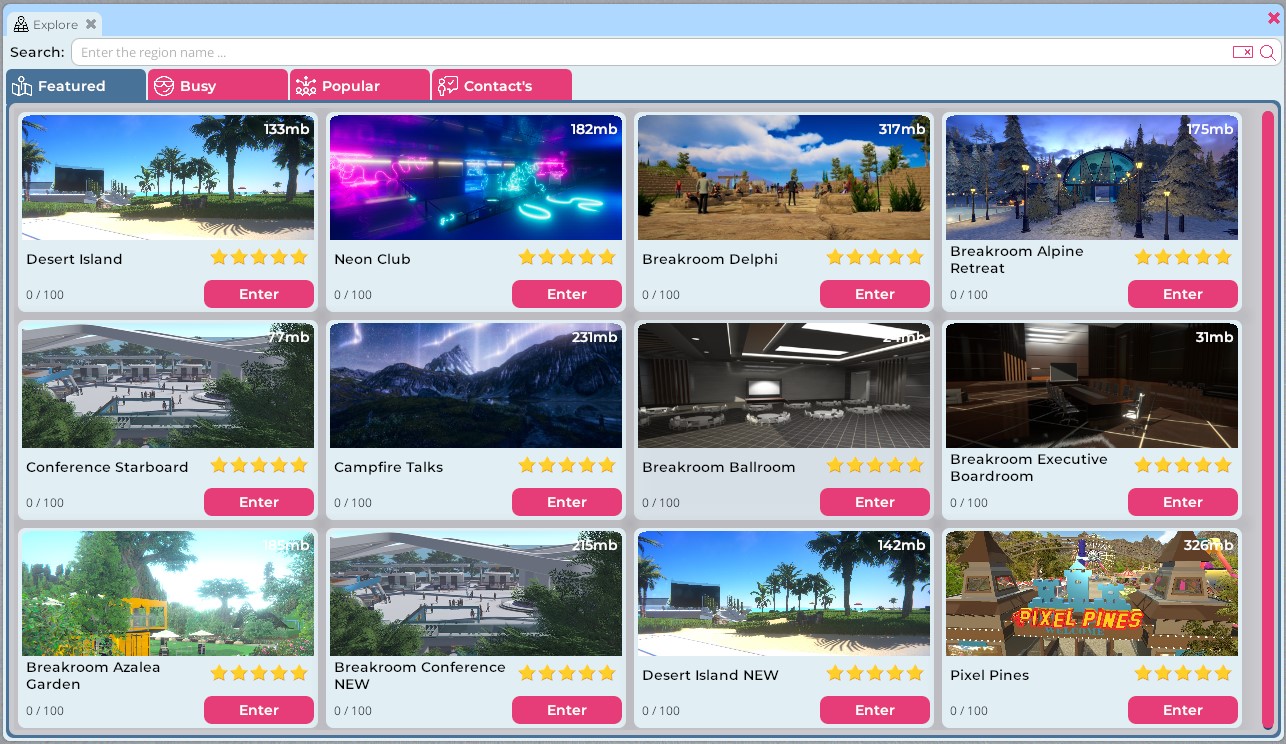
Pictured: The Explore window.
Featured Regions will appear under the Featured tab in the Explore window, making them easier for users to discover.
You can feature a Region by following these steps.
- Navigate to your Dashboard.
- Click on the World Customization > Regions tab.
- Locate the Region you want to feature. (Tip: If you know the Region name, you can enter it into the search field.)
- When you find the Region you want to feature, make sure that the "Enable Region" option is toggled on.
- Click on the vertical ellipses icon in the Region card. In the action menu that appears, toggle the "Featured" option on.
On the Dashboard, Featured Regions will be indicated by a star icon in the top left corner of the Region card, as pictured below.
Pictured: A Region card on the Dashboard. The star icon shows that this is a Featured Region.
Deactivating Featured Regions
To return a Featured Region to enabled status, follow these steps.
- Navigate to your Dashboard.
- Click on the World Customization > Regions tab.
- Locate the Featured Region you want to deactivate. (Tip: If you know the Region name, you can enter it into the search field.)
- Click on the vertical ellipses icon in the Region card. In the action menu that appears, toggle the "Featured" option off.
Hiding Featured Regions
Users with advanced Region-level permissions can prevent a Region they administrate from appearing in search or the Explore window, even if that Region has been featured using the Dashboard, by following these steps.
- Log in to your Breakroom World and navigate your avatar to the Region you would like to edit.
- Click the Region Information button located above the mini map.
- Click the Edit button in the Permissions panel.
- Check the box beside the "Hide the Region from search and Explore etc." option.
- Click the Save button.
To make a Featured Region viewable again, repeat these steps and uncheck the "Hide the Region from search and Explore etc." option.
Deleting a Region
To delete a Region after you have created it, follow these steps.
- Navigate to your Dashboard.
- Click on the World Customization > Regions tab.
- Locate the Region you want to edit and click on the vertical ellipses icon in the Region card.
- In the action menu that appears, click Remove.
- In the confirmation pop-up that appears, click Yes.
Note: You must always have at least one active Default Landing Region. Your final Default Landing Region is protected, and cannot be disabled or deleted. To disable it, you will first need to appoint another Region as its replacement. To delete a Default Landing Region, you will first need to toggle its "Set as Default Landing" status to off.