Waivers
Overview
Waivers allow instructors to present written information to students within the Breakroom platform, and gather student consent or feedback based on context. Waivers can be used for content disclosures, copyright information, touchpoints, etc.
This page discusses the creation and management of waivers on the backend via Dashboard. For more information about administering and reviewing waivers in the Breakroom for Training environment, please see our Instructor orientation.
Creating waivers

Pictured: The Dashboard > Learning Management > Course > Add New Waiver window. Note the Upload Background Image button in the upper right corner.
Only World Owners and World Administrators can access the Dashboard.
Breakroom for Training course content is created and managed through the Dashboard. To add a waiver to any of your existing courses, follow these steps.
- Navigate to your Dashboard.
- Click on the Learning Management tab, then click on the course you would like to edit.
- Click the Create button in the top right corner, and select Waiver from the drop-down menu.
- Enter a name and description for your waiver.
- If you like, you can change the waiver header by following these steps:
- Click the vertical ellipses icon in the upper right corner, and then click Upload Background Image.
- Click the Upload Image button to add an image to launch a standard file selection window on your computer. Select the image you want to use, and click Okay.
- Alternately, click the "Select from Our Course Image Templates" link to choose a basic color or generic image.
- Check the boxes beside the default Agree and Disagree reactions, or enter your own reaction text.
- When you are satisfied, click the Save button.
When waivers are first created, they are deactivated by default. To activate or deactivate a waiver, click the On / Off Toggle located in the top right corner of the waiver card.
Active waivers are live on your Breakroom World and can be accessed by students and Instructors. Deactivated waivers are inaccessible to students and Instructors, but World Owners and World Administrators can still edit their contents via the Dashboard.
Editing waivers
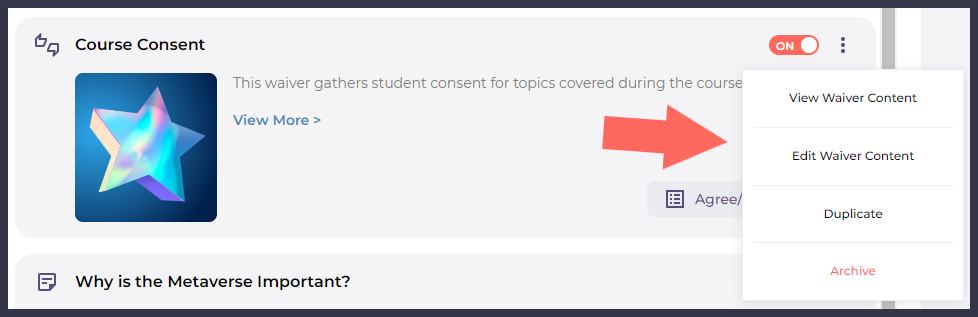
Highlighted: The location of the waiver editing functions.
In the top right corner of each waiver card, you'll see a vertical ellipses icon. Clicking on this will open a menu containing waiver editing functions. Here's an overview of the associated UI.
| Button or function | Purpose |
|---|---|
| On / Off toggle | Activates or deactivates the waiver. |
| View Waiver Content | Allows you to review the waiver and all response options. |
| Edit Waiver Content | Allows you to make changes to the waiver. |
| Duplicate | Creates a copy of the waiver in the same course. |
| Archive | Archives the waiver without deleting it. |
Reviewing waiver responses
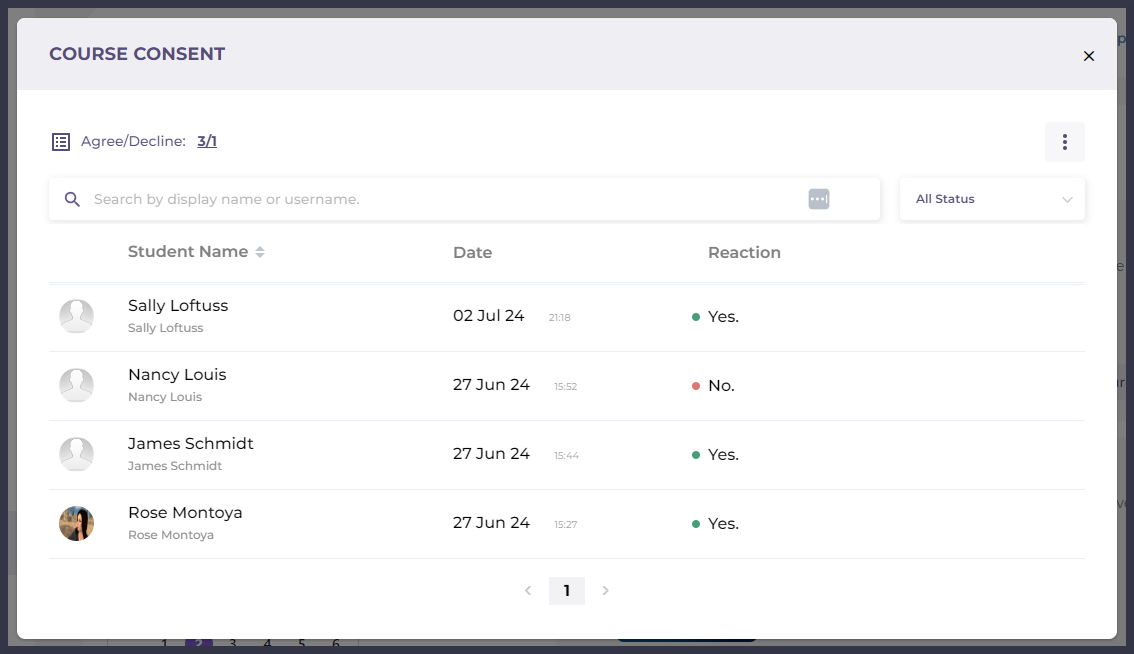
Pictured: An example waiver response window.
Student responses to waivers, including the response date and time, can be viewed following the steps below.
- Navigate to your Dashboard.
- Click on the Learning Management tab, then click on the course you want to review.
- Click the Agree/Decline button in the bottom right corner of the relevant waiver card.
- In the response window that appears, you can use the search field to locate a specific student, and filter all responses using the All Status drop-down menu.
Archiving waivers
Waivers can be archived, which deactivates them and prevents their contents from being edited. This preserves their contents for future use.
To archive a waiver, follow these steps.
- Navigate to your Dashboard.
- Click on the Learning Management tab, then click on the course you want to edit.
- Click the vertical ellipses icon in the relevant waiver card, and select Archive from the menu that appears.
To locate an archived waiver and make it accessible again, follow these steps.
- Navigate to your Dashboard.
- Click on the Learning Management tab, then click on the course you want to edit.
- Click the Filter button in the top right corner. In the menu that appears, check the Archived List option. This will reveal all of your archived materials.
- Locate the waiver you want to unarchive. You can use the search field to streamline this process. Click the vertical ellipses icon in the card, and select Unarchive in the menu that appears.
- To display all of your active and inactive course materials, click the Filter button again and check the box beside the Show All option.
When course materials are unarchived, they are deactivated. To activate a waiver, click the On / Off toggle in the upper right corner of the material card.