Uploading your own virtual clothing
Overview
Virtual clothing items can be uploaded as individual pieces that integrate with Breakroom's standard humanoid avatars, or they can take the form of self-contained costume avatars. You can restrict use of these items to your World or list them for sale in the Sine Wave Shop, making them available to users throughout the Breakroom/Sinespace Metaverse.
Within our advanced documentation, you may see different words used to describe the same concept or tool. This is because Breakroom is based on the Sinespace virtual world platform. Please be aware of the following:
- When you install the Breakroom SDK, you may notice that certain tools and menus refer to Sinespace, Sinespace components, or the Sinespace SDK. This is normal and has no effect on performance.
- When testing and uploading virtual items, you may see documentation, menus, and buttons that refer to Breakroom Worlds as grids.
The instructions provided in this section presume an advanced working knowledge of Breakroom, virtual assets, and third-party 3D software. Please consult our documentation if you need help installing and positioning virtual objects, or editing the RoomFurniture component.
Only World Owners, World Administrators, and World Developers can upload custom items to Breakroom.
Importing your clothing items and textures
To get started, locate the clothing template and textures you want to use. You can import clothing made in Blender or another 3D modeling application, and you are also welcome to utilize our library of clothing templates. These templates were designed specifically for the Breakroom platform, and are completely free to use.
Item templates can be formatted as FBX or OBJ files. Textures can be formatted as PSD, TIFF, JPG, TGA, PNG, GIF, BMP, IFF, or PICT files.
Once you have your clothing template and textures selected, you can import all of your files either by dragging them into the Project Asset panel in Unity, or by clicking the Assets drop-down menu > Import Asset.
Setting up your clothing item
Once you've imported your clothing template into Unity, you can drag it into the Hierarchy.

Pictured: An example clothing item, added to the Hierarchy and currently highlighted.
Next, drag your texture onto the clothing, and add the normal, height, and occlusion maps as required.
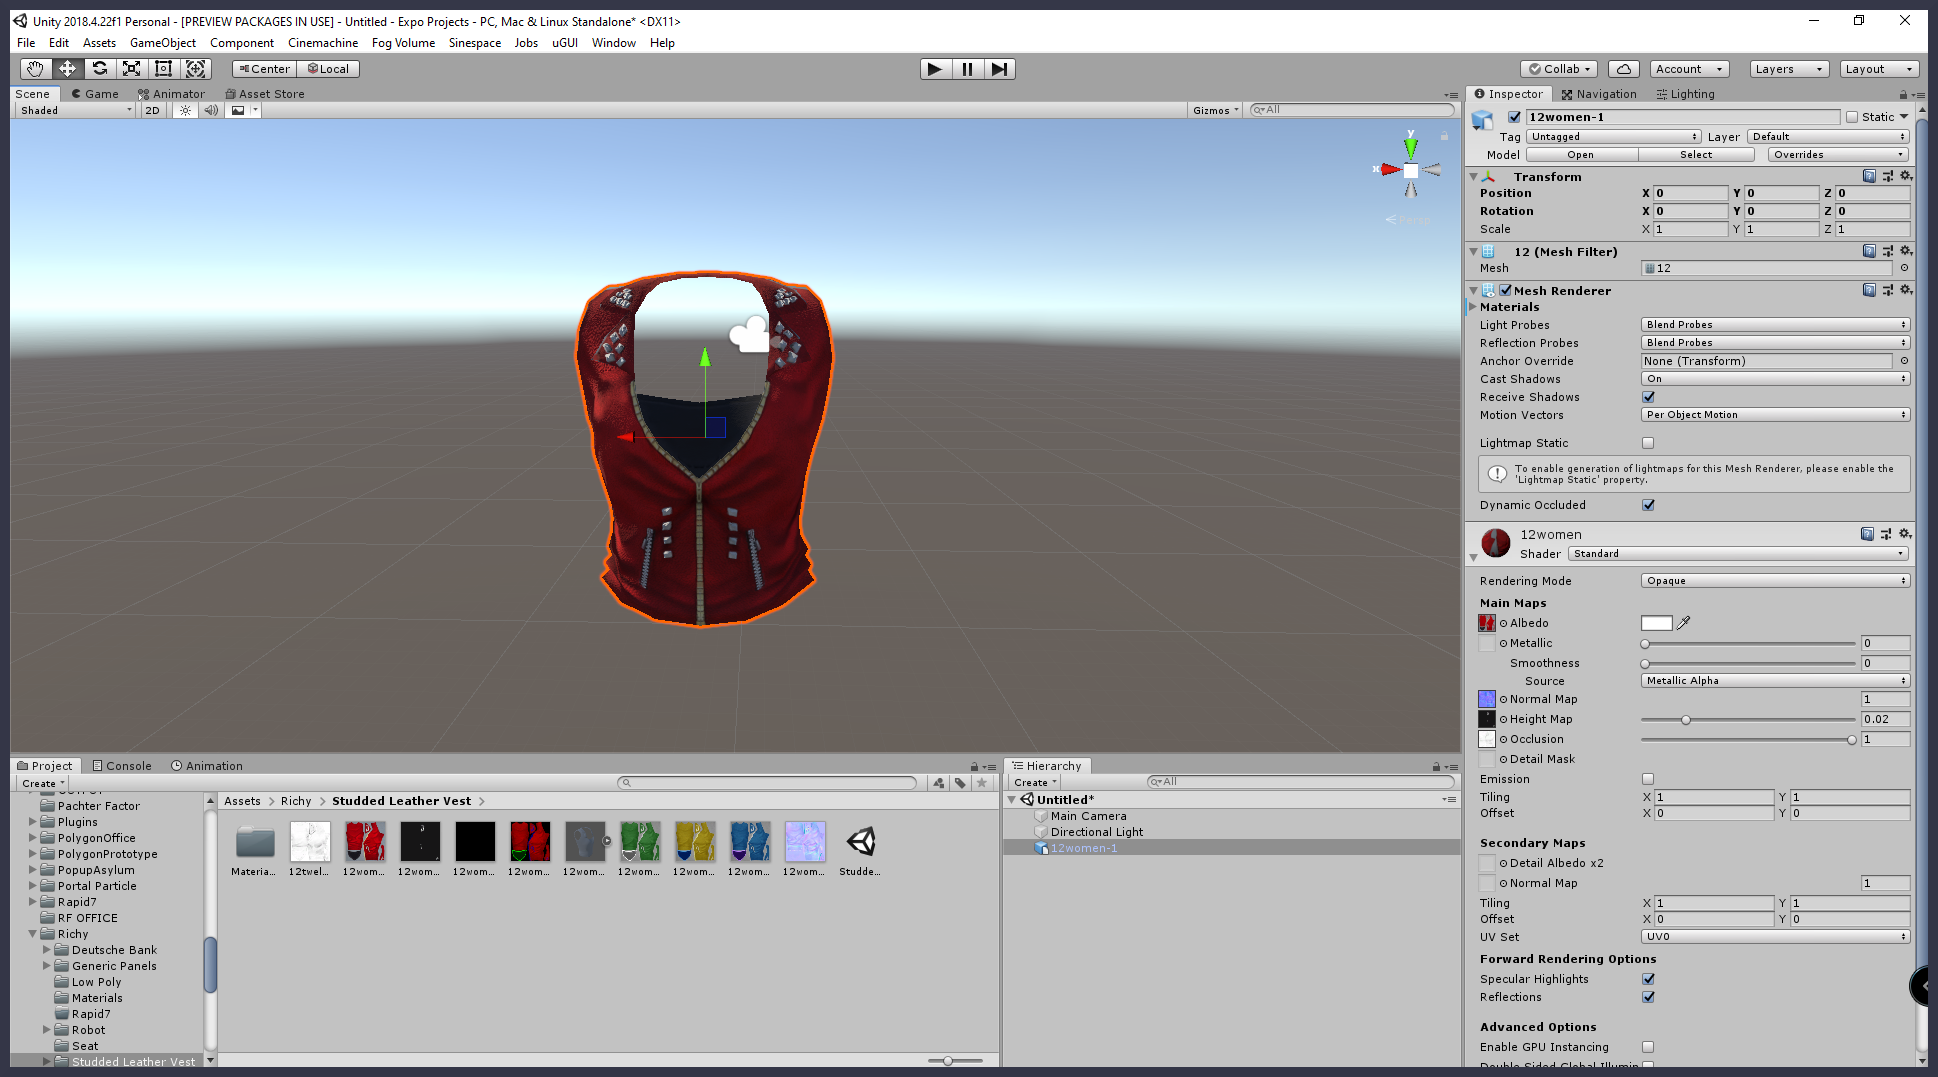
Pictured: The same highlighted clothing item, with textures applied.
Adding the Clothing Item Settings component
Next, make sure the clothing model is selected in the Hierarchy and click the Add Component button. Search for "clothing," and add the Clothing Item Settings component to the model.
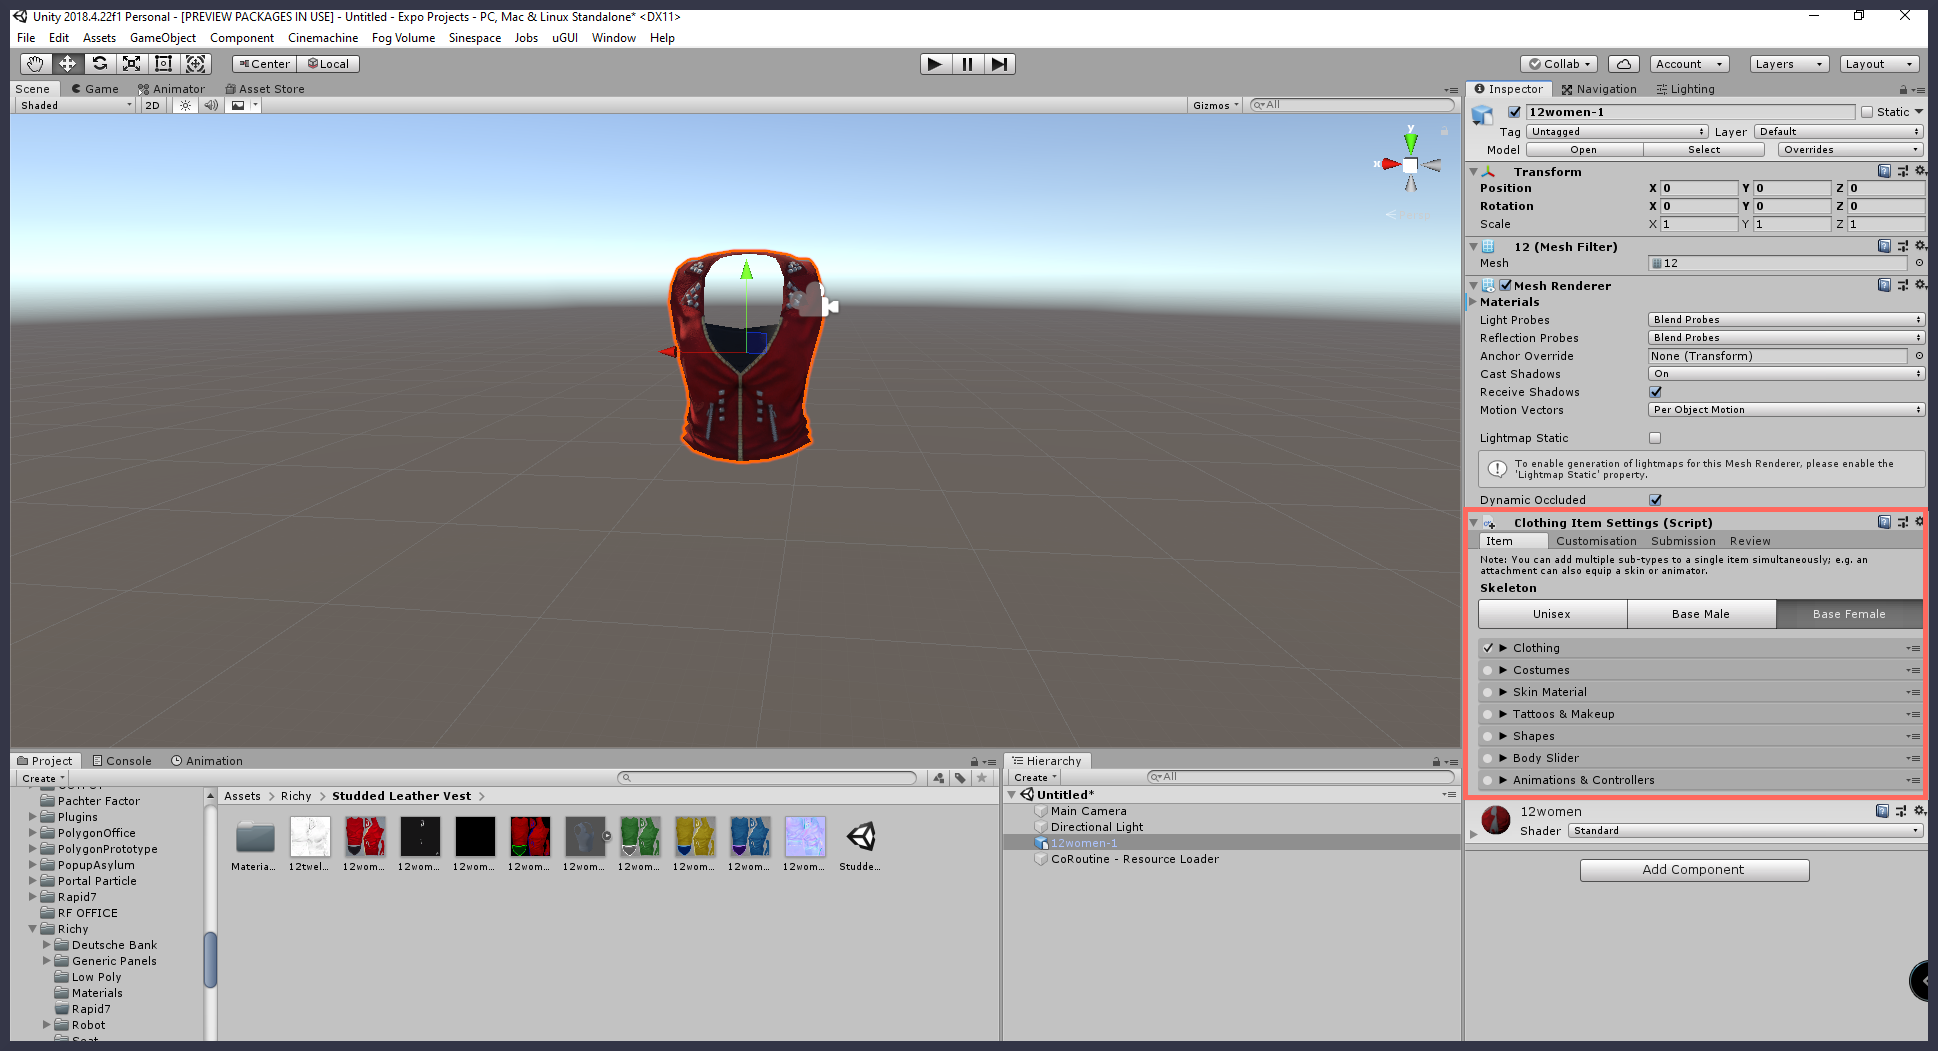
Pictured: The same highlighted clothing item, with the Clothing Item Settings component added.
Setting the skeleton and selecting clothing type
In the Clothing Item Settings component, we will now set our skeleton. The item should be set to the same skeleton for which it was rigged in the original 3D software. You have the choice of unisex, base male, and base female skeletons.
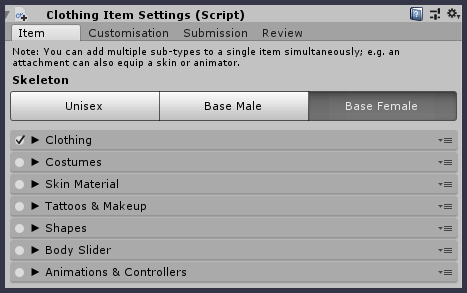
Pictured: The Clothing Items Setting, with the Base Female skeleton selected.
Expand the Clothing tab by clicking the arrow located to the left, and select the clothing type. As we are uploading clothing, we will select Rigged Clothing.
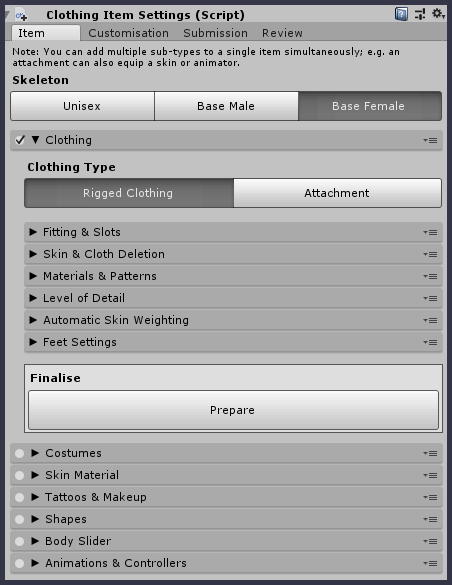
Pictured: The Clothing tab expanded, and Rigged Clothing selected as the clothing type.
Selecting layers and slots
Expand the Fittings & Slots tab by clicking the arrow located to the left. You will be asked to choose which layer the clothing item will occupy. You can visualize virtual clothing layers just as you would physical clothing layers—for example, layering a t-shirt under a pullover, with the t-shirt tucked under the pullover.
Underwear is the default setting, and the layer that sits closest to the avatar skin. Each layer. working downwards through the menu, will be laid on top of the previous layer.
In this tab, you will also select the slot your clothing will occupy on the avatar. The slot and the layer work in conjunction with each other in the avatar wardrobe. You can only wear one item per layer/slot—trying to wear two items in the same layer/slot will remove the first item that was worn. Selecting one or more slots will add a wireframe avatar to the scene view. This can be used to ensure that your clothing is positioned correctly on the avatar.
Care should be taken to only check the slots that are required. For example, a t-shirt would occupy the upper chest and back, leaving other slots open for use.
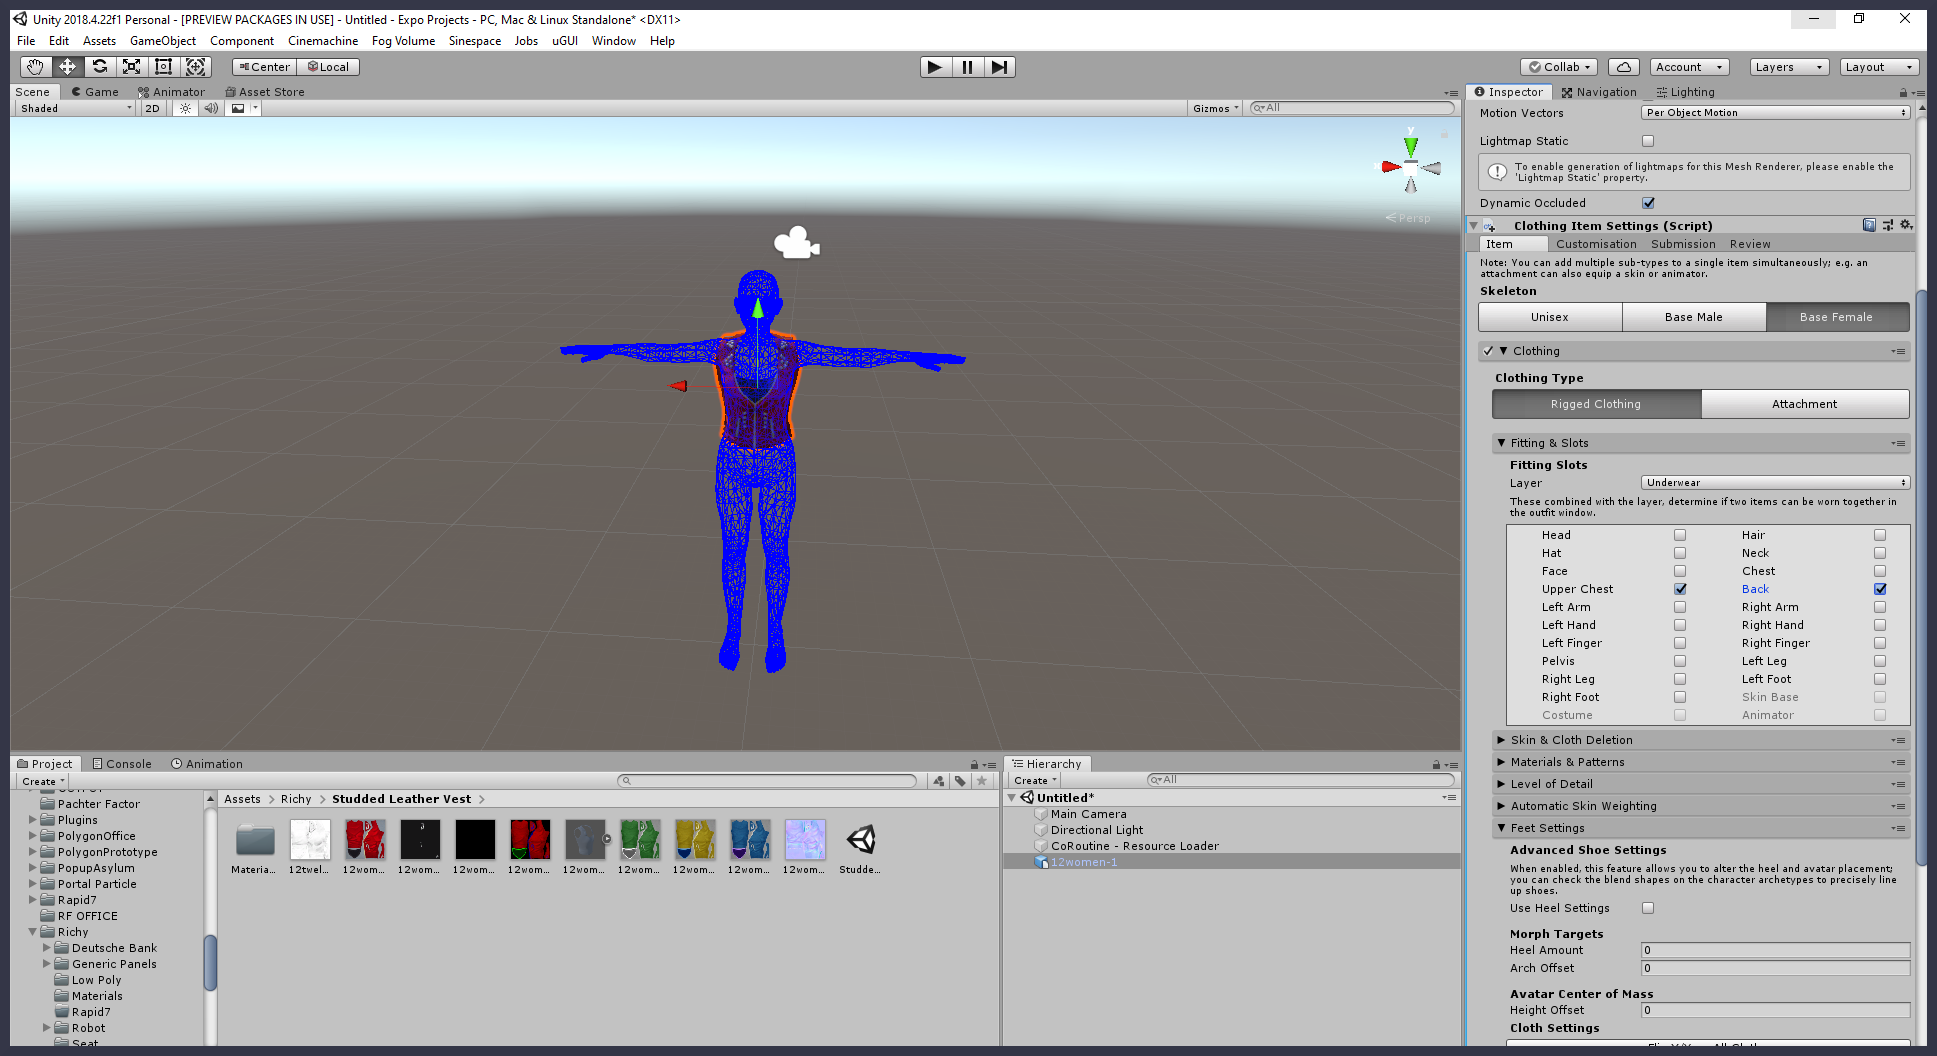
Pictured: The item positioned on a wireframe avatar. A layer and several slots have been selected.
Editing materials and patterns
Next, we will take a look at the Materials & Patterns tab located under the Clothing Item Settings component. You can expand this tab by clicking the arrow located to the left.
If you are using only one material for your clothing item, you will need to check the box beside the "Keep Materials Always" option. Failing to enable this option will cause the material to be removed upon processing.
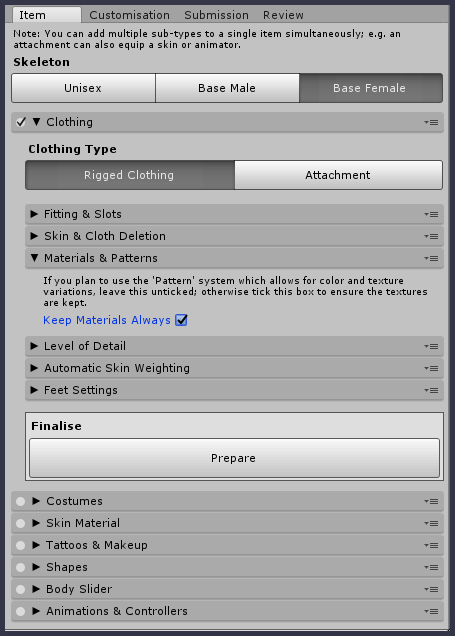
Pictured: The Materials & Patterns tab expanded, and "Keep Materials Always" enabled.
Auto-rigging and weighting clothing
Finally, you will need to auto-rig and weight your clothing in preparation for upload. This can be achieved by expanding the Automatic Skin Weighting tab, and then clicking the Convert to Skinned button.
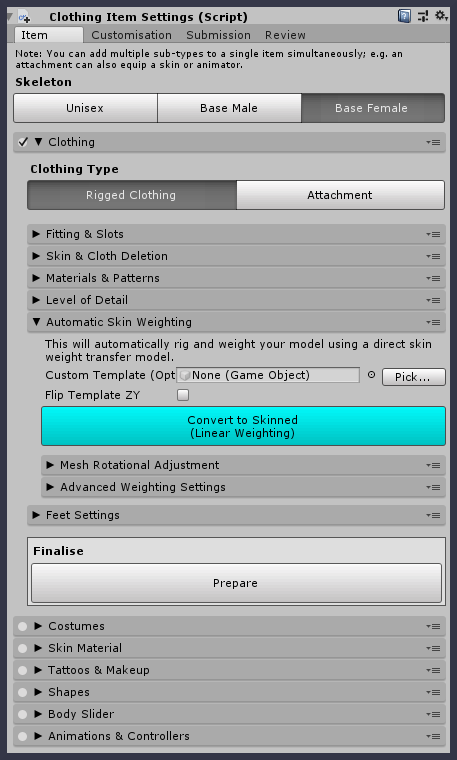
Pictured: The Automatic Skin Weighting tab, with the Covert to Skinned button highlighted.
When rigging is complete, you'll notice that the Automatic Skin Weighting tab will update to detail bone counts and bind counts, and offer the ability to re-rig if necessary.
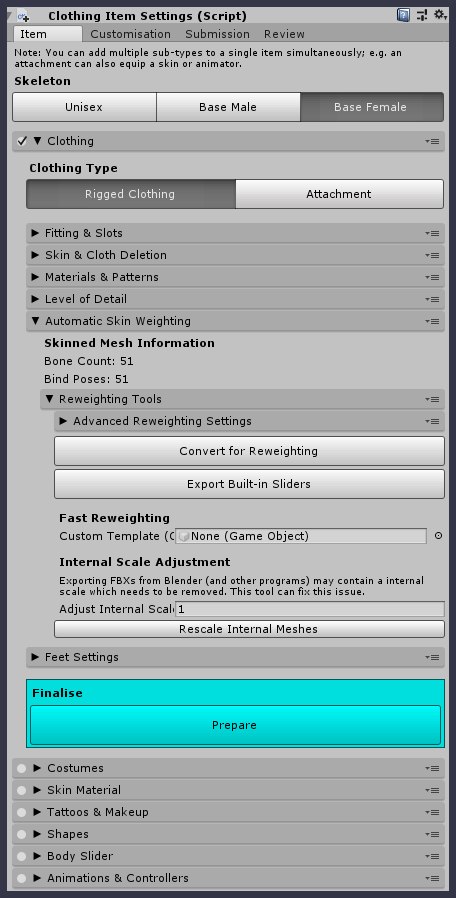
Pictured: The expanded Automatic Skin Weighting tab, updated with rigging information.
You will also see that the Finalize/Prepare button has changed to a bright cyan. This tells us that the clothing item is now ready for finalization. Click the Finalize/Prepare button to complete the clothing setup.
It's normal for clothing preparation to take a few minutes, depending on the complexity of the clothing item.
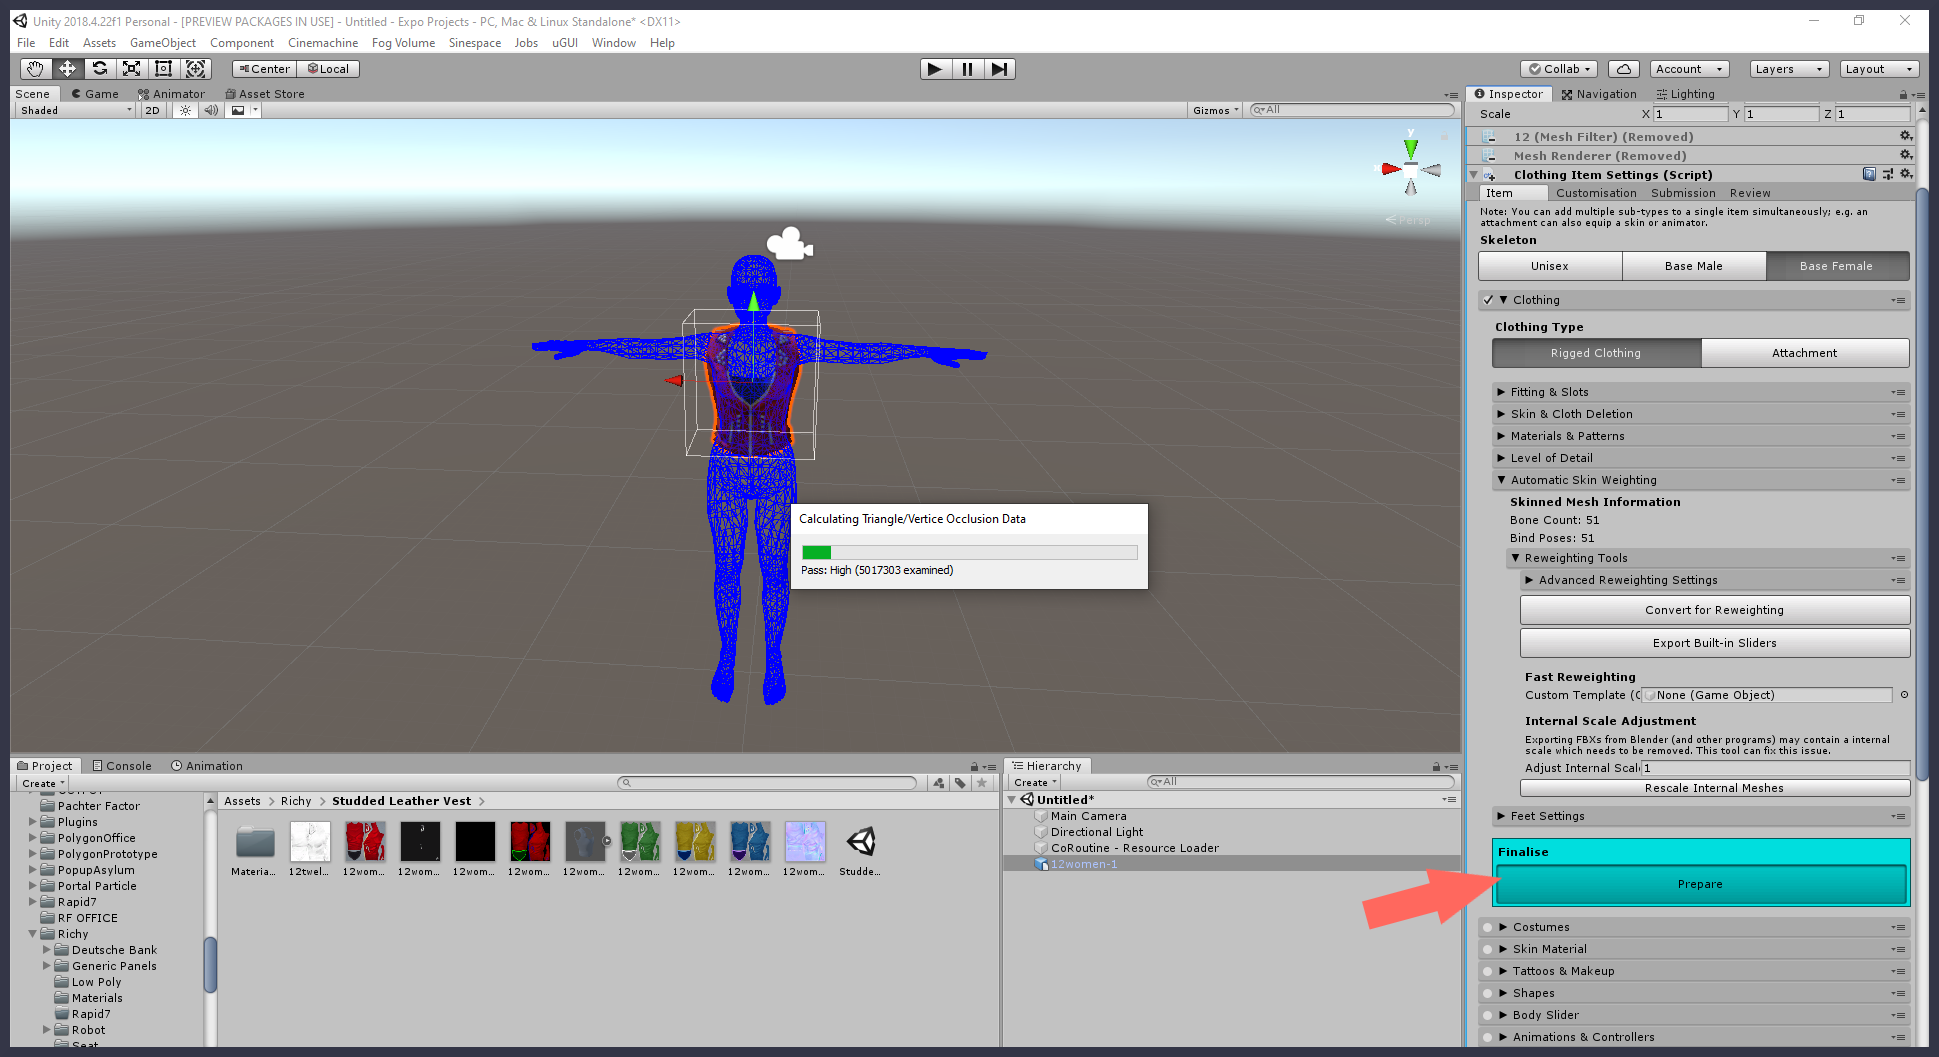
Highlighted: The location of the Finalize/Prepare button.
Adding the Virtual Good component
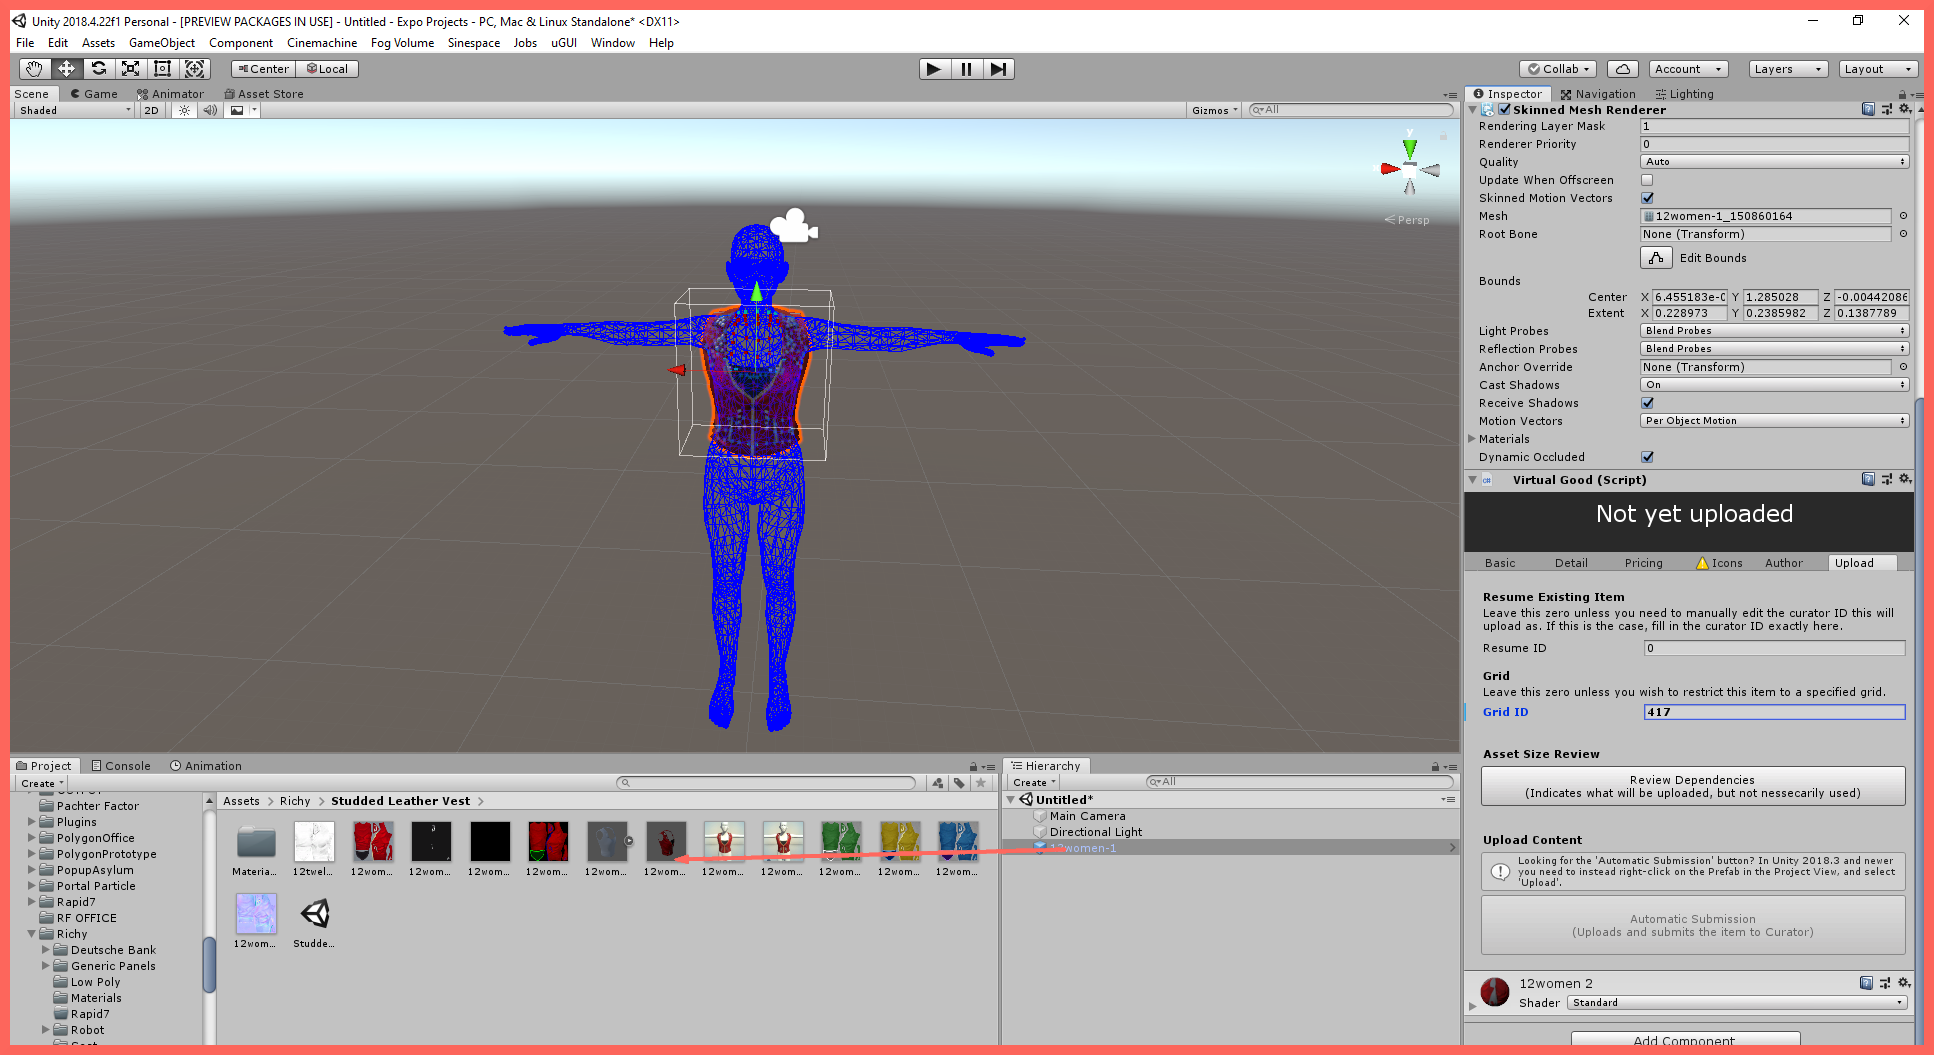
In order to upload the finished clothing item to your grid, you will need to add the Virtual Good component. Select your clothing item in the Hierarchy, and then click the Add Component button in the Inspector window. Search for "virtual good," and add the Virtual Good component.
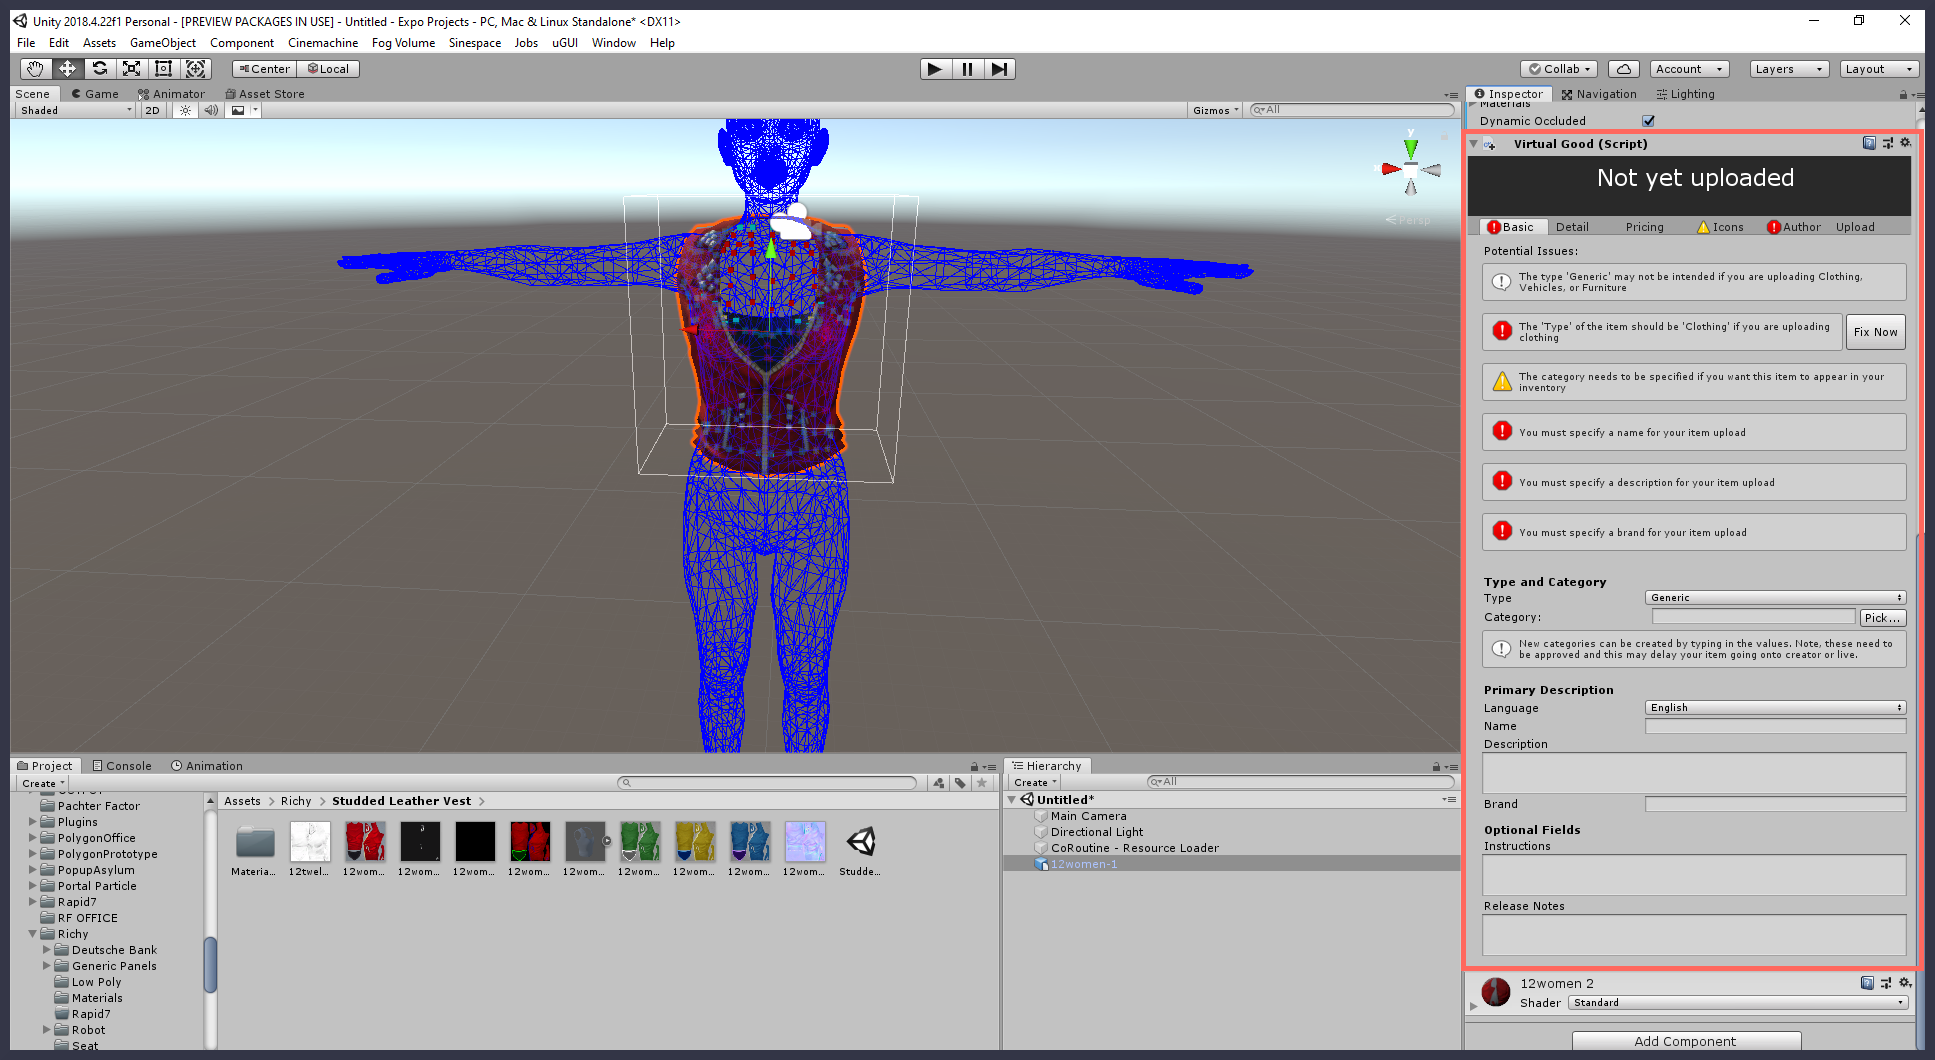
Pictured: A finished clothing item, with the Virtual Good component added.
From here, you will need to navigate through the Virtual Good component tabs and edit certain information to complete setup of your clothing item. Here are the key steps you will need to take.
1. Provide basic item information
In the Virtual Good component, under the Basic tab, you will need to select the clothing type and the clothing category. The clothing category you select will influence where your item appears in your users' inventories and/or where your item is displayed within the Sine Wave Shop. For example, selecting the Clothes/Tops/Shirts category for the vest pictured above will file the item under the Tops tab of the Outfit window, and also under the Tops tab of the Shop should you decide to list your item for sale.
There are additional details under the Basic tab that you will need to provide:
- Name: The item's name.
- Description: A brief description of the item. This will be used to describe your item in the Shop, so it's an excellent place to list your item's features.
- Brand: Your clothing brand name.
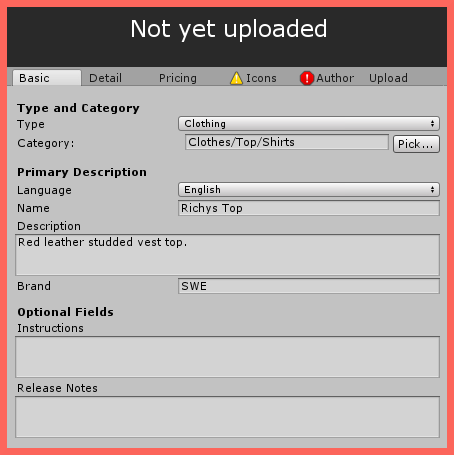
Pictured: Here a clothing item has been named, described, and branded.
2. Edit the Pricing information or restrict the item from sale
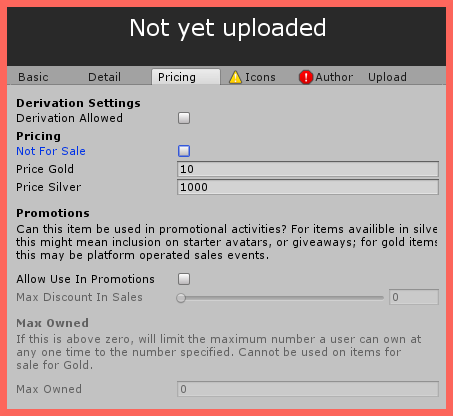
Pictured: An example of how the Pricing tab may appear.
If you want to sell your item in the Sine Wave Shop, you will need to enter your desired price in Silver or Gold under the Pricing tab. (You can list a price in both currencies if you wish.) There are also several other options that you can enable or disable as the seller.
| Option | Sales Result |
|---|---|
| Derivation Allowed | Enabling this option permits purchasers to edit your original product and list their edited version for sale in the Shop. (For example, a user may change the upholstery texture on a chair you created and then sell their derivative version.) |
| Allow Use In Promotions | As explained in the image text above, this option encompasses two different types of promotions. For items that sell for Silver, Breakroom/Sinespace may include your goods on starter avatars or in special giveaways. For items that sell for Gold, Breakroom/Sinespace may include your items in platform operated sales events. |
| Max Discount in Sales | If you opt into promotions for your Gold-listed items, you can set a maximum discount for platform operated sales. (For example, you may indicate that your products should never be sold for more than 20% off.) |
| Max Owned | As explained in the image text above, setting this number higher than zero will limit the maximum copies a user can own at any one time to the number specified. This option cannot be enabled if your item is on sale for Gold. |
If you do not intend to sell your item, do not enter a price into either the Price Gold or Price Silver fields. Instead, be sure to check the box beside the "Not for Sale" option.
3. Edit the Icons information
The Icons tab allows you to associate images with your item, such as a store image, inventory image, or brand logo. Click on the Select buttons to pick the images you would like to use.

Pictured: An example of how the Icons tab may appear.
You can use the Take Screenshots button located under the Icons tab to auto-generate images for your item based on the Unity model. You will need to finish prefabbing your item before this function will work. See the section that follows about prefabbing and uploading your clothing item.
4. Edit the Author information
The Author tab allows you to add relevant author information, such as the developer name and copyright.
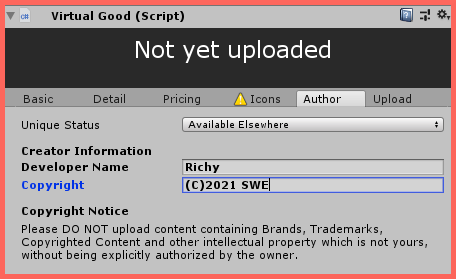
Pictured: An example of how the Author tab may appear.
If in doubt, leave the Unique Status drop-down menu set to Available Elsewhere, enter your name into the Developer Name field (as the grid Owner), and set the Copyright field to your company name.
5. Edit the Upload information
When uploading a clothing item intended for sale, you do not need to make any changes to the information listed under the Upload tab. If you want to upload a clothing item to your grid alone, however, you will need to specify your grid ID. You can obtain your grid ID from multiple places.
Finding your grid ID on Dashboard
- Navigate to your Dashboard.
- Look in the top left corner of the screen. You will see your world name followed by an ID number. This ID number is your grid ID.
Finding your grid ID on Curator
- Navigate to your Dashboard.
- Click the Advanced button at the top of the page. This will take you to Curator.
- In the Curator window that appears, locate the Grid listing for your World. Your grid ID will be displayed next to the World name.
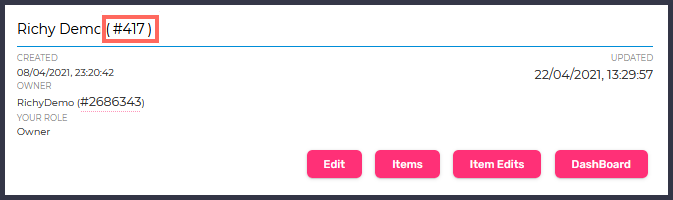
Pictured: An example of what you might see in Curator.
Now that you have your grid ID, it can be entered into the Grid ID field under the Upload tab as shown.
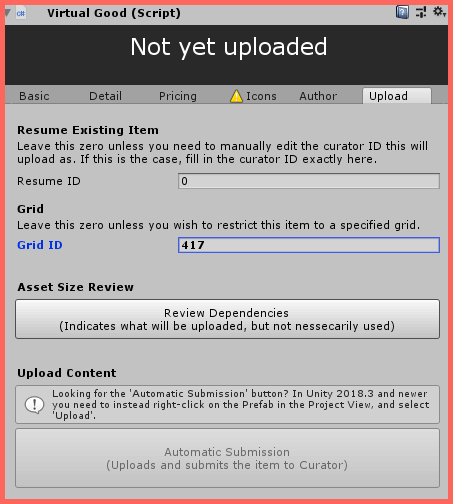
Pictured: The Upload tab, with the grid number entered into the appropriate field.
Prefabbing and uploading your clothing
To complete setup on your clothing item, you will need to prefab it by dragging the model from the Hierarchy to the Project Asset panel. Once the item is prefabbed, you can right click on the clothing item in the Project Asset panel and select Upload to Sinespace to upload your item.
Pictured: You will need to drag your completed model to the Project Asset folder to prefab it.
Once uploaded, your clothing item will be available for testing on the preview server. When you have tested the item and are happy with how it performs, you can push it to the live server for your users.