Pushing items to the live server
Overview
Curator is a control panel that allows World Owners, World Administrators, and World Developers to manage items that have been uploaded to Breakroom. Curator can be used to view, edit, and delete items, as well as to "push" items from the preview server to the live server. Curator can also be used to review Sine Wave Shop transactions when items have been listed for sale, and to request payouts (in order to convert in-game Gold to real currency).
Only World Owners, World Administrators, and World Developers can upload custom items to Breakroom.
When testing and uploading virtual items, you may see documentation, menus, and buttons that refer to Breakroom Worlds as grids. Because Breakroom is based on the Sinespace virtual world platform, you may also see the name Sinespace used instead of Breakroom.
Testing and review permissions
Only World Owners, World Administrators, and World Developers can review and approve content uploaded to the preview server. If you grant a user Administrator or Developer permissions, they will need to log in to Curator and accept the Terms and Conditions before they can access the preview server.
Accessing Curator

Pictured: The Dashboard page header.
You can access Curator from the Dashboard by clicking on either your username or the Advanced button located at the top of the page.
You can also access Curator directly by entering http://curator.sine.space into your browser.
If you navigate to Curator using the Advanced button on your Dashboard, you will be logged in automatically. If you navigate to Curator using the link above, you will need to log in with your Breakroom credentials. If you are new to Curator, you will be prompted to accept the Developer Terms and Conditions.
Managing grids and items
For most tasks, you will need to access information about your grids by clicking the Grids tab located at the top of the screen. The Grids tab lists all the Breakroom Worlds (hereafter referred to as "grids") to which you currently have access, and contains the tools you need to manage the content hosted on those grids. The UI you see may vary depending on your permissions level.
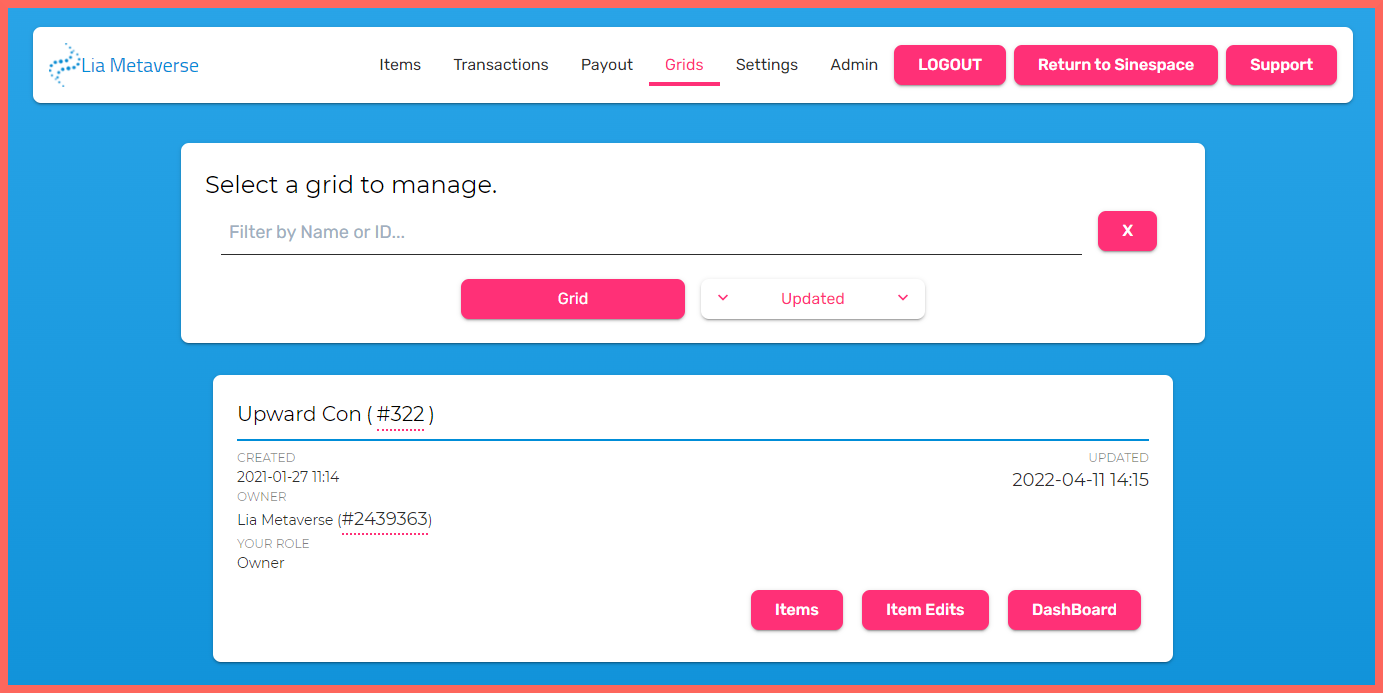
Pictured: An example of how Curator may appear, with the Grids tab active.
In the image above, you can see that this user account has access to one grid (Upward Con #322). In addition to some basic information about the grid, the grid listing also features three buttons:
- Items
- Item Edits
- Dashboard
These buttons can be used to navigate between Curator and Dashboard, or to access additional information and Curator functions. We will now explore the purpose of each button in more detail.
Items
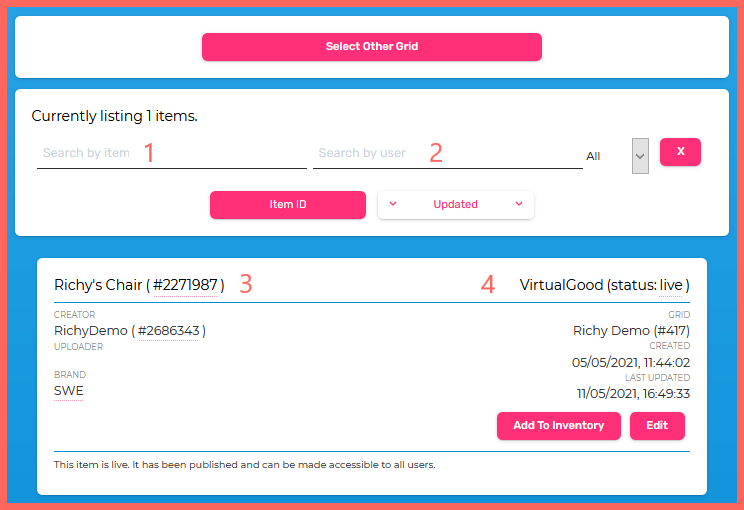
The Items button is available to both World Owners and World Developers. Clicking it opens the Items panel, which lists of all of the virtual content that has been uploaded to a particular grid.
When reviewing the Items panel and the item listings, you will see an assortment of informational fields, components, and buttons. Here is a brief overview of the combined UI.
| Component or button | Function |
|---|---|
| Search by item (field #1) | Allows you to search for content by item name or ID number. |
| Search by user (field #2) | Allows you to search for content by the name of the Developer who uploaded it. |
| Item ID button | Sorts by Item ID, in ascending or descending order. |
| Updated button | Sorts by time or date updated, in ascending or descending order. |
| Item name (line #3) | Identifies the name and item ID of a single Item listing. |
| Item type and status (line #4) | Lists the content type and its current status (see below for details). |
| Add to Inventory button | Places a copy of the object in your Inventory on the preview server for review purposes. Does not affect the status of an object or push it to live. |
| Edit button | Allows you to edit details for a specific item. |
Content Types
The item type and status field (labeled as line #4 in the image above) identifies what kind of item has been uploaded. Item types include:
- VirtualGood: Furniture items (content that can be placed in a Region)
- Region: Region templates that your guests can visit
- Clothing: Clothing items or avatar attachments
- Pattern: Textures that are uploaded for use with clothing or furniture items
Status Types
The item type and status field also identifies the item's status, which will be one of the following:
- Uploaded: Content is uploaded and awaiting processing by the servers
- Processing: Content is being processed by the servers
- Staging: Content is available for review on the preview server
- Live: Content is available on the live server
Additionally, each item listing allows you to identify who created an item, its brand name, its associated grid, and its creation and update dates.
Editing individual item details
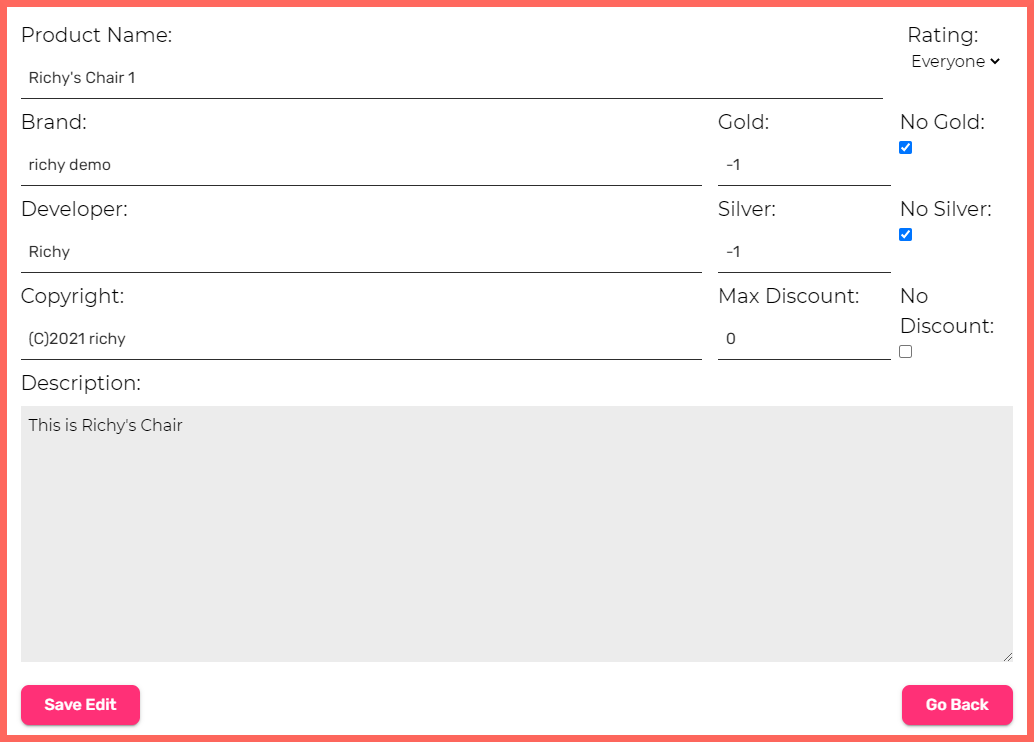
Pictured: The Edit panel for a single item.
Clicking the Edit button in an individual item listing will open the Edit panel. Here you can edit an item's name, its associated brand and copyright information, its description, and its sale information. Once you are happy with your changes, click the Save Edit button.
Item Edits
Clicking this button will push any changes you've made in Curator to the live server.
Dashboard
Clicking this button will take you to the Dashboard for that specific grid.
Pushing content to the live server
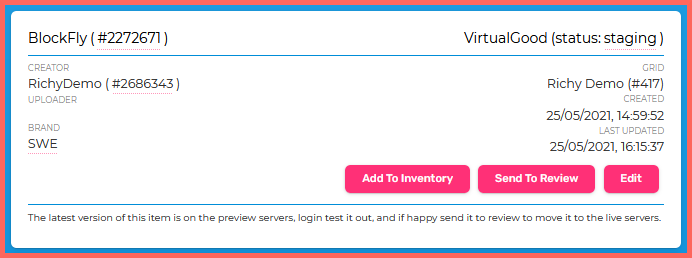
Pictured: An example item listing, with the status listed as "staging."
If you've tested a virtual item on the preview server and would like to push it to the live server, you can do so by following the steps below.
- Navigate to Curator and log in.
- Click on the Grids tab located at the top of the screen.
- Find the grid that contains the item you want to push to live. Click the Items button in that Grid panel.
- Locate the item that you want to push to the live sever. Make sure that the item has a status of "staging."
- Click the Send to Review button in that item panel, and you will notice several new buttons appear. These include buttons labeled Accept Item, Reject Item, and Cancel Review.
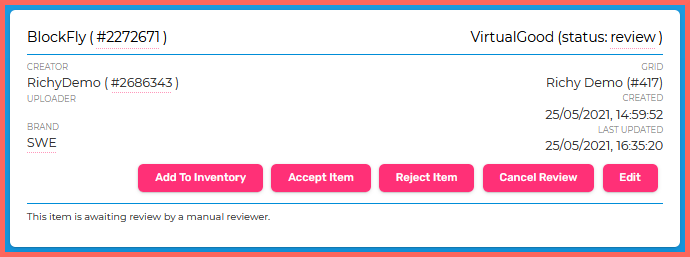
Pictured: The same example item listing, updated with new buttons.
- Click the Accept Item button to push the content to the live server. The status of the item will change to "live" to reflect this.
It is the responsibility of World Owners, World Administrators, or World Developers to review and approve all virtual items uploaded to the preview server. Without final approval, virtual items will remain on the preview server and will not be added to the live Breakroom World.
Updating content
To update content that was previously pushed to the live server, upload your item again using the same process. Once uploaded, your updated item's status will revert to "staging." You can then preview it and push it to live using the steps outlined above.
Important notes about updates:
- Once you push updated content the live server, Breakroom's cloud servers will also need to process that update. During this delay, you will still see the old version of your item on the live server. This issue should resolve itself after 15-20 minutes.
- If you issue an update for an item that was previously distributed to other users or sold through the Sine Wave Shop (for example, branded t-shirts), those users will automatically receive the updated version when it is pushed to live. For this reason, please ensure the item has been thoroughly tested prior to submission.
Tips and important notes
- Breakroom staff will not review any items uploaded to user grids, either for basic approval or for content and quality. Your team may want to consider implementing its own internal review processes to streamline content creation.
- As a general rule, we would advise that you let uploaded content sit in staging status for at least ten minutes before you submit it to the live server.