LogoLogo
Tutorial VideosScripting DocumentationLegalHome
Breakroom
Breakroom
  • Welcome to Breakroom
  • GETTING STARTED
    • Helpful terms
    • UI tour
    • Keyboard shortcuts
    • Customizing your avatar
      • Choosing a starter avatar
      • Editing avatars in the Outfit window
      • Using the Sine Wave Shop
    • Controlling your avatar
    • Controlling your camera
    • Communicating with other users
    • Using the conference system
      • Troubleshooting audio and video issues
    • Using Breakroom for Training
    • Settings
    • Language and accessibility
    • Reporting issues
  • EXPLORING BREAKROOM
    • Region navigation tools
    • Bookmarks and teleport invites
    • Using the Explore window
    • Using the Meetings window
    • Networking with other users
      • People
      • Groups
    • Snapshots
  • BUILDING NEW WORLDS
    • Breakroom Dashboard tour
    • Creating and managing Regions
    • Default Landing and Orientation Regions
    • Region settings
    • Region template descriptions
  • CREATING CUSTOM EXPERIENCES
    • Branding tools
    • UI customization options
    • Filtering the Sine Wave Shop
    • Selecting default avatars
      • Default avatar collections
    • Using the Region Editor
      • Editing and moving objects
      • Editing terrain and sky
      • The Region Editor ADVANCED window
    • Exploring the Breakroom Toolkit
      • Breakroom Video Player
      • Breakroom Web Browser
      • Breakroom Image Viewer
      • Breakroom Info Kiosk
      • Breakroom Teleport Portal
      • Breakroom Web Collab
      • Breakroom Note Board
      • Breakroom Games
      • Breakroom Reactives
      • Breakroom Orientation Quest
      • Breakroom Tour Cameras
      • Conference rooms and booths
      • Add-on seats
      • Breakroom Start Here UI
      • Breakroom Basic Emojis
      • Breakroom 360° Video Player
    • Managing your Media Library
  • OPENING THE DOORS
    • Seats and concurrency
    • Creating and managing user accounts
      • World-level user permissions
      • Region-level user permissions
      • Single sign-on
      • Eventbrite integration
    • World Stream
      • Purchasing and managing World Credits
      • Pre-allocation campaigns
      • World Stream viewer toolbars
      • World Stream keyboard shortcuts
      • Troubleshooting World Stream issues on Chrome
      • Troubleshooting World Stream issues on macOS
    • Desktop viewers
    • Privacy Policies, EULAs, and data collection
    • Analytics
    • Toggling World availability
  • RUNNING YOUR EVENT
    • Understanding the conference system
      • Voice zones, zone types, and conference permissions
      • Voice chat and spatial audio
    • Customizing the conference system components
      • Adding breakout areas
      • Creating custom voice zones
      • Setting up Presenter and Audience zones
      • Designating triage zones
      • Troubleshooting duplicate zone errors
      • The RoomFurniture component
    • Setting up Breakroom for Training courses
    • Moderator tools
      • Broadcast messages
      • Crowd management
      • Audience questions
      • Raised hands
      • Presentation controls
      • Hidden UI toggle
      • Participation
      • Audio streams
  • TIPS FOR SUCCESS
    • Region Editor best practices
    • Onboarding new users
  • ADVANCED TUTORIALS
    • Uploading your own Region
      • Installing Unity and the Breakroom SDK
      • Reducing poly counts on CAD files
      • Uploading a Region from Unity to Breakroom
      • Creating and uploading custom chairs
      • Testing items on the preview server
      • Pushing items to the live server
      • Installing the conference system components
    • Uploading your own virtual objects
    • Uploading your own virtual clothing
    • Creating and copying avatar shapes
    • Installing the Quest System
    • Registration and grid APIs
    • Video streaming
    • Sinespace scripting documentation
  • HELP
    • Where to find support
    • Tutorial video playlists
      • Platform basics
      • Dashboard
      • Moderator tools
      • Breakroom Games
      • Creator Core
      • Breakroom for Training - Students
      • Breakroom for Training - Instructors
      • Breakroom for Training - Dashboard and Backend
    • Account management
    • System requirements
    • Troubleshooting network ports and firewalls
  • RELEASE NOTES
    • Breakroom SDK
    • Breakroom Viewer
    • Breakroom Dashboard
Powered by GitBook

©2008-2024 Sine Wave Entertainment Ltd. All Rights Reserved.

On this page
  • Overview
  • Enabling SSO
  • Important notes
  • Disabling SSO
  • Customizing the Breakroom login screen
Export as PDF
  1. OPENING THE DOORS
  2. Creating and managing user accounts

Single sign-on

Learn how to enable SSO on Breakroom and customize your end-user login experience.

PreviousRegion-level user permissionsNextEventbrite integration

Last updated 10 months ago

Overview

By enabling single sign-on (SSO) on Breakroom, you can provide your users with a secure and simplified login process. Integrating your current identity management system with Breakroom takes only a few minutes, but has the potential to save you a lot of hassle.

In order to enable SSO, you will need to contract for services with an Identity Provider (IdP). Some IdPs to consider include Okta and Microsoft Azure.

Only and can access the Dashboard.

Enabling SSO

To enable SSO within Breakroom, you will need to copy the parameters Breakroom provides and enter them into your IdP's SAML Signing Certificate generator. Your IdP will then provide you with a SAML Signing Certificate, which will include a metadata file containing additional information. You will need to enter this information into the Breakroom Dashboard in order to complete setup.

You can enable SSO within Breakroom by following the steps below.

  1. Click on the World Customization > World Access tab.

  2. Click the SSO Login toggle to enable SSO.

  1. Once the SSO Login toggle is enabled, several additional sections will appear on your screen. Scroll down to the Identity Provider Setup panel.

  2. Here you will see two parameters provided in the form of links—the SSO URL and the SP Entity ID. You can click the copy icon located next to either of these parameters in order to copy it.

  3. Enter these parameters into the SAML Signing Certificate generator on your IdP's website. Once your IdP finishes creating your SAML Signing Certificate, they will provide you with a metadata file.

  1. Return to the Breakroom Dashboard and scroll to the Details Provided by your Identity Provider section. Enter the Entity ID, X.509 Certificate, and Sign-in URL parameters from the IdP metadata file into the relevant fields.

  2. Click the Save button.

Important notes

Disabling SSO

Customizing the Breakroom login screen

To customize the login panel, follow these steps.

  1. Click on the World Customization > World Access tab.

  2. First, choose which login methods will be available for your users.

    1. Enable or disable the standard login (Breakroom account email and password).

  3. If you have chosen to enable SSO, you can then customize the SSO login button appearance.

    1. In the Button Text field, enter the text you would like to appear on the button.

    2. If you want to upload a custom logo for the SSO login button, click the Browse link in the Button Image field. This will launch a standard file import window on your computer. Locate the image file you want to use, click on it, and then click the Open button.

    3. If you want to clear the current logo, click the Delete button.

  4. When you are satisfied with your changes, click the Save button.

Navigate to your .

Upon enabling SSO, user accounts are not automatically generated in Breakroom, and you will not see any users appear under the . Instead, Breakroom accounts will be generated as users log in. Each user account will occupy one of the available under your Breakroom account.

To disable SSO integration, follow steps 1-2 as and click the SSO Login toggle again.

The World Access tab features a login panel preview, so you can see how your changes will appear on the landing page and on the . You can also personalize your SSO button with a logo and custom text.

Navigate to your .

Enable or disable .

Enable or disable .

Dashboard
Manage Users tab
seats
World Stream
desktop app
Dashboard
detailed above
SSO
World Owners
World Administrators
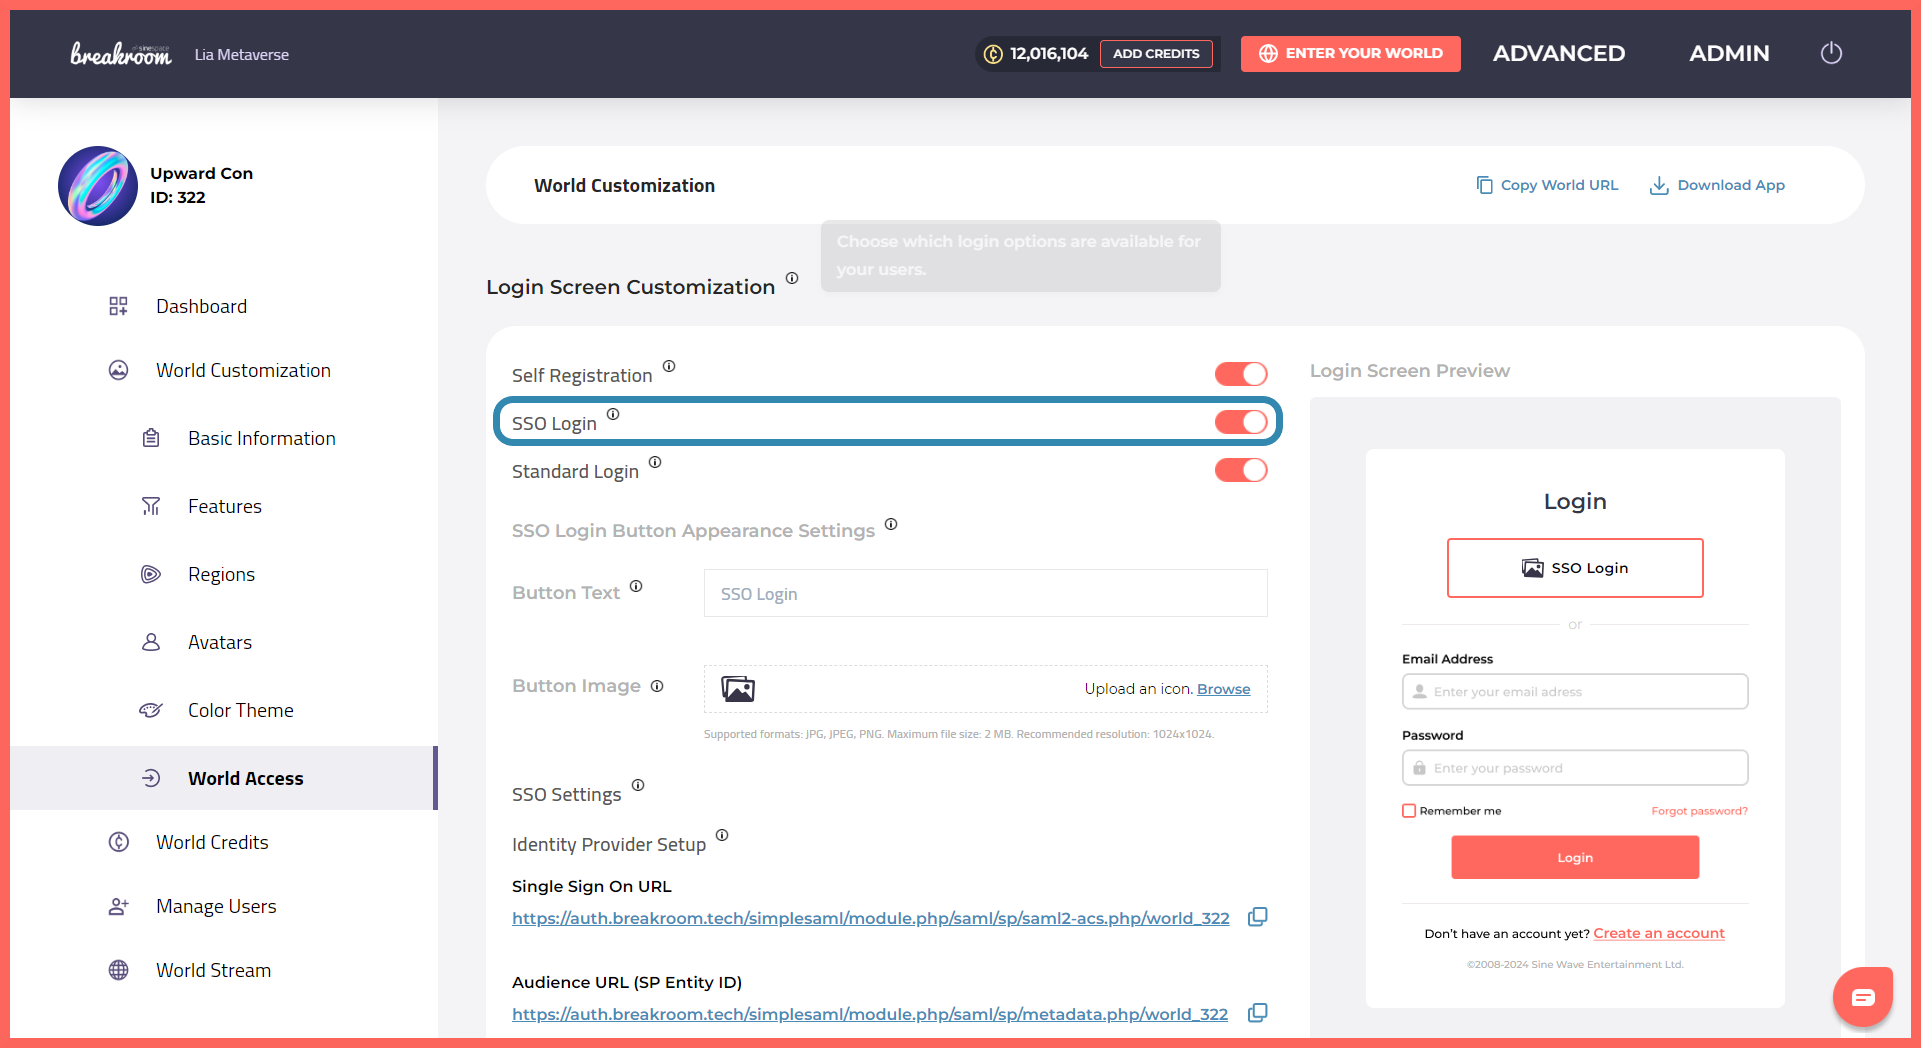
Highlighted: The Dashboard > World Customization > World Access tab, and the location of the SSO Login toggle.
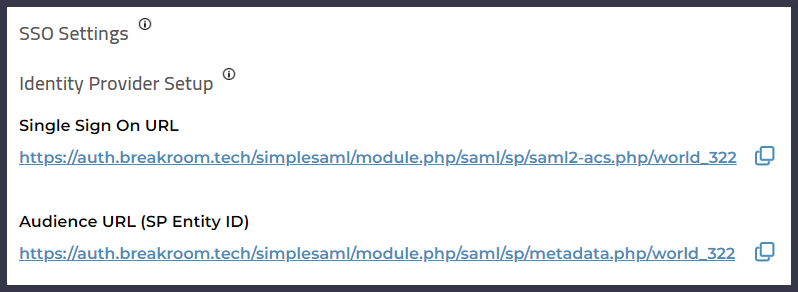
Pictured: The SSO Settings > Identity Provider Setup panel.
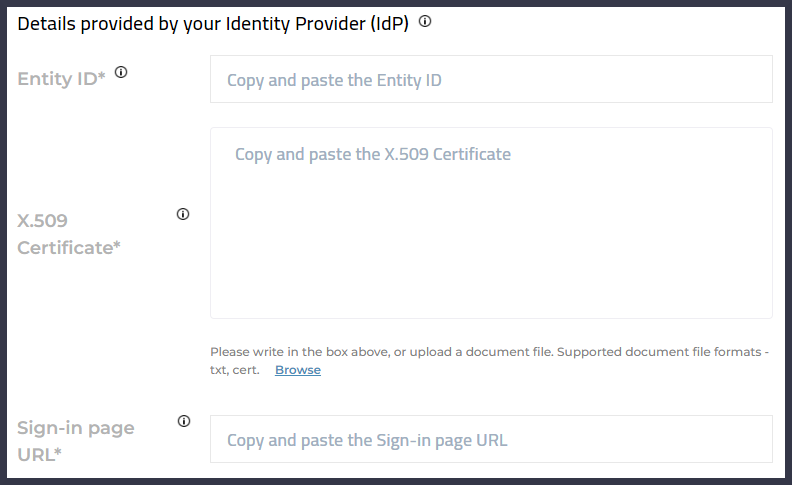
Pictured: The IdP panel.
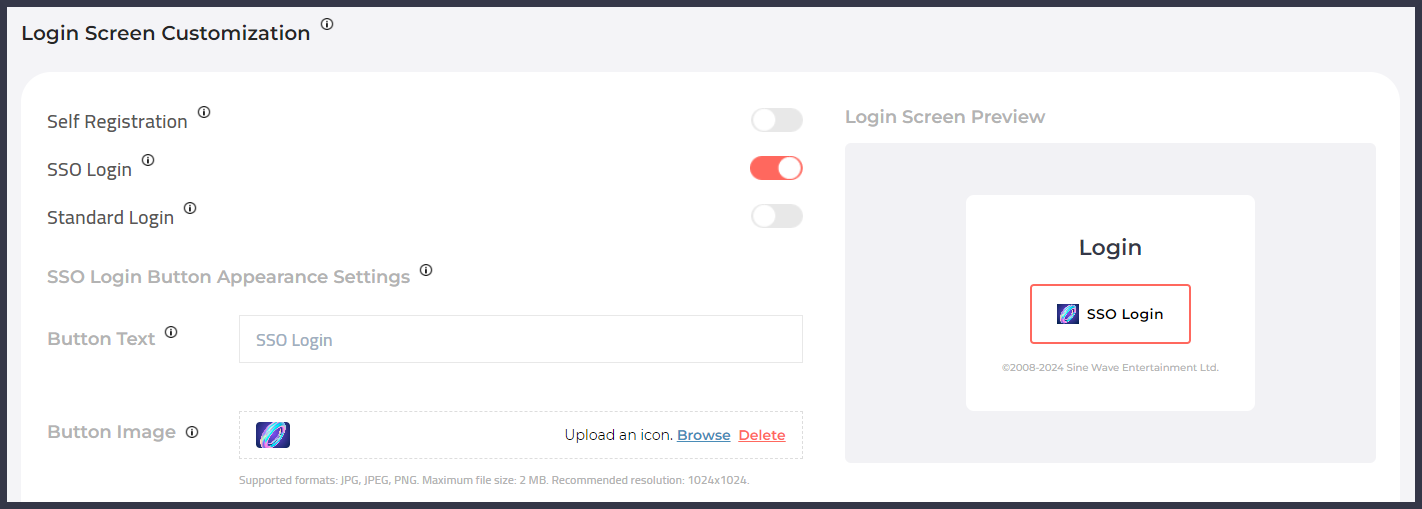
Pictured: Here the SSO buton has been customized, and the self registration and standard login features have been disabled. The end result is visible in the Login Screen Preview panel.
self-registration