Breakroom Landmark
Overview
Every Breakroom voice zone includes a landing pad component that indicates where avatars will arrive when they teleport to that location. The Breakroom Landmark object gives you the ability to set up a similar landing pad anywhere within a Region, independent of other voice zone functionality.
In your Inventory, you'll see the Breakroom Landmark represented by this icon: ![]()
In order to set up a Breakroom Landmark, users with appropriate World- or Region-level permissions will need to place the object in a Region and edit its sub-objects and components. The instructions provided below presume an advanced working knowledge of Breakroom. Please consult our documentation if you need help installing and positioning virtual objects or editing the RoomFurniture component.
In order for this Toolkit object to work, you must have the Breakroom conference core components installed in the same Region. If you have uploaded a custom Region, you will need to install these components manually prior to setting up this object.
Setting up a Breakroom Landmark
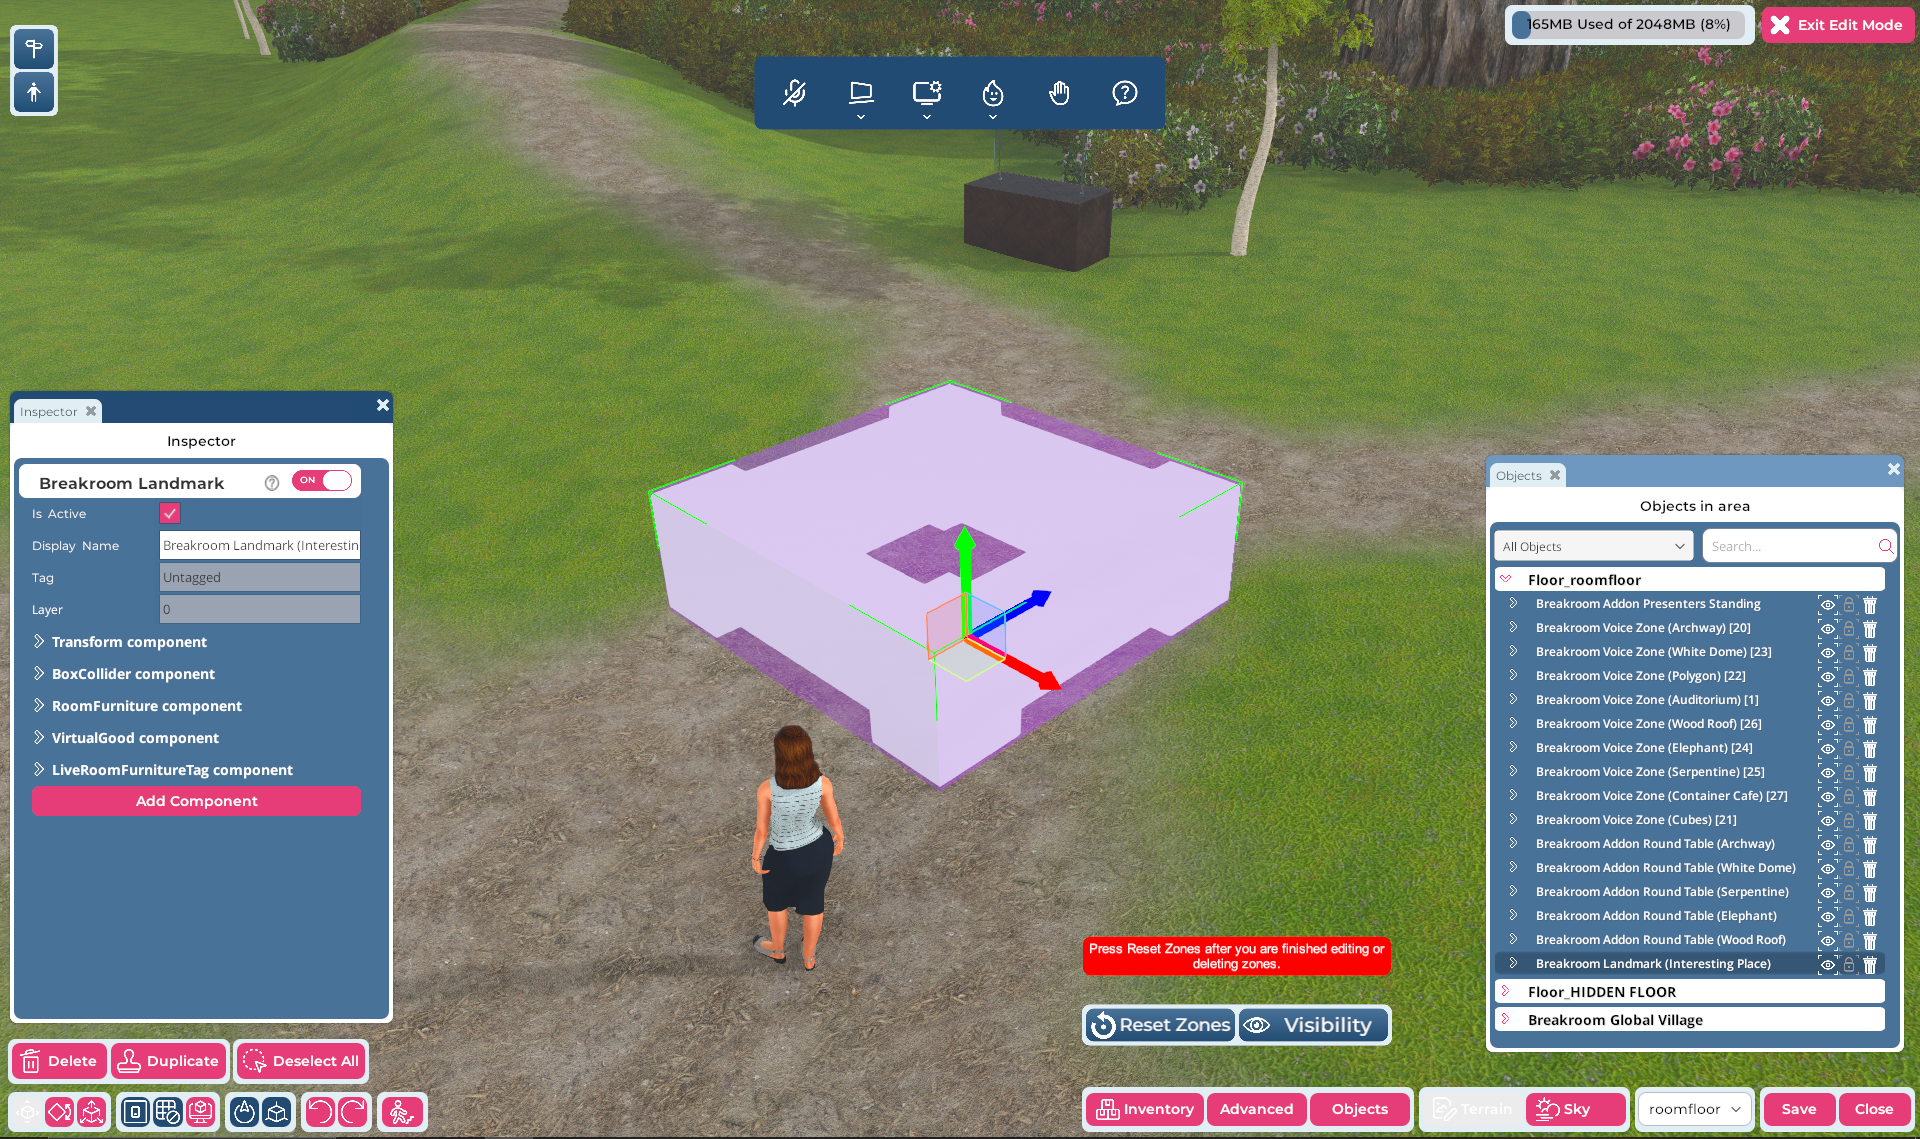
Pictured: The Region Editor, with a Breakroom Landmark object highlighted.
To place a Breakroom Landmark object in your Region, follow the quick-start steps below.
- Open the Region Editor by clicking the Edit Region button in the top toolbar.
- Click the Inventory button in the bottom right toolbar.
- Search for the Breakroom Landmark object in your Inventory and drag the item into your Region.
- The Breakroom Landmark object must be located at the place you want users to arrive. You can position it using the Region Editor tools, or by manually editing the Transform component.
The size of the landing pad indicates the area into which your users will teleport. You can make the landing pad bigger or smaller by highlighting it in the Objects window and then changing the local scale values listed under its Transform component, or by using the scale tool in the Region Editor.
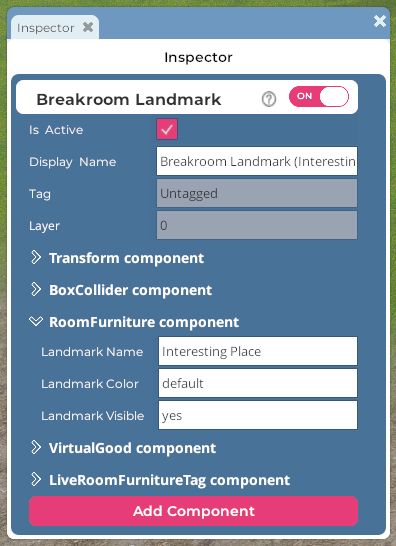
Pictured: The Breakroom Landmark Inspector window, with the RoomFurniture component expanded.
Once you've customized the Breakroom Landmark object position and size, you'll need to assign it a name. You can also assign it a specific color for use in the associated UI, and control whether it appears under the Areas of Interest panel.
- In the Inspector window, locate the RoomFurniture component. Expand this component by clicking the > arrow located to the left of its name.
- In the Landmark Name field, enter the name you would like to use for the landmark.
- If you leave the Landmark Color field set to default, the teleport button associated with the landmark will follow the color "rules" set by the conference system or your UI customization choices. You can change this color by manually typing in any of the allowed color keywords. You can also change the hex code associated with these keywords for even more options.
- If you want the landmark to be visible under the Areas of Interest panel, type the word yes into Landmark Visible field. If you want to remove it from the panel, set the field to no.
- Click the Reset Zones button to reset the conferencing system.
- Click the Save button to store your changes, and the Close button to exit the Region Editor.
Accessing a Breakroom Landmark
The Areas of Interest panel
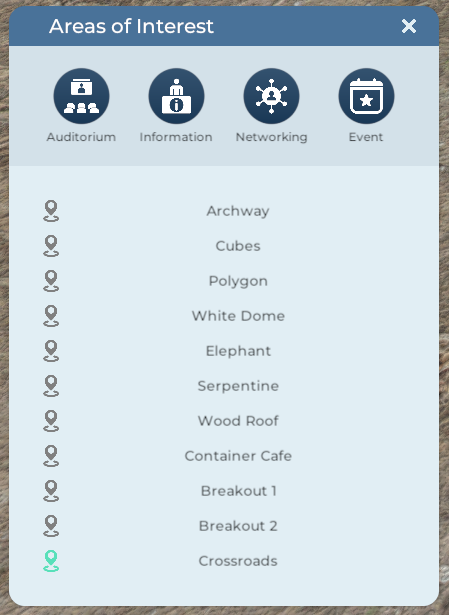
Pictured: The Areas of Interest panel.
After you set up a Breakroom Landmark as described above, a teleport button will be added to the Areas of Interest panel. Users can click these buttons at any time in order to travel to the specified point.
The Crowd Management panel
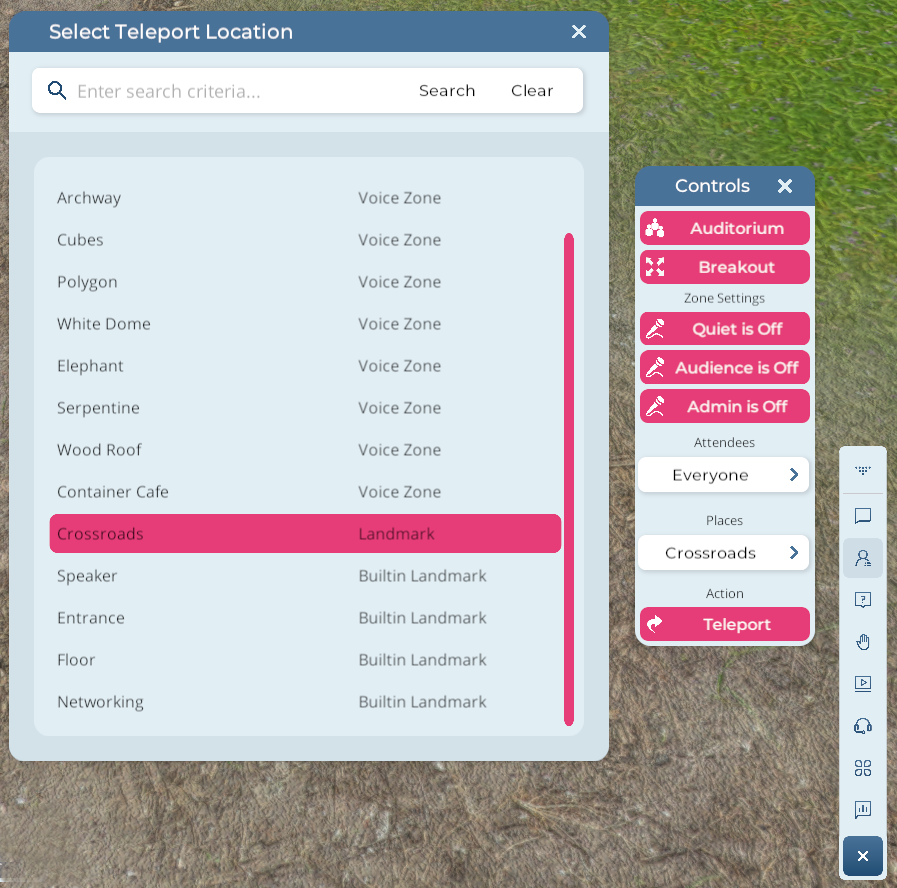
You can also select the Breakroom Landmark as a teleport location under the Crowd Management panel on the Moderator tools. This gives Moderators the ability to teleport or more users directly to the landmark as needed.
Multi-zone landmarks
.png)
Highlighted: A multi-zone landmark in the Crowd Management panel.
By naming Breakroom Landmarks sequentially, you will create an additional place listing in the Crowd Management panel devoid of any identifying numeral and labeled multiple locations. This teleport target can be employed to send users to a random associated landmark.
In the example pictured above, you can see we've named two Breakroom Landmarks Breakout 1 and Breakout 2. Notice how this has created an additional landmark simply named Breakout, which has no numeral and is labeled multiple locations.
This multi-zone landmark can be used to teleport a crowd of multiple users, with those users being distributed randomly between the two associated landmarks.
Advanced Breakroom Landmark options
When installing a Breakroom Landmark object, you can choose between default landing and clustered landing effects for users who teleport there. You can also randomize the direction your users will face upon arrival.
Default landing
The default landing pattern is automatically enabled upon installation. Under the default landing pattern, users will arrive at random points within the boundary designated by the Breakroom Landmark object.
To avoid a teleportation bottleneck, make your landing pad object as large as possible.
Clustered landing
By enabling the clustered landing option, you can arrange for users to arrive in groups within the zone designated by the Breakroom Landmark object. This can help foster an atmosphere of socialization and camaraderie.
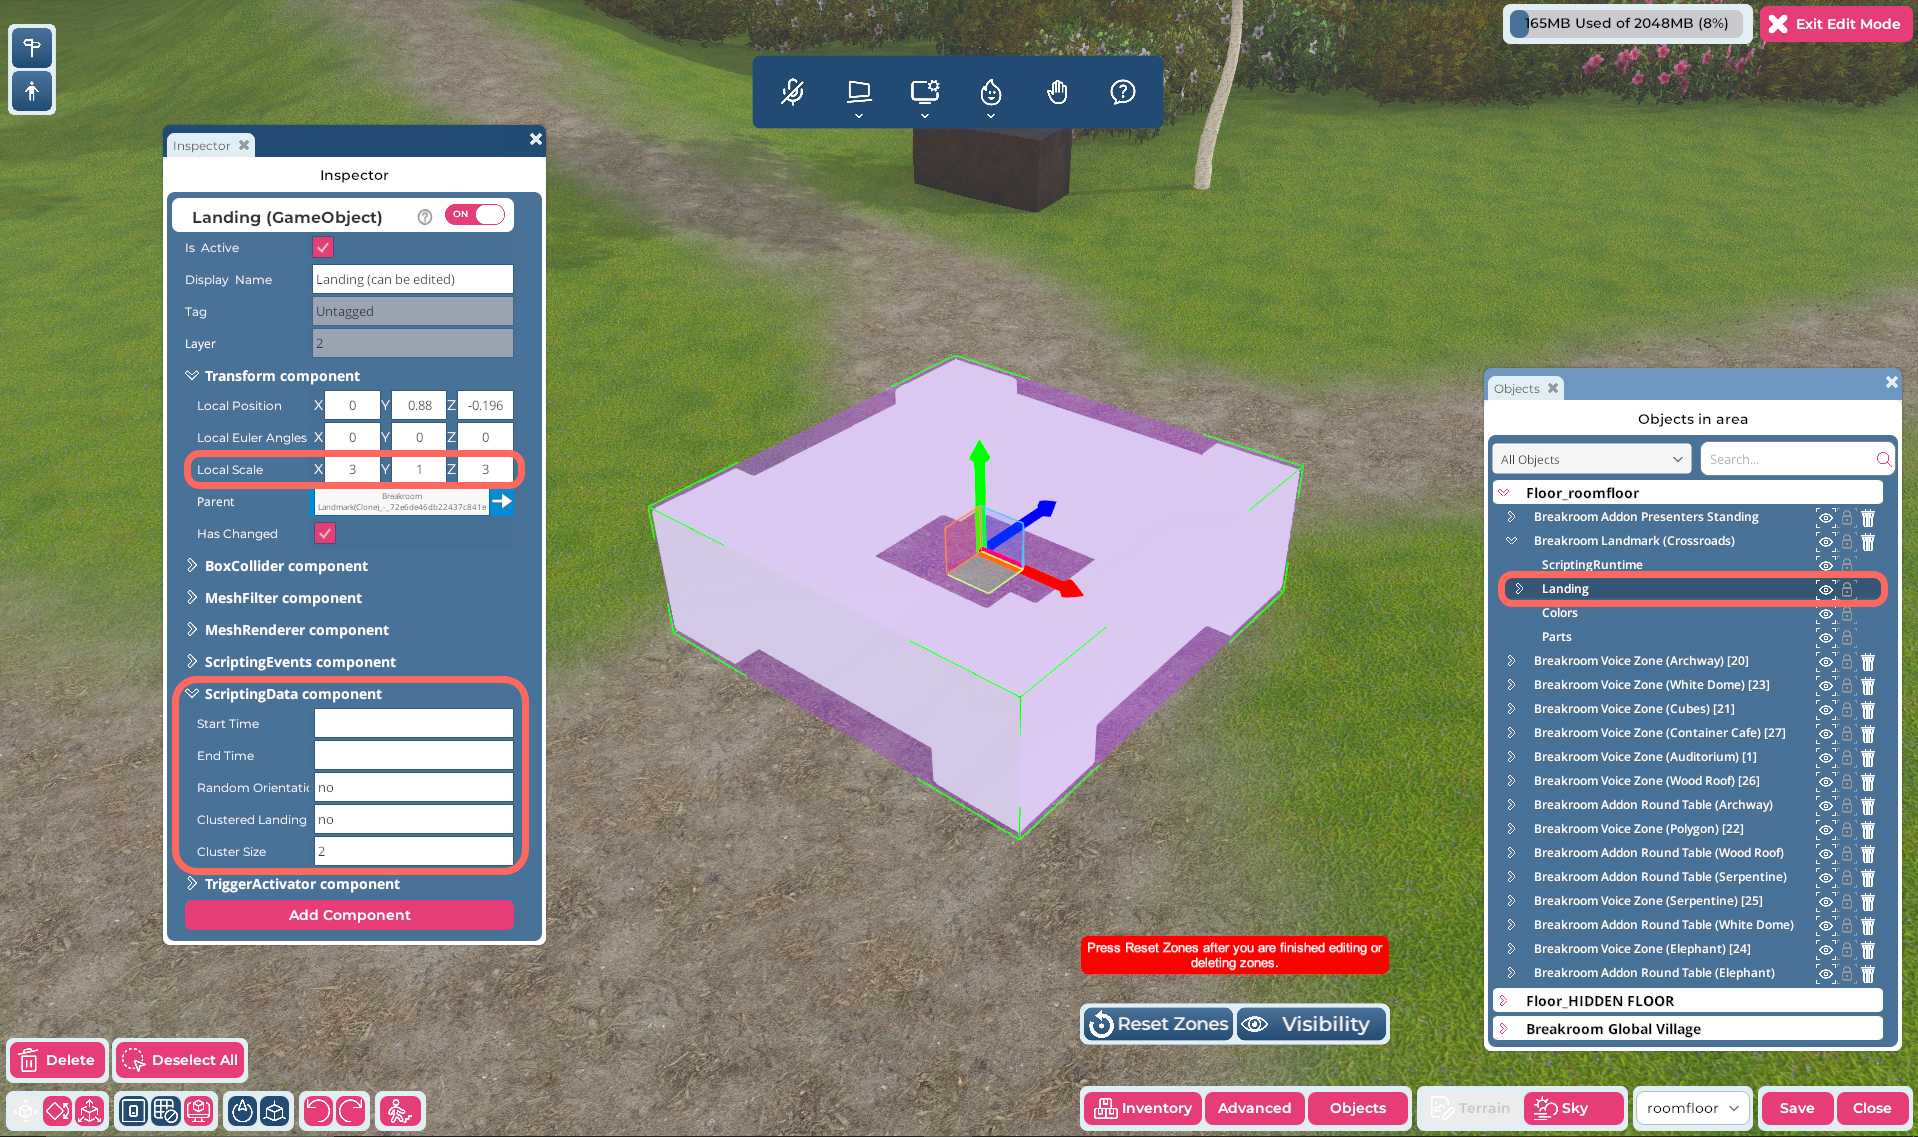
Highlighted: The location of the Landing object in the Objects window, as well as the relevant landing pad components in the Inspector window.
To enable and manage clustered landing, follow these steps.
- Open the Region Editor by clicking the Edit Region button in the top toolbar.
- Click the Objects button to launch the Objects window. Locate the Breakroom Landmark object you want to edit and click the > icon to the left of the object name to expand it. Then click on the Landing component to highlight it.
- In the Inspector window that opens, click on the > icon to the left of both the Transform and ScriptingData components to expand them.
At this point, it is useful to explain what a few of these component properties do, as well as some of the math involved in creating clustered landing areas. The key properties to consider are:
- Transform component > Local Scale. This property controls the size of the Landing component. In the example image above, you can see that the object is 6x1x12 meters, or 6x12 along the axes that "count."
- ScriptingData component > Clustered Landing. This property controls whether clustered landing is enabled or disabled. If clustered landing is turned off, users will arrive in the default/randomized landing style.
- ScriptingData component > Cluster Size. This property controls the size of the clustered landing areas within the Landing component.
- ScriptingData component > Random Orientation. This property controls whether users will arrive in a group facing each other (i.e. oriented toward the center of the cluster), or facing in random directions.
The most important property to consider is the Cluster Size. This value must be entered as a number. If you enter the numeral N, we might summarize the instructions relayed to the system as "create as many clustered landing areas of NxN meters as will fit within the scale values of the landing pad object."
In the example image above, you can see that the Landing component is 6x12 meters in size. Under the ScriptingData component, you can see that the Cluster Size property has been set to 6. This will result in the creation of two 6x6 meter clustered landing areas within the boundary designated by the Breakroom Landmark.
With this explained, let's return to the instructions.
- Make sure the Landing component is the size you need by changing the local scale values listed under its Transform component, or by using the scale tool in the Region Editor.
- Under the ScriptingData component, enable or customize the following properties:
- Random Orientation:
- If you want users to arrive in a cluster facing each other, enter no into the field.
- If you want users to arrive in a cluster facing in random directions, enter yes.
- Clustered Landing: Enter yes into the field.
- Cluster Size: Enter the size of your clustered landing points into the field (e.g. 3 to create 3x3 clustered landing points).
- Random Orientation:
- Click the Reset Zones button to reset the conferencing system.
- When you are satisfied, click the Save button to store your changes.
Random Orientation
Whether you choose to implement default landing or clustered landing for your Breakroom Landmarks, you can randomize the direction that your users will face when they arrive. To do so, follow these steps.
- Open the Region Editor by clicking the Edit Region button in the top toolbar.
- Click the Objects button to launch the Objects window. Locate the Breakroom Landmark object you want to edit and click the > icon to the left of the object name to expand it. Then click on the Landing component to highlight it.
- In the Inspector window that opens, click on the > icon to the left of the ScriptingData component to expand it.
- In the Random Orientation field, enter yes.
- Click the Reset Zones button to reset the conferencing system.
- When you are satisfied, click the Save button to store your changes.
To return a Breakroom Landmark to standard orientation, repeat steps 1-4 above and enter no into the Random Orientation field. Click the Reset Zones button, followed by the Save button.