Setting up Presenter and Audience zones
Overview
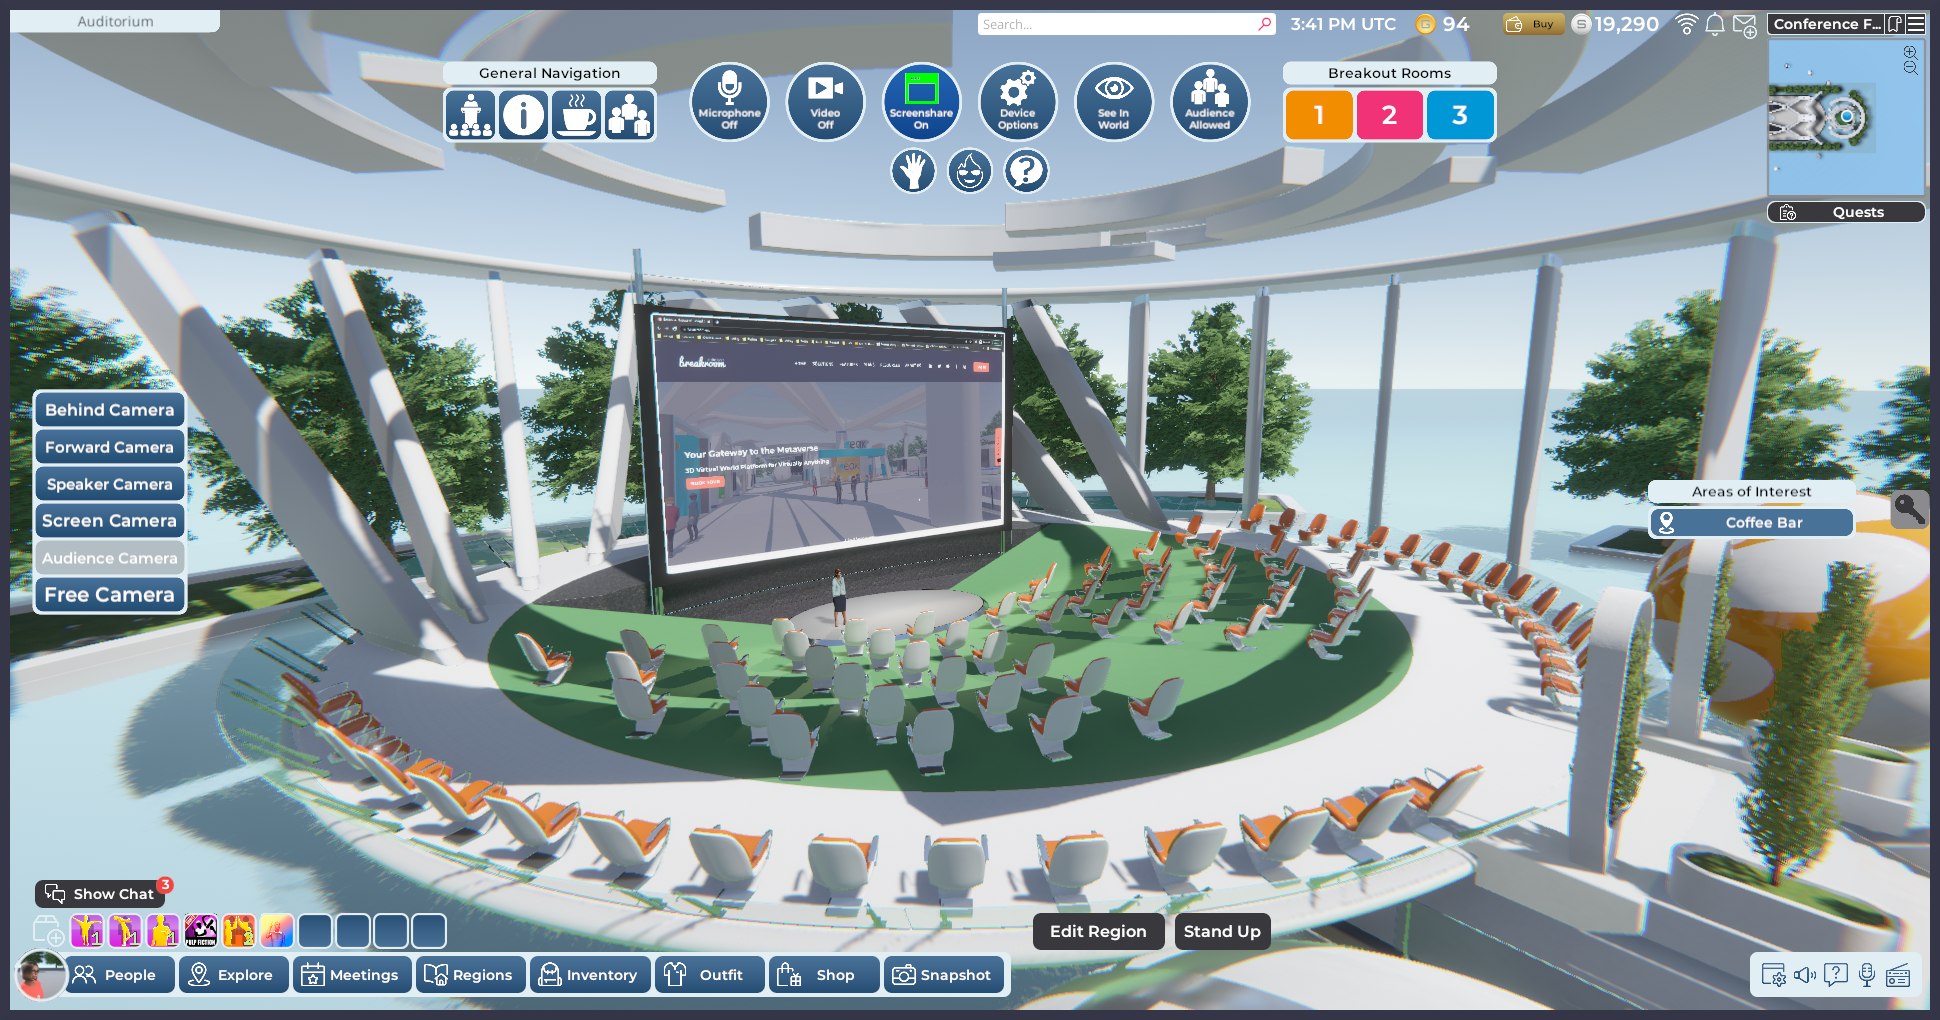
Pictured: Here a keynote speaker is standing in one of the presenter seats in a Presenter zone, and is able to share her screen.
Breakroom allows you to customize your Regions with a variety of voice zone types, each with its own set of rules governing what kinds of media can be shared and by whom. Among these, Presenter and Audience zone types are unique, as both make use of special presenter seats.
By positioning their avatars in these seats, presenters can gain access to voice chat and media sharing functions within a particular voice zone, even if these functions are otherwise restricted. Users with access to the Breakroom moderator tools (hereafter referred to collectively as Moderators) can also grant access to voice chat or media sharing functions as needed.
The instructions provided in this section presume an advanced working knowledge of Breakroom. Please consult our documentation if you need help installing and positioning virtual objects, or editing the RoomFurniture component.
After using the Region Editor to add or edit a voice zone, always remember to click the Reset Zones button to reset the conferencing system. If this doesn't seem to push your changes forward, try saving your work, leaving the Region, and entering it again.
Using Presenter and Audience zones
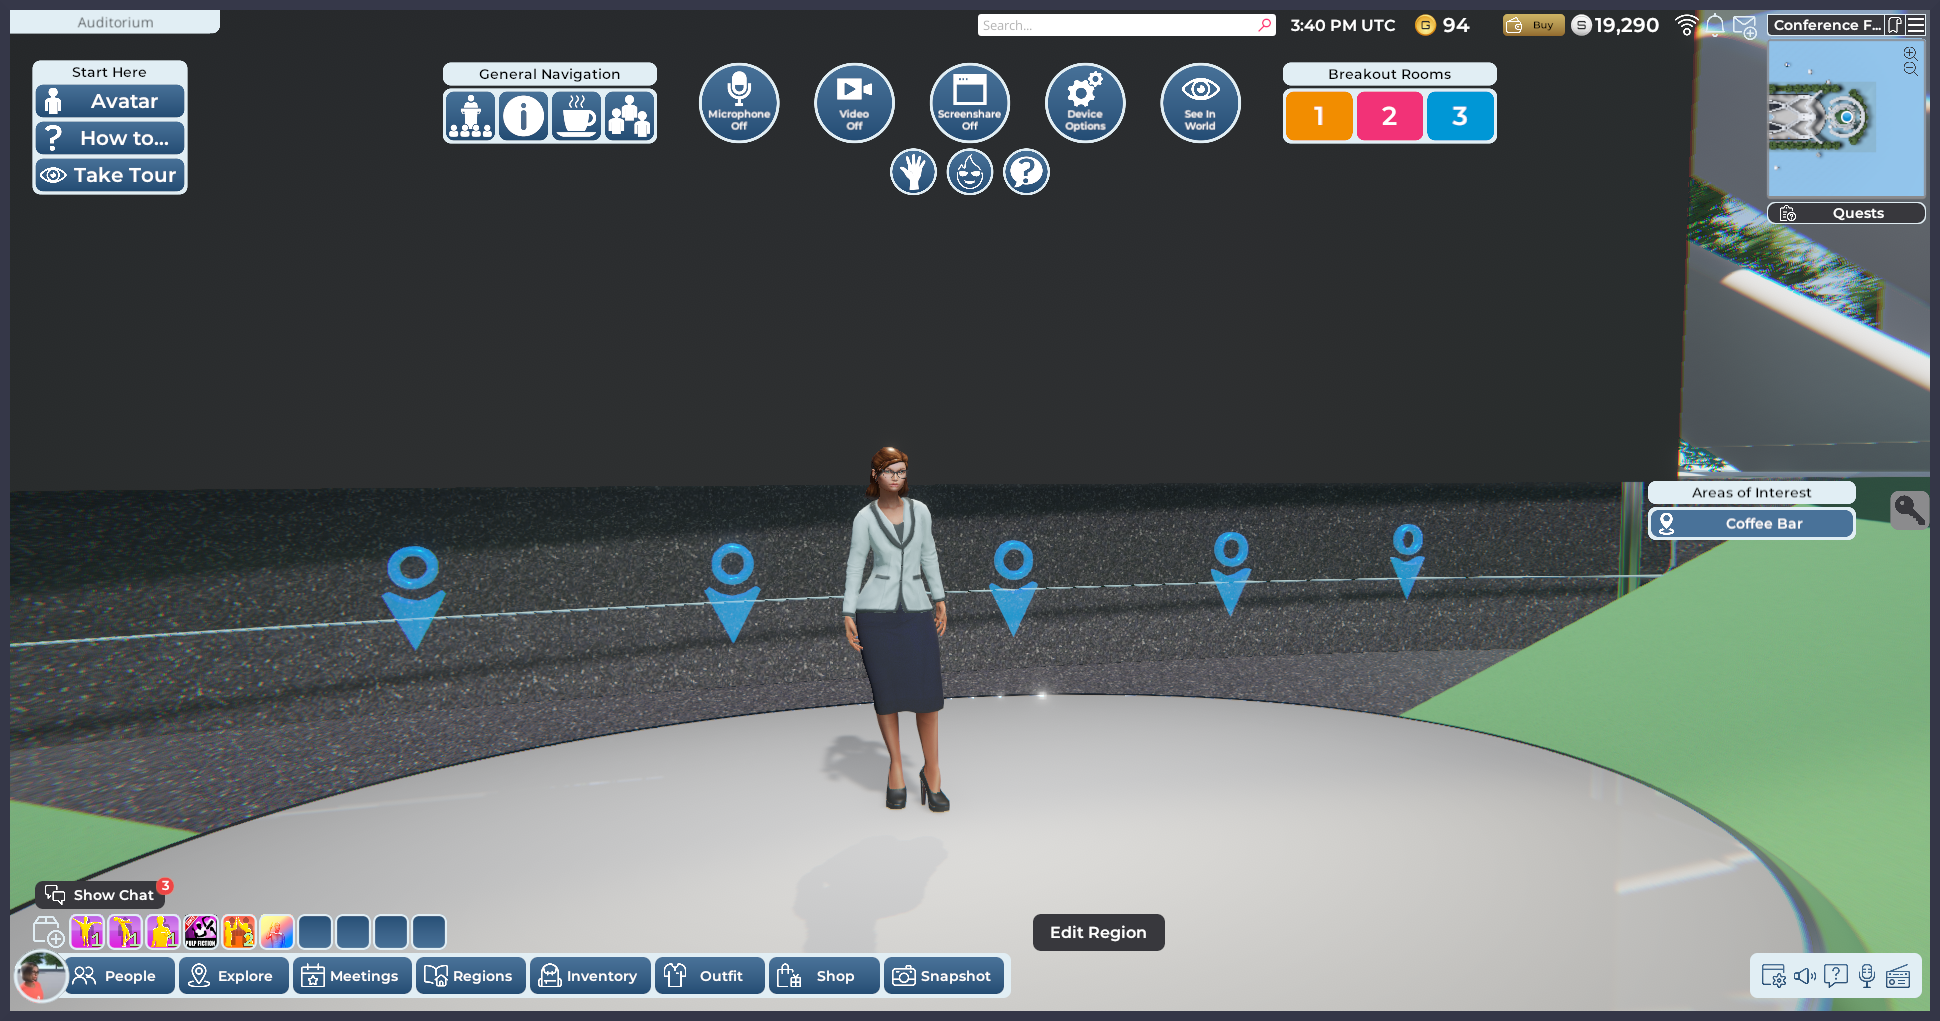
Pictured: An example of how a Presenter or Audience zone might appear, with five presenter seats set up on a stage.
Presenter seats are represented by the usual blue seat tag. Depending on which Region template or breakout area is being utilized, you may see these tags arranged on a stage, set in front of a main screen, or otherwise located in the logical spot for a presenter to occupy.
To take up a presenter spot, simply click on a blue presenter seat tag. This will position your avatar and give you access to voice chat and media streaming options. To leave the presenter seat, click the Stand Up button at the bottom of the screen.
Presenter and Audience zone functionality
Presenter and Audience voice zones are similar, in that both restrict media access to certain users. For reference, here is a comparison of the default settings for Presenter and Audience zones.
| Zone type | Voice chat | Media share (webcam, etc.) |
|---|---|---|
| Presenter | All users | Presenters only |
| Audience | Presenters only | Presenters only |
In the following sections, we will explain how presenters can access the media sharing functions they need, and how Moderators can enable or disable media streaming. Instructions are also provided so that World Owners and other users with access to the Region Editor can customize the number of available presenter seats in a given voice zone, or place limitations on who can use those presenter seats.
Setting up Presenter and Audience zones
You can customize Presenter and Audience zones by adding or removing presenter seats. You can also set limitations on who can use those seats. The following tutorials offer step-by-step instructions for specific use cases, but the same general principles can be used to create many different presenter configurations.
Adding presenter seats
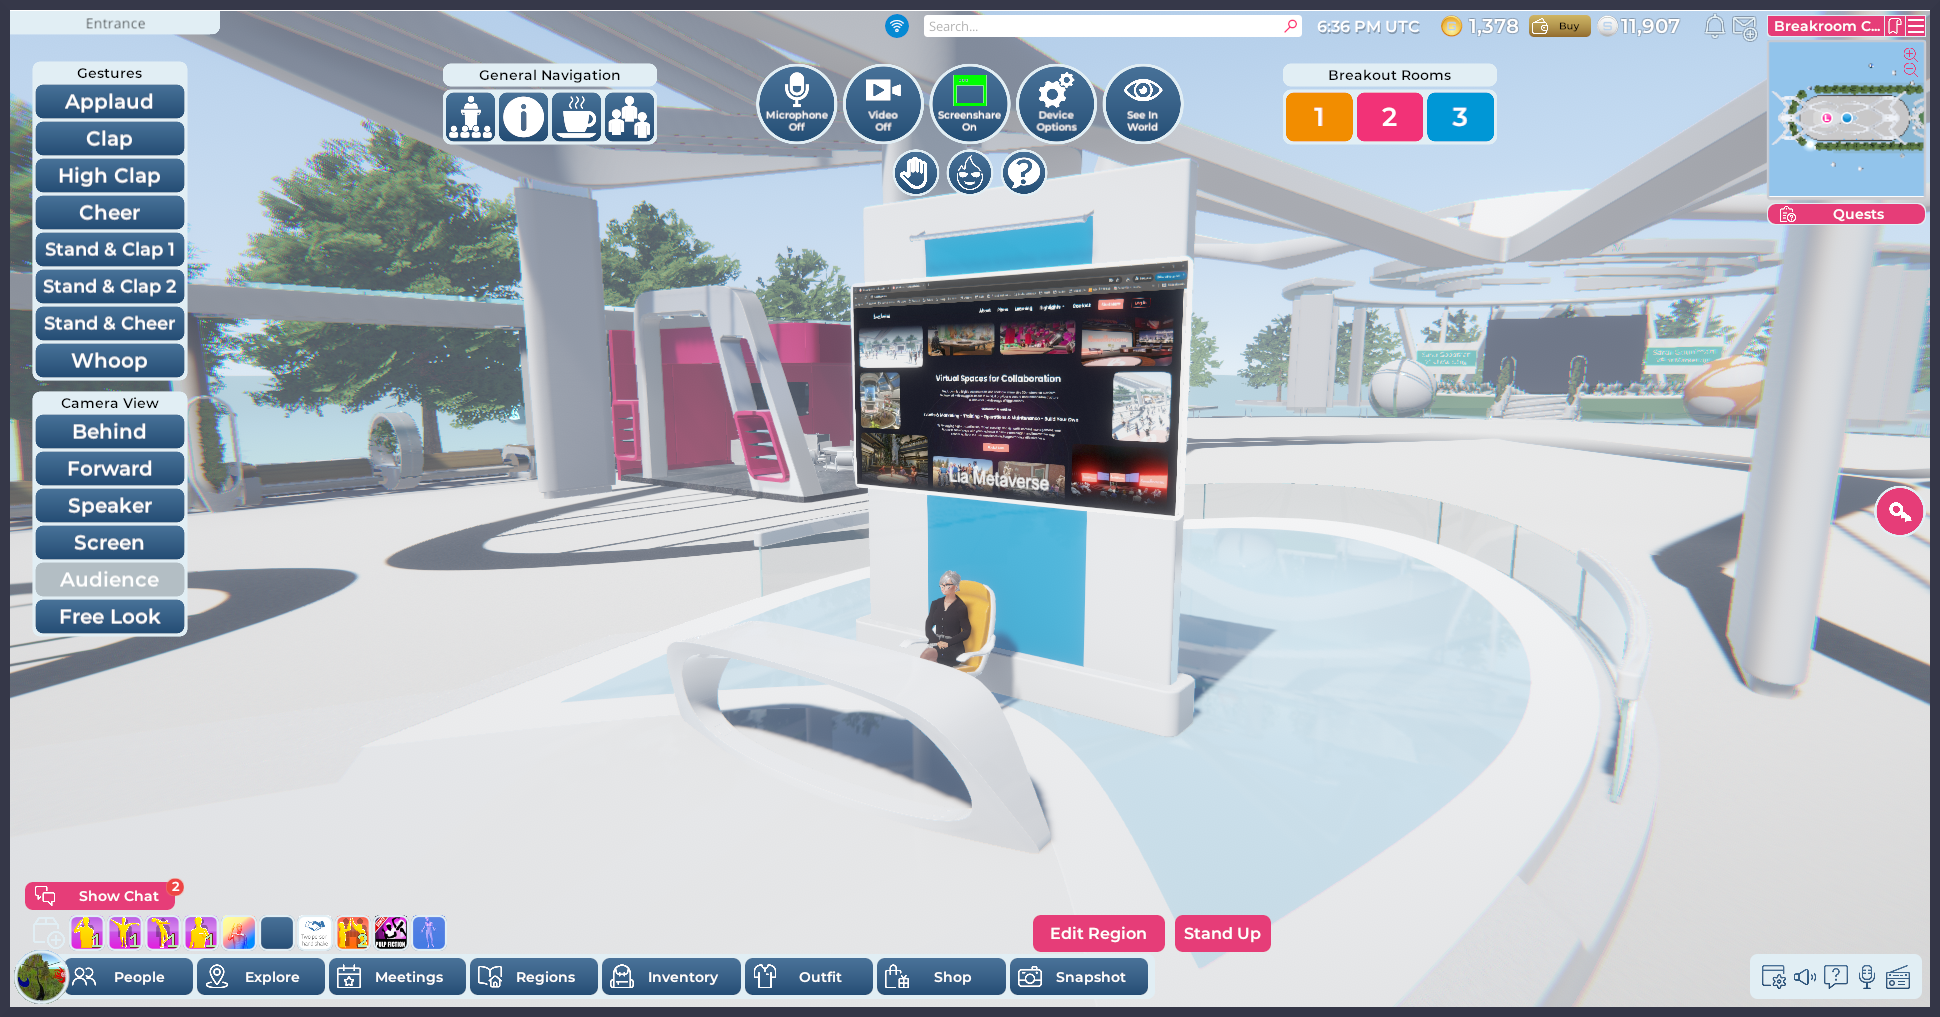
Pictured: An example of the default Breakroom Helpdesk setup.
For our first tutorial example, we'll add some additional presenter seats to a Breakroom Helpdesk. We will assume that the Breakroom Helpdesk object is already installed in a Region, along with its single presenter seat.
The Breakroom Toolkit includes a variety of presenter seat objects that you can add to any Presenter or Audience zone. Our goal is to place one additional standing presenter seat on either side of the desk to accommodate event staff.
To get started, follow these steps.
- Log in to your Breakroom World and navigate your avatar to the Region you would like to edit.
- Open the Region Editor by clicking the Edit Region button at the bottom of your screen.
- Click the Inventory Button to launch the Inventory window.
- Locate the Breakroom Addon Presenters object. This object consists of nine standing presenter seats. To find it, use the search field at the top of the Inventory window to look for "presenters."
- When you find the Breakroom Addon Presenters object, set it down in your Region using your preferred method. Click the Save button.
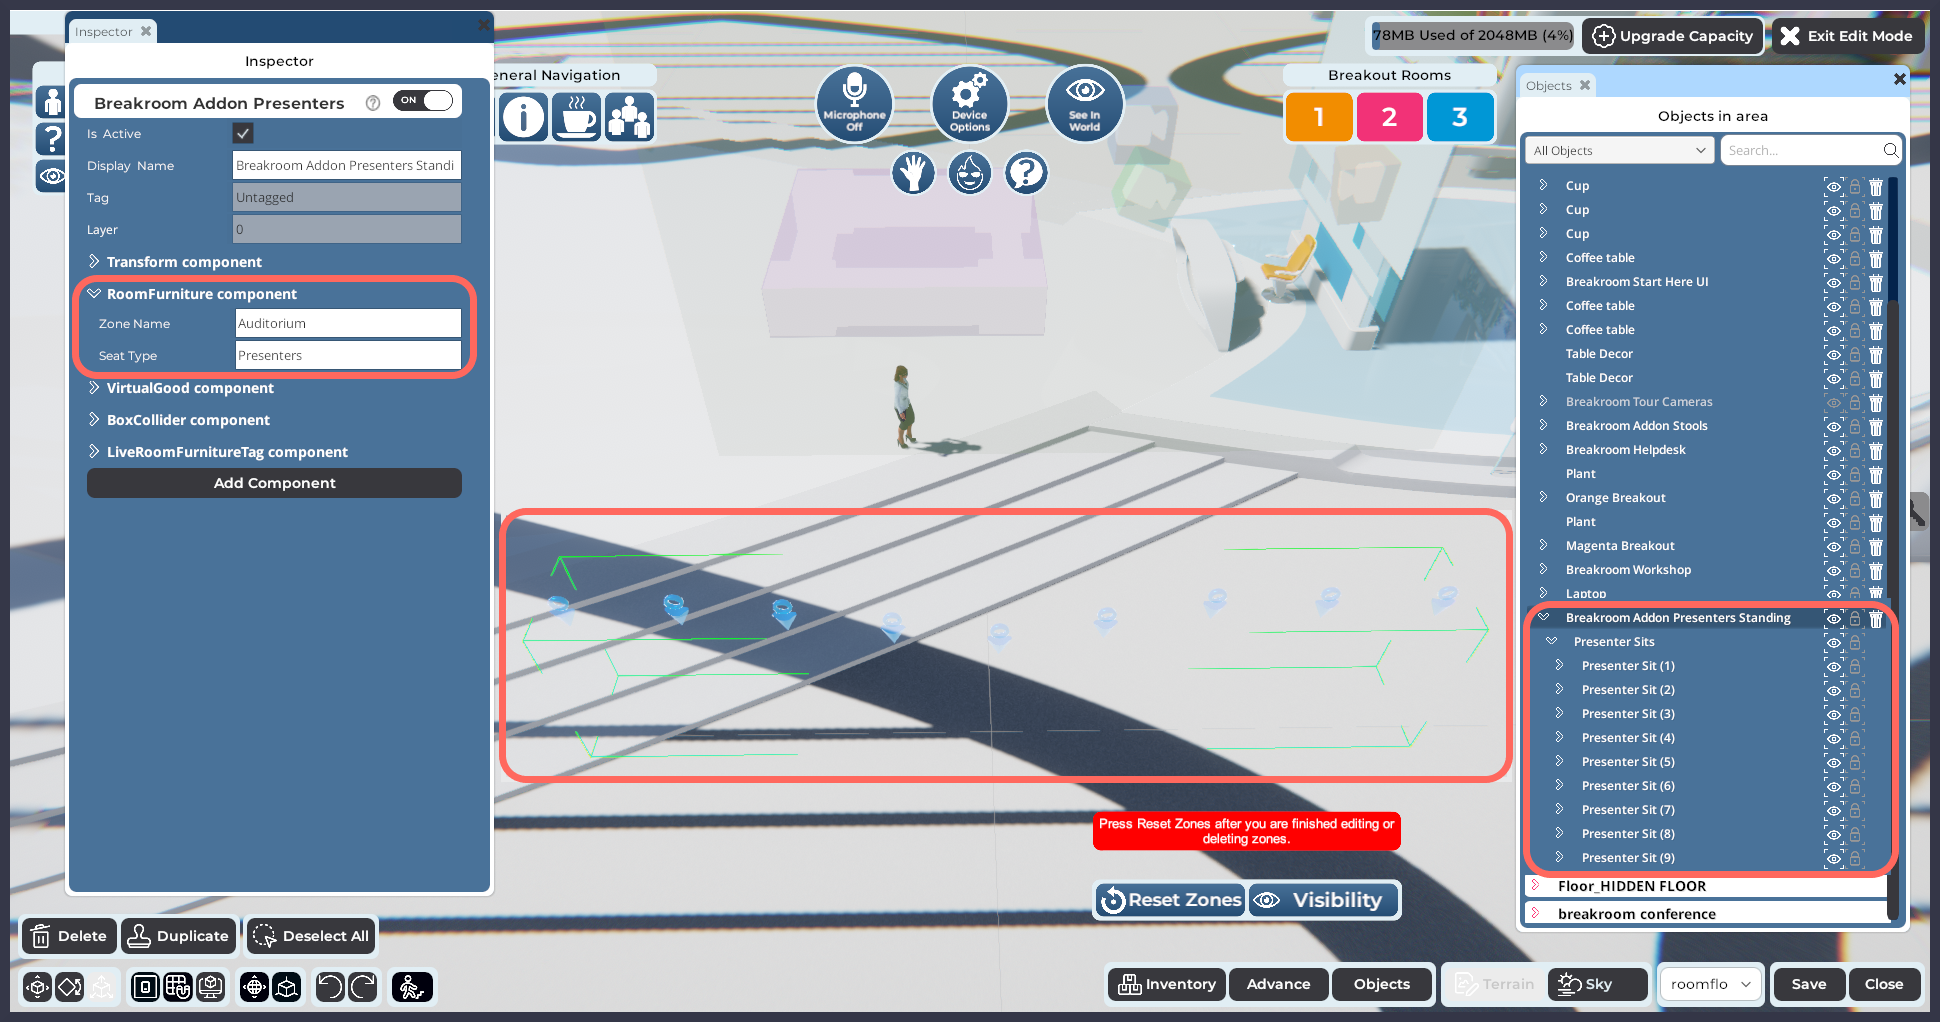
Pictured: The Breakroom Addon Presenters object added to a Region, with its contents expanded in the Objects window.
Here we encounter our first challenge. There are too many standing presenter seats for our purposes. For our next step, we will make all but two seats invisible.
- In the Objects window, click the > arrow located beside the Breakroom Addon Presenters object to expand it.
- Click the > arrow located beside the Presenter Sits object to expand it.
- Here you will find the nine individual seats that make up the linked presenter seats object. To make a seat invisible, click the eye icon located to the right of its name. Repeat this step for every seat you want to make invisible. Click the Save button.
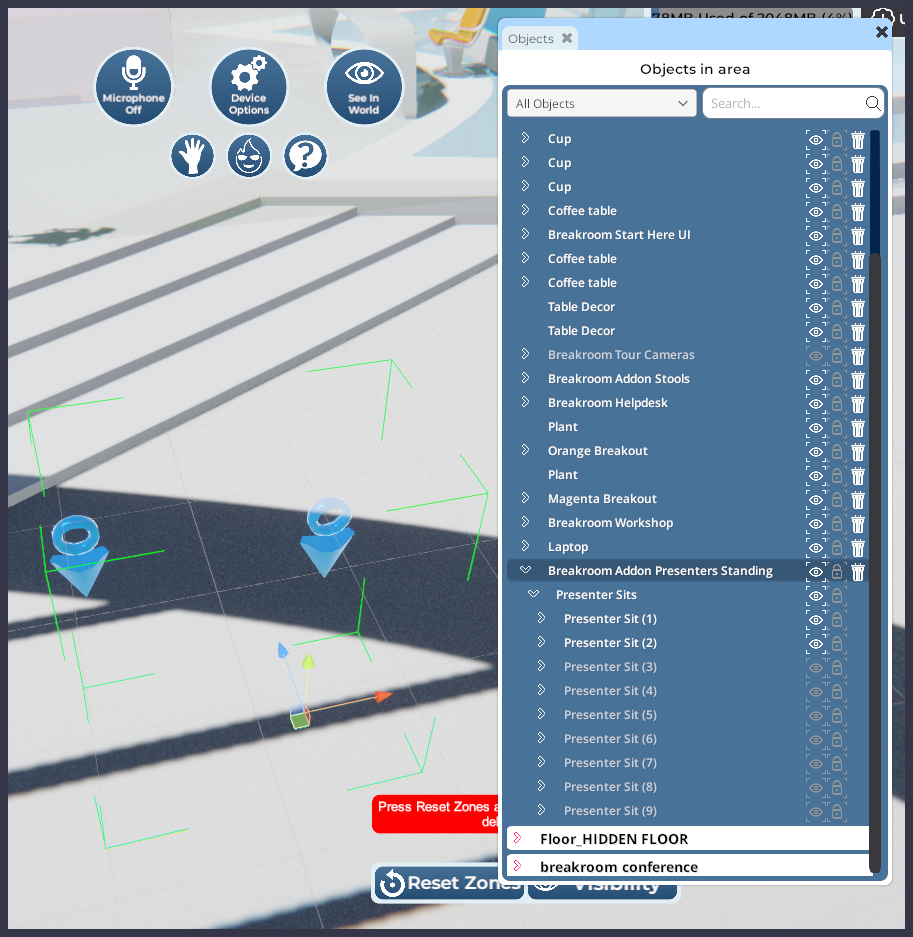
Pictured: Nine standing presenter seat tags reduced to two.
Now we need to move the seat tags into position by placing one on either side of the desk.
- Locate the first seat you want to edit under Breakroom Addon Presenters > Presenter Sits in the Objects window. Click on the seat name to highlight that individual seat.
- Use the movement and rotation tools to position the seat tag in your Region. You can also key position values into the tag's Transform component.
- Once you have the first seat tag in position, repeat this process for the remaining seat. Click the Save button.

Finally, we need to connect the new presenter seats to the Breakroom Helpdesk voice zone.
- Click the Objects button to launch the Objects window. Locate the Breakroom Addon Presenters object. Click on the object name to launch the Inspector window.
- In the Inspector window, click on the > arrow to the left of the RoomFurniture component to expand it.
- You will see a property titled Zone Name. In this field, enter the Zone Name you want to attach the presenter seats to. (For example, my Helpdesk voice zone is named "Entrance," so I would type in "Entrance.")
- Click the Reset Zones button to reset the conference system.
- Click the Save button to store your changes, and the Close button to exit the Region Editor.
You can add as many presenter seats as you like to a voice zone. However, it is important to note that Breakroom's media streaming system cannot accommodate more than 17 simultaneous webcam or screen share users.
Removing presenter seats
To remove presenter seats from a voice zone (for example, if you want two presenter spots instead of nine), you would follow the same instructions included in the example tutorial above.
- Log in to your Breakroom World and navigate your avatar to the Region you would like to edit.
- Open the Region Editor by clicking the Edit Region button at the bottom of your screen.
- In the Objects window, click the > arrow located beside the Breakroom Addon Presenters object to expand it.
- Click the > arrow located beside the Presenter Sits object to expand it.
- Here you will find the individual seats that make up the linked presenter seats object. To make a seat invisible, click the eye icon located to the right of its name. Repeat this step for every seat you want to make invisible.
- Click the Reset Zones button to reset the conference system.
- Click the Save button to store your changes, and the Close button to exit the Region Editor.
The Presenter and Audience zones seats that come preconfigured in Breakroom's Region templates cannot be edited, as they are uploaded with the Region as a whole. We apologize for the inconvenience.
Restricting presenter seat access
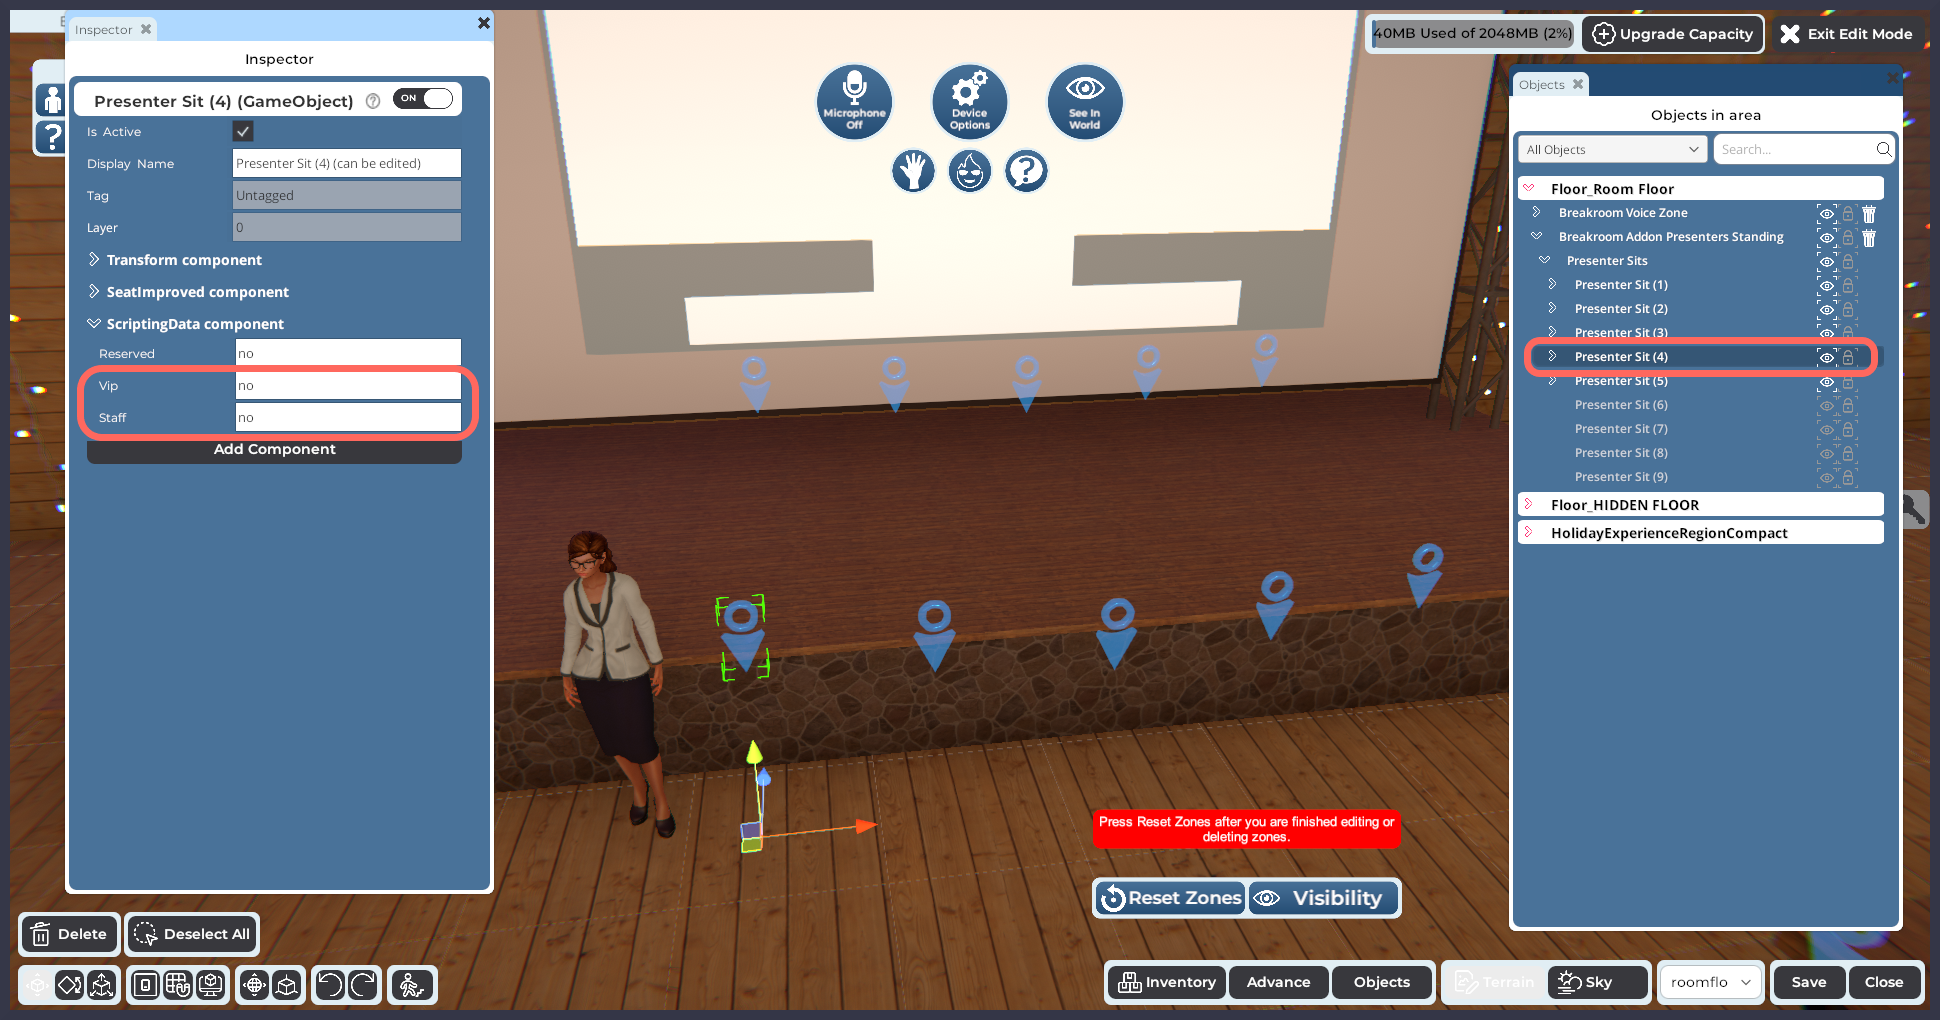
Pictured: An individual presenter seat being isolated and edited in the Region Editor.
It is possible to prevent unauthorized users from jumping on empty presenter seats by restricting access to VIPs or staff members only. To get started, follow these steps.
- Log in to your Breakroom world and navigate your avatar to the Region you would like to edit.
- Open the Region Editor by clicking the Edit Region button at the bottom of your screen.
- In the Objects window, click the > arrow located beside the Breakroom Addon Presenters object to expand it.
- Click the > arrow located beside the Presenter Sits object to expand it.
- Here you will find the individual seats that make up the linked presenter seats object. To edit a seat, click on it in the Objects window. Doing so will launch the Inspector window for that seat.
- In the Inspector window, locate the ScriptingData component. Click the > arrow on the left to expand it.
- Here you will see three properties and their associated fields. We are concerned only with the VIP and Staff fields. The Reserved field should not be edited.
- VIP field: To restrict presenter seat access to Region VIPs and above, as well as world-level Administrators and above, type yes into this field.
- Staff field: To restrict presenter seat access to Region Moderators and above, as well as world-level Administrators and above, type yes into this field.
- Repeat these steps for every seat you want to restrict. When you are satisfied, click the Reset Zones button to reset the conference system.
- Click the Save button to store your changes, and the Close button to exit the Region Editor.
The Presenter and Audience zones seats that come preconfigured in Breakroom's Region templates cannot be edited, as they are uploaded with the Region as a whole. We apologize for the inconvenience.
Controlling audience voice chat and media access
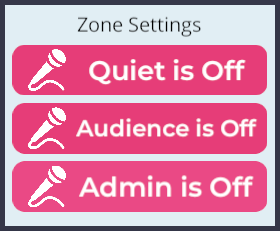
Pictured: The Crowd management panel.
Using the Crowd management panel, Moderators can permit or restrict access to voice chat, webcam streaming, and screen sharing in Presenter and Audience zones.
To locate this panel, click the Moderator controls/Key button located on the right side of the screen, and then the Crowd management button. In order to moderate Presenter and Audience zones, you will use the buttons under the Zone Settings section.
In detail, the available zone settings are:
- Quiet Mode: When turned on, Quiet Mode will mute every user who is not currently seated on a presenter seat.
- Audience Mode: When turned on, Audience Mode grants users access to all enabled communication options in that voice zone (e.g., voice chat, webcam, and screen share). Audience Mode overrides Quiet Mode, if Quiet Mode is also turned on.
- Admin Mode: When turned on, Admin Mode permits Moderators to access all enabled communication options in that voice zone (e.g., voice chat, webcam, and screen share). Admin Mode overrides Quiet Mode.
To customize a voice zone's communication settings, follow the steps below.
- Navigate your avatar to the appropriate Region.
- Position your avatar inside the voice zone that you want to customize.
- Click the Moderator tools/Key button located on the right side of the screen.
- Click the Crowd management button. In the Crowd Management panel that appears, locate the Zone Settings section.
- Click the relevant buttons to customize the voice zone.
- If a button says Quiet/Audience/Admin is On, then that communication setting is currently enabled. Click the button again to disable it.
- If the button says Quiet/Audience/Admin is Off, then that communication setting is currently disabled. Click the button again to enable it.
- Repeat this process for every voice zone you want to customize.
The most common change Moderators will make is to toggle Quiet Mode on or off in Presenter zones. This will enable the audience to use voice chat—for example, during a Q&A session.