LogoLogo
Tutorial VideosScripting DocumentationLegalHome
Breakroom
Breakroom
  • Welcome to Breakroom
  • GETTING STARTED
    • Helpful terms
    • UI tour
    • Keyboard shortcuts
    • Customizing your avatar
      • Choosing a starter avatar
      • Editing avatars in the Outfit window
      • Using the Sine Wave Shop
    • Controlling your avatar
    • Controlling your camera
    • Communicating with other users
    • Using the conference system
      • Troubleshooting audio and video issues
    • Using Breakroom for Training
    • Settings
    • Language and accessibility
    • Reporting issues
  • EXPLORING BREAKROOM
    • Region navigation tools
    • Bookmarks and teleport invites
    • Using the Explore window
    • Using the Meetings window
    • Networking with other users
      • People
      • Groups
    • Snapshots
  • BUILDING NEW WORLDS
    • Breakroom Dashboard tour
    • Creating and managing Regions
    • Default Landing and Orientation Regions
    • Region settings
    • Region template descriptions
  • CREATING CUSTOM EXPERIENCES
    • Branding tools
    • UI customization options
    • Filtering the Sine Wave Shop
    • Selecting default avatars
      • Default avatar collections
    • Using the Region Editor
      • Editing and moving objects
      • Editing terrain and sky
      • The Region Editor ADVANCED window
    • Exploring the Breakroom Toolkit
      • Breakroom Video Player
      • Breakroom Web Browser
      • Breakroom Image Viewer
      • Breakroom Info Kiosk
      • Breakroom Teleport Portal
      • Breakroom Web Collab
      • Breakroom Note Board
      • Breakroom Games
      • Breakroom Reactives
      • Breakroom Orientation Quest
      • Breakroom Tour Cameras
      • Conference rooms and booths
      • Add-on seats
      • Breakroom Start Here UI
      • Breakroom Basic Emojis
      • Breakroom 360° Video Player
    • Managing your Media Library
  • OPENING THE DOORS
    • Seats and concurrency
    • Creating and managing user accounts
      • World-level user permissions
      • Region-level user permissions
      • Single sign-on
      • Eventbrite integration
    • World Stream
      • Purchasing and managing World Credits
      • Pre-allocation campaigns
      • World Stream viewer toolbars
      • World Stream keyboard shortcuts
      • Troubleshooting World Stream issues on Chrome
      • Troubleshooting World Stream issues on macOS
    • Desktop viewers
    • Privacy Policies, EULAs, and data collection
    • Analytics
    • Toggling World availability
  • RUNNING YOUR EVENT
    • Understanding the conference system
      • Voice zones, zone types, and conference permissions
      • Voice chat and spatial audio
    • Customizing the conference system components
      • Adding breakout areas
      • Creating custom voice zones
      • Setting up Presenter and Audience zones
      • Designating triage zones
      • Troubleshooting duplicate zone errors
      • The RoomFurniture component
    • Setting up Breakroom for Training courses
    • Moderator tools
      • Broadcast messages
      • Crowd management
      • Audience questions
      • Raised hands
      • Presentation controls
      • Hidden UI toggle
      • Participation
      • Audio streams
  • TIPS FOR SUCCESS
    • Region Editor best practices
    • Onboarding new users
  • ADVANCED TUTORIALS
    • Uploading your own Region
      • Installing Unity and the Breakroom SDK
      • Reducing poly counts on CAD files
      • Uploading a Region from Unity to Breakroom
      • Creating and uploading custom chairs
      • Testing items on the preview server
      • Pushing items to the live server
      • Installing the conference system components
    • Uploading your own virtual objects
    • Uploading your own virtual clothing
    • Creating and copying avatar shapes
    • Installing the Quest System
    • Registration and grid APIs
    • Video streaming
    • Sinespace scripting documentation
  • HELP
    • Where to find support
    • Tutorial video playlists
      • Platform basics
      • Dashboard
      • Moderator tools
      • Breakroom Games
      • Creator Core
      • Breakroom for Training - Students
      • Breakroom for Training - Instructors
      • Breakroom for Training - Dashboard and Backend
    • Account management
    • System requirements
    • Troubleshooting network ports and firewalls
  • RELEASE NOTES
    • Breakroom SDK
    • Breakroom Viewer
    • Breakroom Dashboard
Powered by GitBook

©2008-2024 Sine Wave Entertainment Ltd. All Rights Reserved.

On this page
  • Overview
  • Starting a new scene in Unity
  • Editing the Virtual Good component
  • 1. Provide basic item information
  • 2. Edit the Inworld Customization setting
  • 3. Edit the Pricing information
  • 4. Edit the Author information
  • 5. Add your grid number
  • 6. The Scene Save Settings component
  • Video tutorial
Export as PDF
  1. ADVANCED TUTORIALS
  2. Uploading your own Region

Uploading a Region from Unity to Breakroom

By combining Unity with Breakroom, you can unlock almost limitless creative potential. Learn how to upload a custom Region to Breakroom with just a few steps.

PreviousReducing poly counts on CAD filesNextCreating and uploading custom chairs

Last updated 2 months ago

Overview

After you've created a Region or other 3D model, only a few additional steps are required to upload it to Breakroom. Please note that the instructions below presume a basic working knowledge of Unity, and that you must have Unity and the Breakroom SDK.

Only can upload custom items to Breakroom.

The instructions provided in this section presume an advanced working knowledge of Breakroom, virtual assets, and third-party 3D software.

Starting a new scene in Unity

In Unity, click on the File menu, and then click New Sinespace Scene. This will add the necessary components to a new scene to begin your Region upload.

When you create a standard Unity scene, it will include a Main Camera and a Directional Light. A new Sinespace scene creates a specific setup for use in Breakroom, and includes some additional elements:

  • Landmark: This controls where your users will land when they teleport to the Region.

  • Sun: This is a renamed Directional Light.

  • Cube: This is a simple floor. This would normally be replaced by your Region's models and designs.

  • Scene Export Settings: This contains specific information that you will need to edit. This is covered in more detail below.

  • Post Processing Settings: You will normally not need to make changes to these settings.

Throughout this document, the default cube pictured is representative of a scene. Remember that normally, this cube will be replaced by your own custom models.

Editing the Virtual Good component

In order to upload your Region, you'll need to make some changes to the Virtual Good component. To begin, click on the Scene Export Settings component in the Hierarchy. In the Inspector panel, you will see the Virtual Good component.

From here, you'll need to navigate through the Virtual Good component tabs and edit their contents to complete setup of your Region. Here are the key steps you'll need to take.

1. Provide basic item information

Under the Basic tab, you must:

  1. Specify the item type and category (e.g. Region) using the Type drop-down menu and Category search field.

  2. Enter a name for the Region in the Name field.

  3. Enter a description in the Description field.

  4. And finally, enter a brand name in the Brand field. If you don't have an in-world brand, this would normally be your company name.

2. Edit the Inworld Customization setting

After you're done editing the Basic tab, click on the Detail tab. The settings located under this tab are optional, and usually left in their default state. The sole exception is the Inworld Customization setting, which is highlighted in the image above. Using the drop-down menu, set this to Full.

3. Edit the Pricing information

Next, click the Pricing tab and check the box beside the "Not for Sale" option.

4. Edit the Author information

Click the Author tab, and then enter the relevant information for your upload. If in doubt, leave the Unique Status drop-down menu set to Available Elsewhere, enter your name into the Developer Name field, and set the Copyright field to your company name.

5. Add your grid number

Under the Upload tab, add your grid number to the Grid field. You can obtain your grid ID from multiple places.

Finding your grid ID on Dashboard

  1. Look in the top left corner of the screen. You will see your World name followed by an ID number. This ID number is your grid ID.

Finding your grid ID on Curator

  1. Click either your account name or the Advanced button located at the top of the page. This will take you to Curator.

  2. In the Curator window that opens, click the Grids heading.

  3. Locate the grid card for your World. Your grid ID will be displayed next to the World name.

6. The Scene Save Settings component

While still in the Upload tab, locate the Scene Save Settings component. Here you will need to add two images. One will be your Region-specific "splash screen," and the smaller one will be your logo.

Logo: The image should be 512x256, PNG format preferred, and no larger than 5MB.

Once you have uploaded these images, click on the Automatic Submission button to complete your upload.

Video tutorial

The tutorial below is designed for Sinespace, but the advice is consistent with Breakroom.

You can skip the Icons tab, as this tab is only used if you intend to your Region as a product in the .

Navigate to your.

Navigate to your .

Splash screen: This image will appear in the , and when users are teleporting to your Region. It should be 1920x1080, PNG format preferred, and no larger than 5MB.

sell
Sine Wave Shop
Dashboard
Dashboard
Explore window
installed on your computer
World Owners, World Administrators, and World Developers
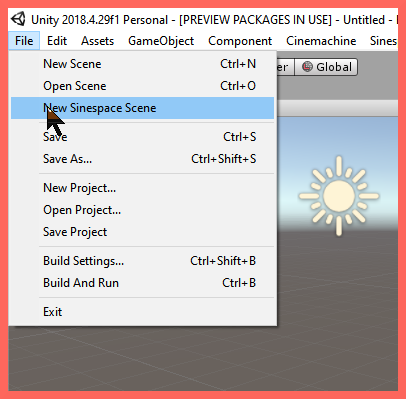
Pictured: The location of File > New Sinespace Scene.
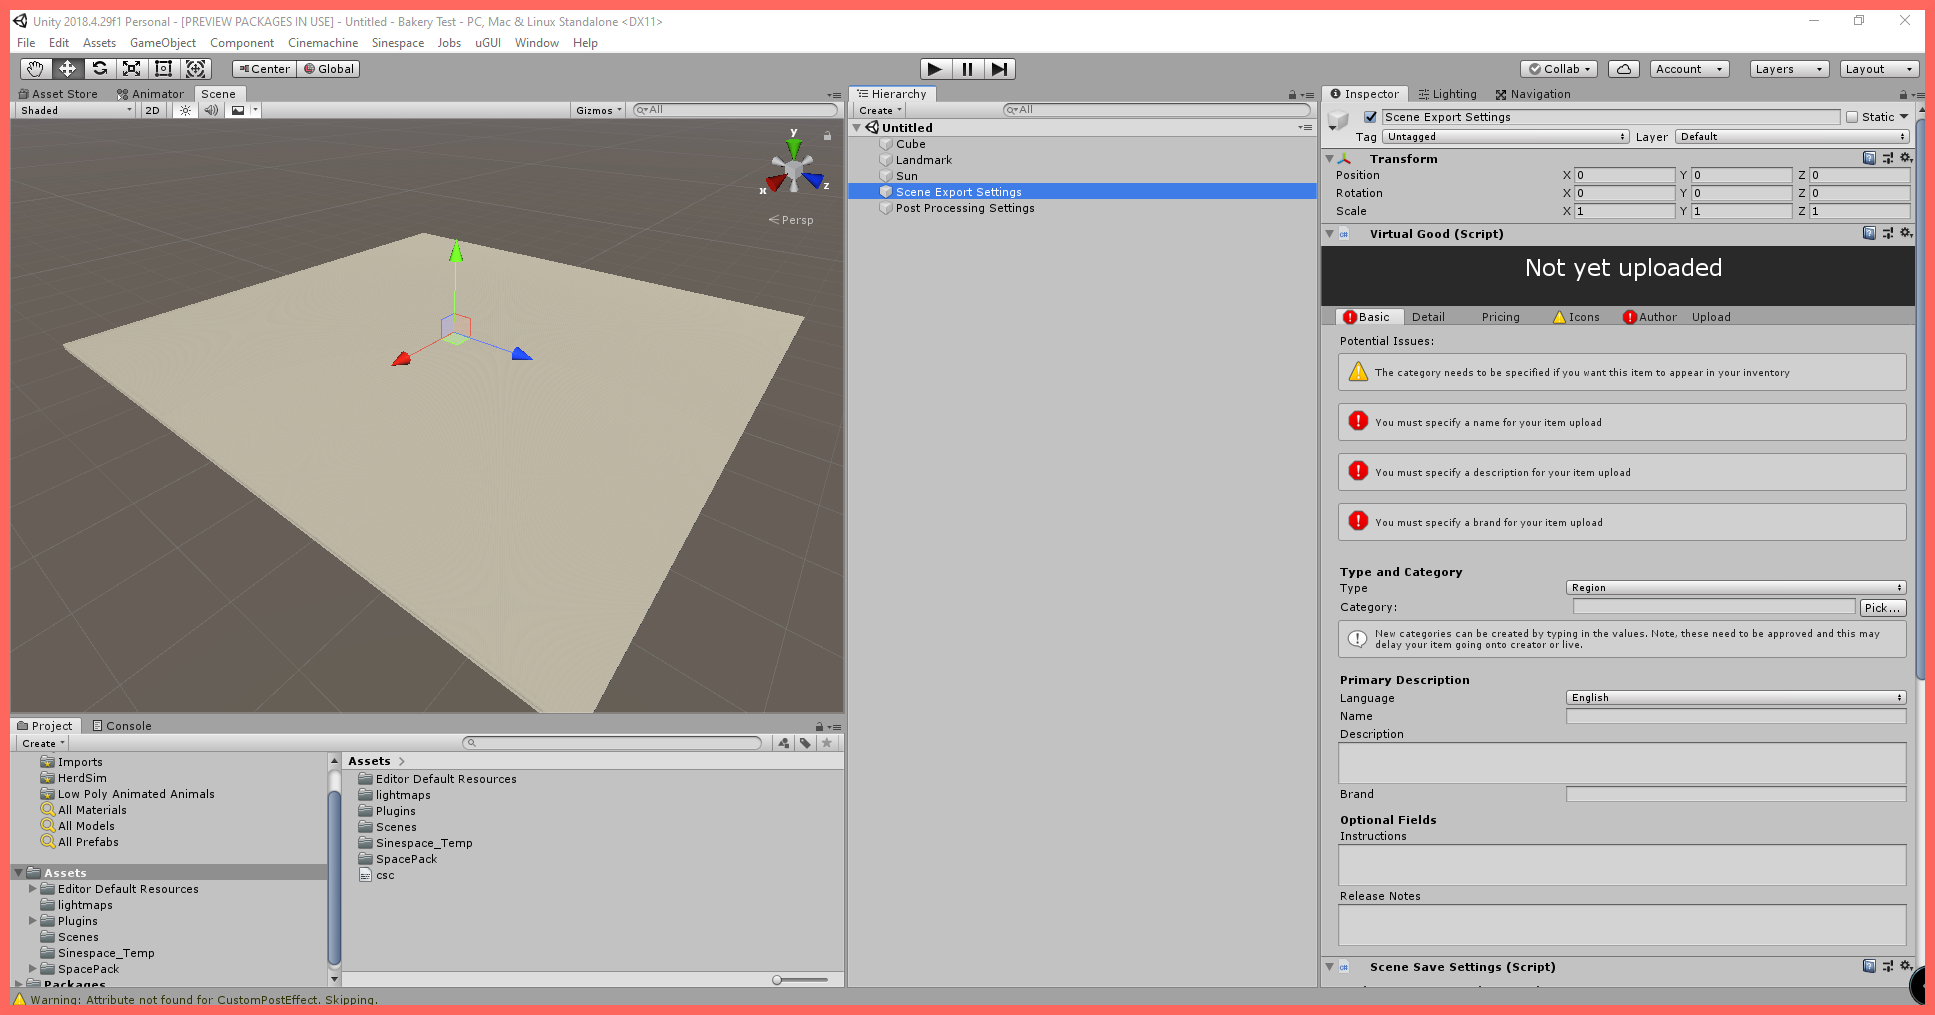
Pictured: How Unity may appear during the process described above, with the example cube. Note the Virtual Good component in the Hierarchy.
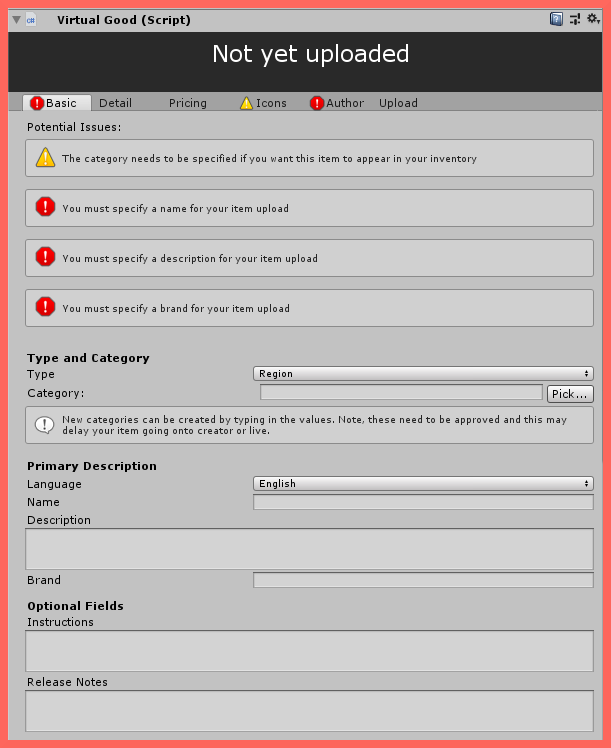
Pictured: The Virtual Good component > Basic tab, featuring a number of information fields.
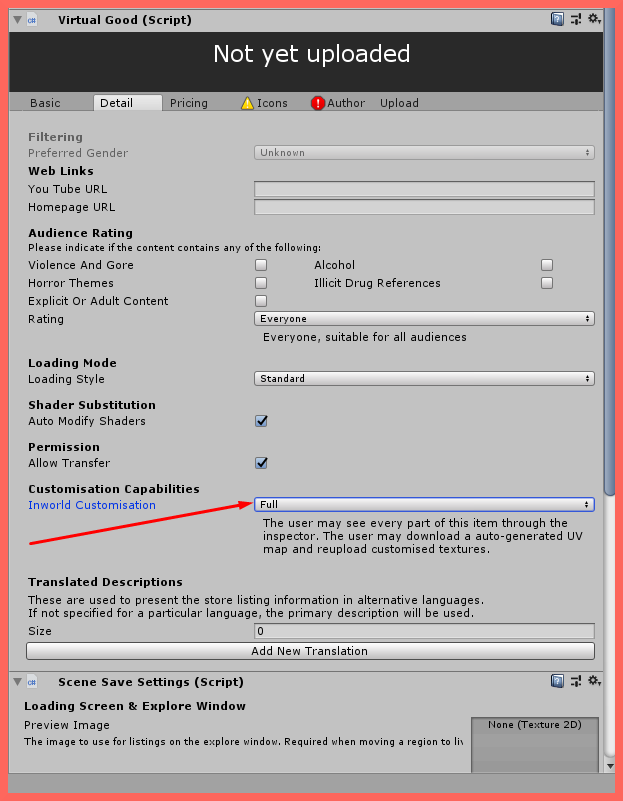
Pictured: The Virtual Good component > Detail tab.
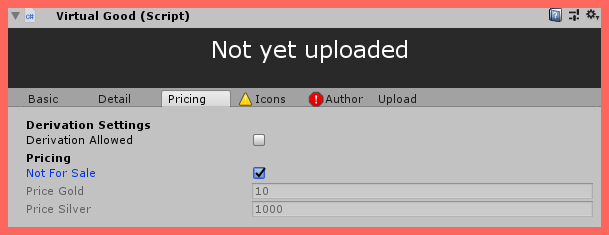
Pictured: The Virtual Good component > Pricing tab.
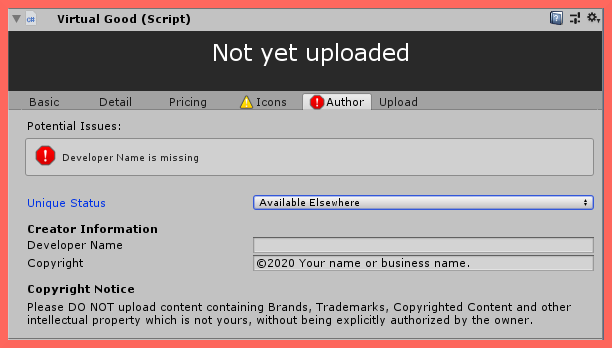
Pictured: The Virtual Good component > Author tab.
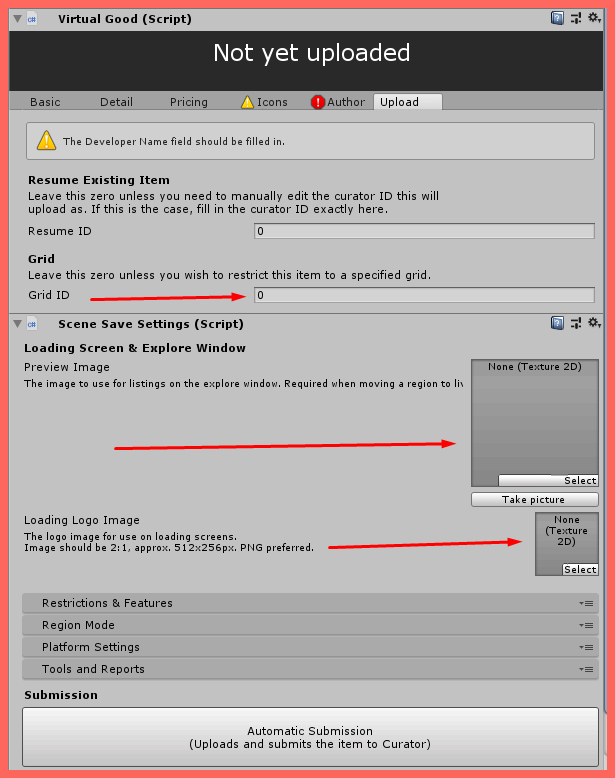
Pictured: The Virtual Good component > Upload tab, with relevant settings highlighted.