Syllabuses
Overview
Within the Breakroom for Training system, a syllabus is broadly considered to be an "activity" like waivers and quizzes. However, syllabuses can draw upon those other activities as part of a larger program of instruction, allowing stakeholders to create standardized, semi-automated content modules. These modules can include on-screen annotations and other messages, timers, camera effects, media cues, the execution of custom Lua scripts, and more.
Student-led vs. Instructor-led courses
A syllabus can be designated as student-led or Instructor-led. These can be considered synonymous with “single user” and “multi-user," as in:
- A student-led syllabus is controlled by and only impacts the user running it.
- An instructor-led syllabus is controlled by anyone logged in as an Instructor, while everyone else is a passive participant. Any actions executed by Instructor-led syllabus will impact all users in the Region.
By default, Breakroom for Training's educational products are designed to be administered by a live Instructor. Once you've created a student-led syllabus on the Dashboard, you'll need to edit the Breakroom LMS Core RoomFurniture component to make it accessible to students.
Key features
The purpose of a syllabus is to create a structured, guided way for students to experience the course content, and offers the following key features:
- Consistency: Regardless of who takes the course, or who teaches it, the content and lesson plan remain the same for each student.
- Onboarding: Syllabuses simplify onboarding of new Instructors and students to the platform. An Instructor who is competent with the material being presented can quickly guide students through the course using the syllabus widget.
- Completion: Tracking who has finished a syllabus to the end allows stakeholders to evaluate student progress and see whether they have completed the required materials.
- Resiliency: Instructors have the ability to resume classes from any point if the material cannot be completed in a single session. Student-led courses automatically pick up where the student left off if they need to step away.
Building a syllabus
Building a syllabus on the Breakroom for Training system is a multi-step process. In the following sections, we will begin by exploring the Dashboard interface and its related control panels, breaking down the creation of syllabus steps and actions in clear terms. We will then create a simple custom syllabus as a tutorial example.
Dashboard interface tour
Adding a syllabus
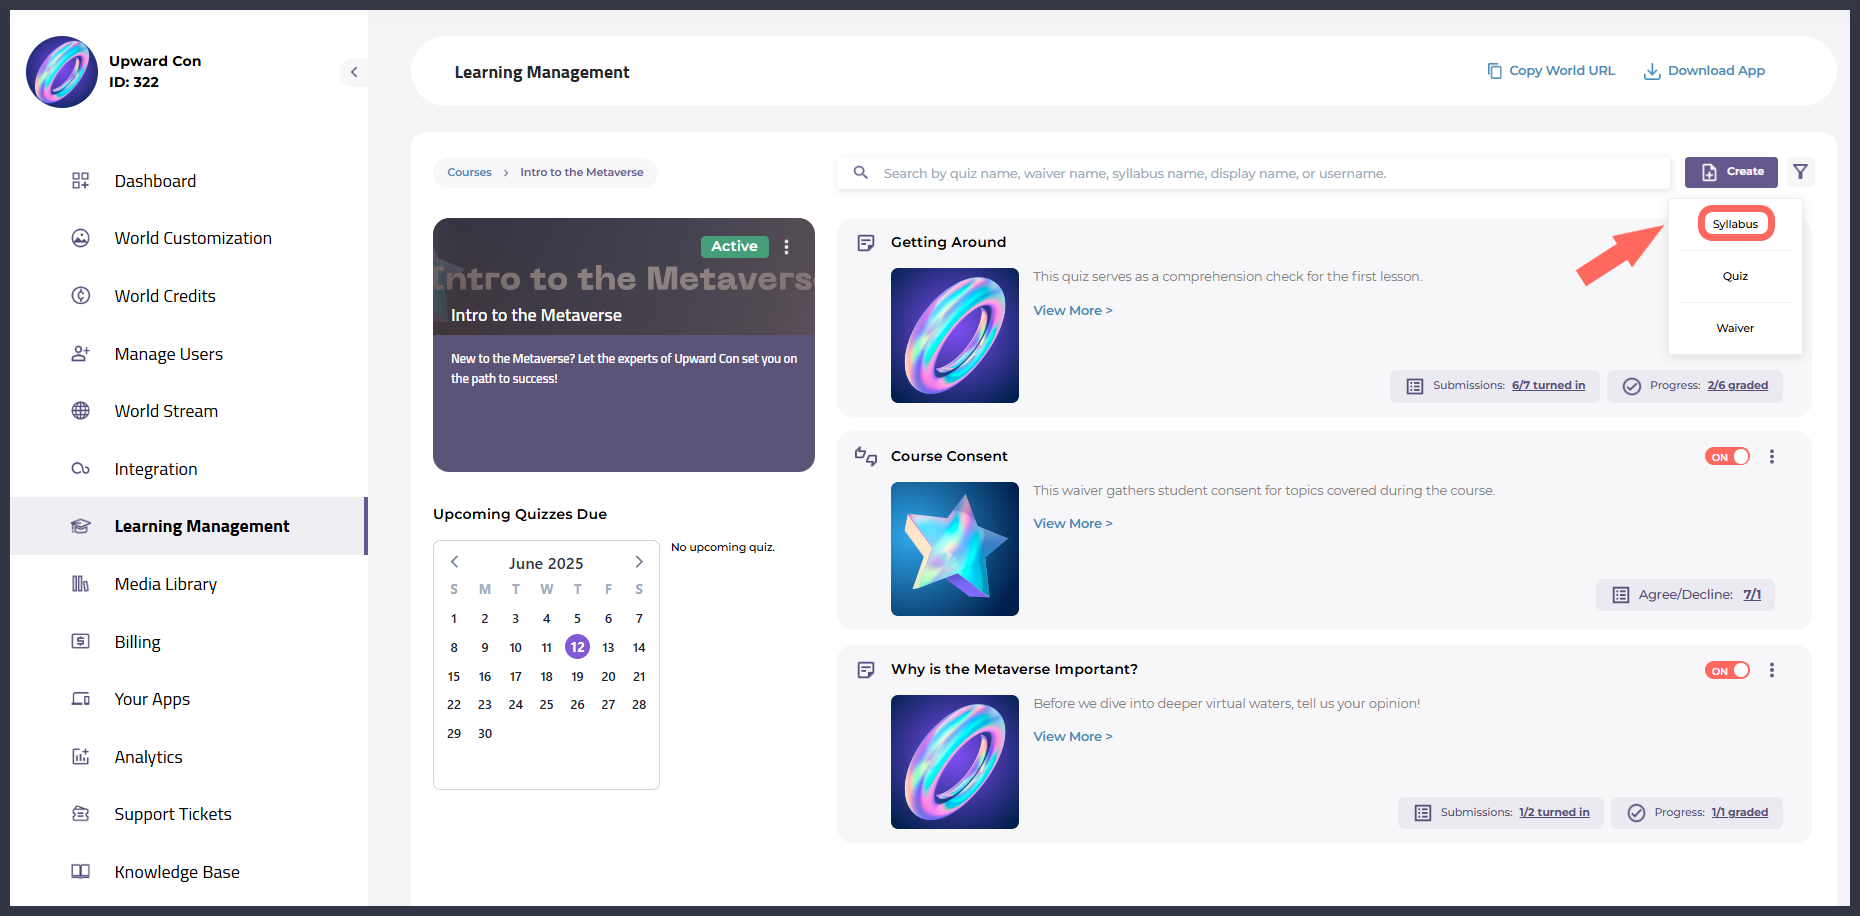
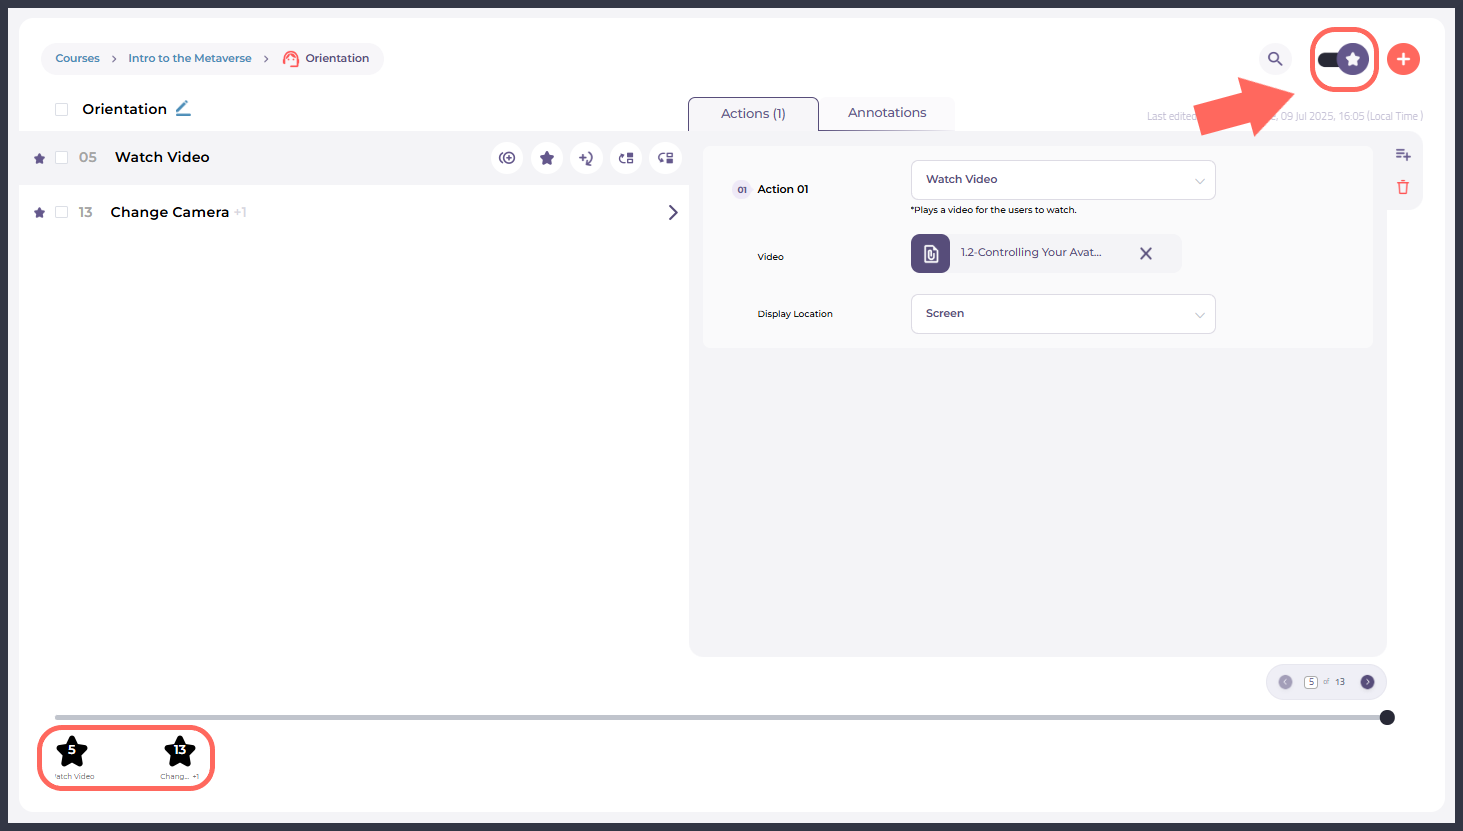
Highlighted: The location of the Syllabus button.
Only World Owners and World Administrators can access the Dashboard.
Breakroom for Training course content is created and managed through the Dashboard. To add a syllabus to any of your existing courses, follow these steps.
- Navigate to your Dashboard.
- Click on the Learning Management tab, then click on the course you would like to edit.
- Click the Create button in the top right corner, and select Syllabus from the drop-down menu.
- Enter a name and description for your syllabus.
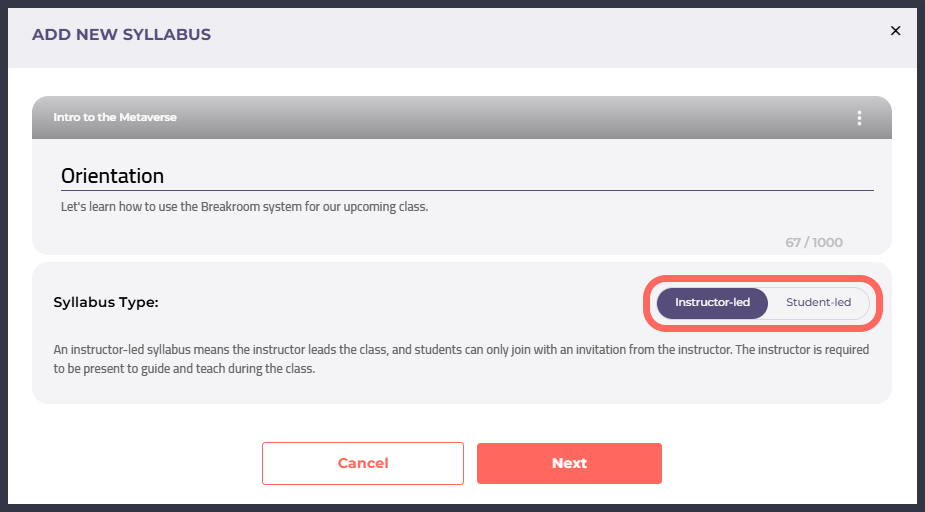
Highlighted: The Syllabus Type toggle.
- Click the Syllabus Type toggle to indicate whether you would like the syllabus to be Instructor-led or student-led.
- If you like, you can change the syllabus header by following these steps:
- Click the vertical ellipses icon in the upper right corner, and then click Upload Background Image.
- Click the Upload Image button to add an image to launch a standard file selection window on your computer. Select the image you want to use, and click Okay.
- Alternately, click the "Select from Our Course Image Templates" link to choose a basic color or generic image.
- When you are satisfied with your changes, click the Next button.
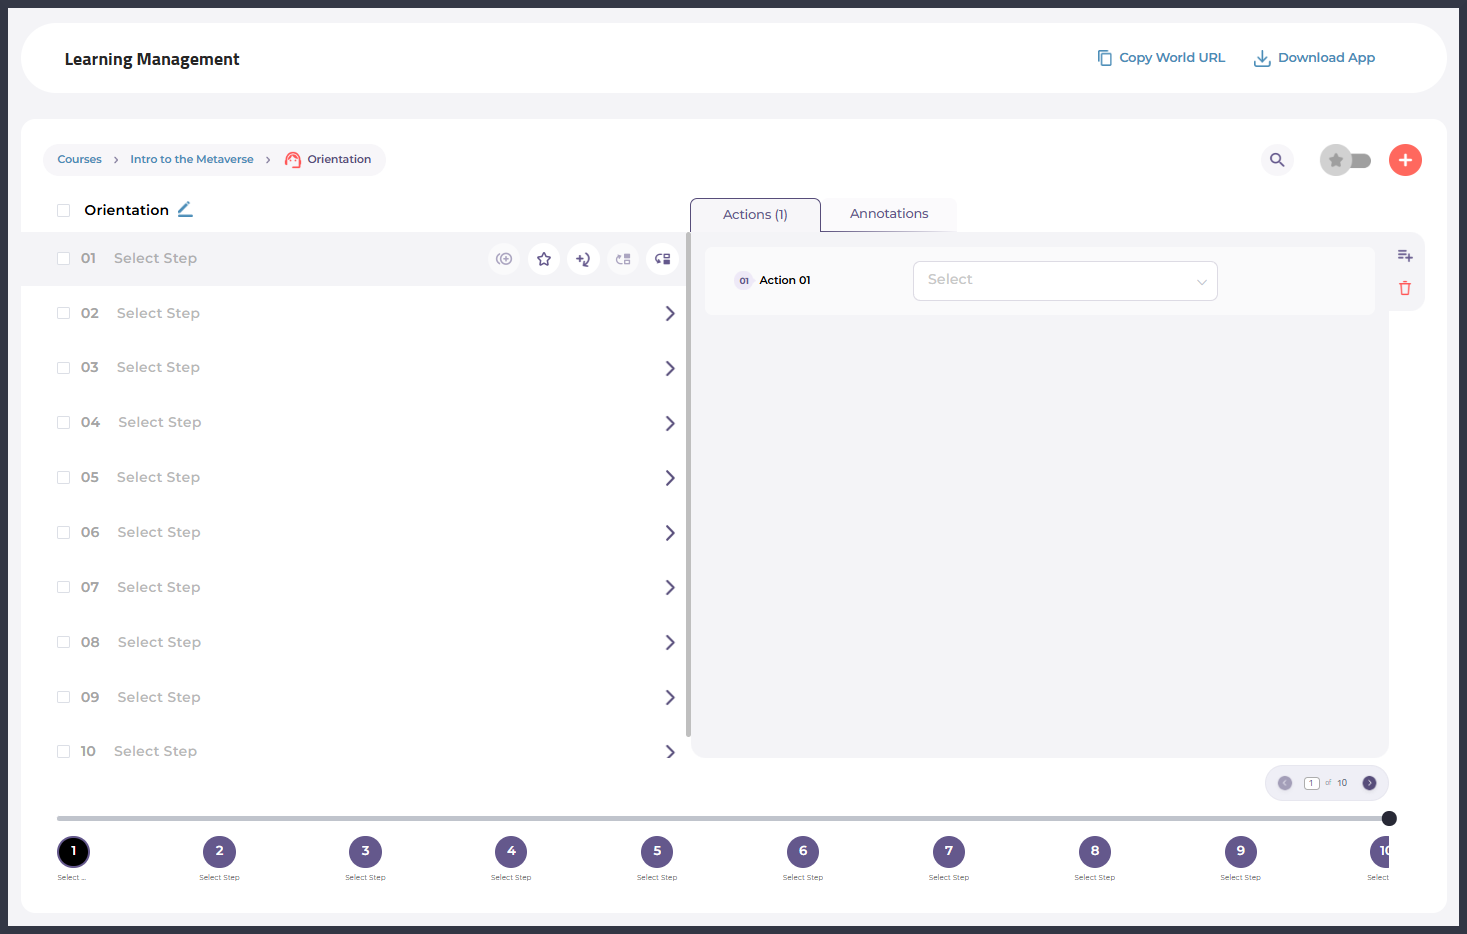
Pictured: The Syllabus editing panel.
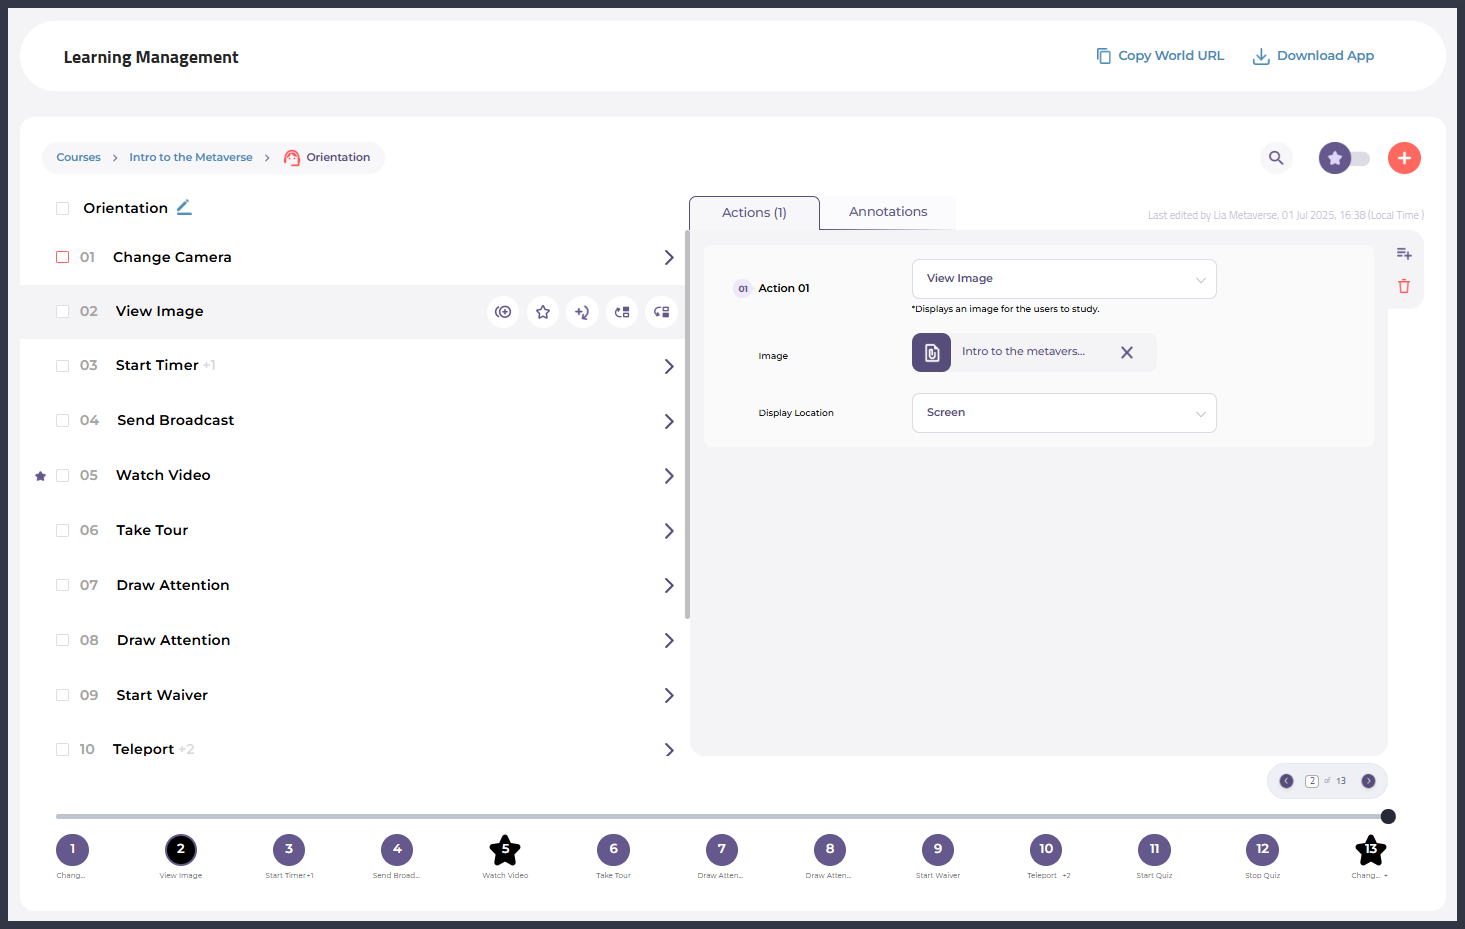
Once your syllabus is created, you'll be directed to the Syllabus editing panel. Here you will see Steps on the left, and Actions and Annotations for each step on the right. We will review these features in more detail in the following sections.
Editing a syllabus
Highlighted: The location of the syllabus editing functions.
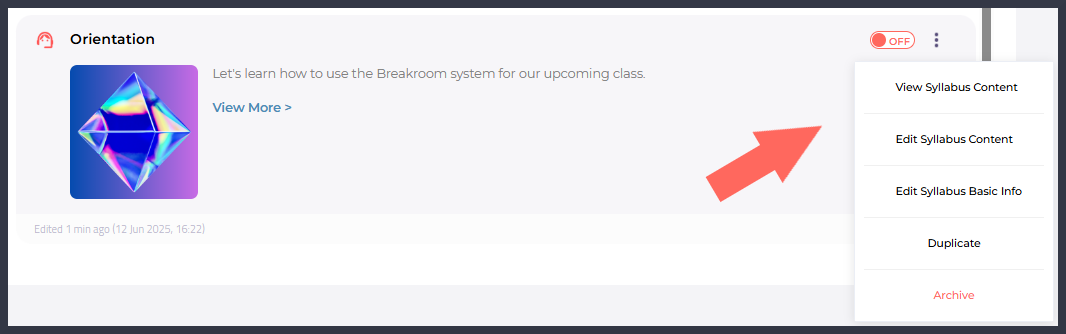
Similar to a waiver or quiz, creating a syllabus will add a syllabus card to the main course screen. In the top right corner of each syllabus card, you'll see a vertical ellipses icon. Clicking on this will open a menu containing editing functions. Here's an overview of the associated UI.
| Button or function | Purpose |
|---|---|
| On / Off toggle | Activates or deactivates the syllabus. |
| View Syllabus Content | Allows you to view basic syllabus settings without changing them. |
| Edit Syllabus Content | Allows you to make changes to the syllabus, including adding or deleting steps and actions. |
| Edit Syllabus Basic Info | Allows you to edit basic syllabus information such as name, description, and type. |
| Duplicate | Creates a copy of the syllabus in the same course. |
| Archive | Archives the syllabus without deleting it. |
Archiving a syllabus
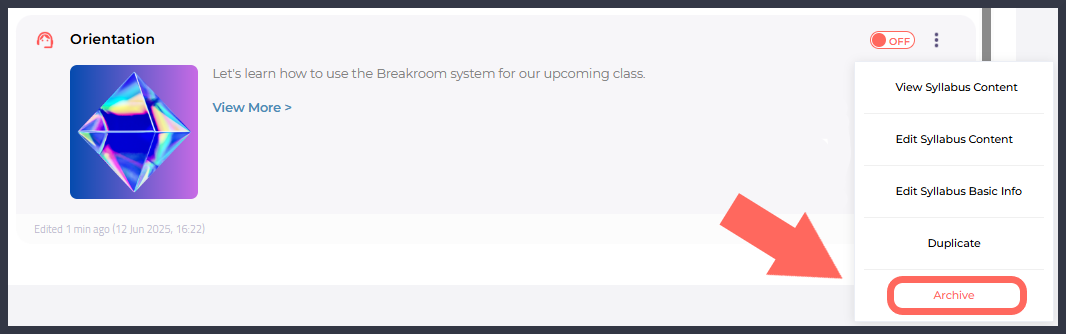
Highlighted: The location of the Archive button.
Syllabuses can be archived, which deactivates them and prevents their contents from being edited. This preserves their contents for future use.
To archive a syllabus, follow these steps.
- Navigate to your Dashboard.
- Click on the Learning Management tab, then click on the course you want to edit.
- Click the vertical ellipses icon in the relevant syllabus card, and select Archive from the menu that appears.
To locate an archived syllabus and make it accessible again, follow these steps.
- Navigate to your Dashboard.
- Click on the Learning Management tab, then click on the course you want to edit.
- Click the Filter button in the top right corner. In the menu that appears, check the Archived List option. This will reveal all of your archived materials.
- Locate the syllabus you want to unarchive. You can use the search field to streamline this process. Click the vertical ellipses icon in the card, and select Unarchive in the menu that appears.
- To display all of your active and inactive course materials, click the Filter button again and check the box beside the Show All option.
When course materials are unarchived, they are deactivated. To activate a syllabus, click the On / Off toggle in the upper right corner of the material card.
Steps and actions
When editing and executing a syllabus, everything revolves around steps. A syllabus contains one or more steps that must be completed to finish the syllabus. The current limit for this is 150 maximum steps.
Each step also contains actions. A step will have at least one action associated with it, but can have more actions if desired. The current limit is 10 actions per step. All actions execute on each step in the order they are arranged on the Dashboard.
Steps can also include annotations. Annotations consist of information that is displayed on-screen, and can be any combination of text, an image, and a link that opens in an external browser tab. There are separate annotations available for students and Instructors. Instructors can see student annotations if present, but students will never see Instructor annotations.
Action types
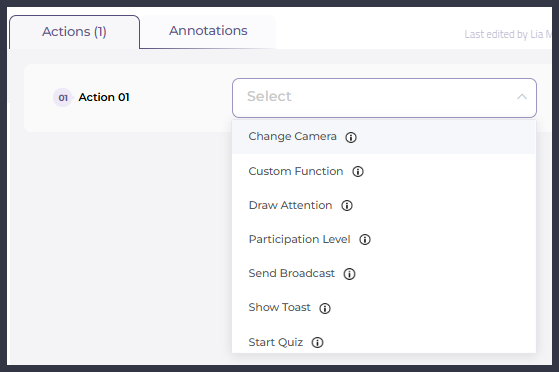
Pictured: The Action drop-down menu.
All actions execute on each step in the order they are arranged on the Dashboard. Annotations are displayed alongside the first action listed under any given step, and will not be dismissed until the next step is triggered.
The following actions are possible for any given step. Please note that some of these actions require advanced working knowledge of Breakroom customization, including custom scripting.
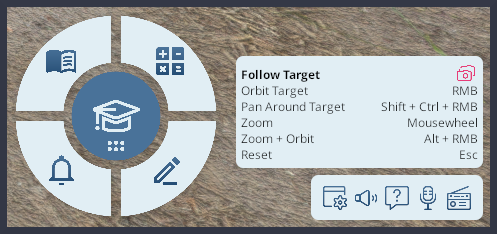
Change Camera
If the user is seated in a Region that contains a camera system, this action will automatically adjust their camera view as if they had pressed the corresponding button. Users can change it back at any time, as the camera is not locked to this view.
Fields and options
- Camera Perspective: Choose from Behind, Forward, Speaker, Screen, Audience, and Free Look
Custom Function
This action executes a custom Lua function in the Region. This requires that the course designer has placed their own Lua script in the Region with a registered Space.Shared function call that matches the supplied parameters. A Lua script in the Region can do anything the Breakroom SDK allows. Altering UIs, changing the environment and lighting, adding new objects, moving objects around, playing games, animating models or custom camera views, etc.
Fields and options
- Channel: The channel parameter provided to Space.Shared.CallBroadcastFunction.
- Command: The command parameter provided to Space.Shared.CalBroadcastFunction.
- Parameters (Optional): Any extra info to pass to the Space.Share.CallBroadcastFunction call. This can be simple strings, or anything up to including encoded JSON information.
- Along with the above information, the Lua script will receive a variety of metadata including:
- Whether the syllabus is Instructor-led
- The ID of the syllabus that called it
- The ID of the course that called it
- The current step number
- A force parameter that translates to “override the ‘already done’ parameter”
- An already done parameter which indicates if this step is being repeated (i.e., perhaps you don’t want to do a repeated step exactly the same as you did the first time)
- Whether the current user is in control of the syllabus (i.e., the Instructor in an Instructor-led course, versus being a student)
Draw Attention
This action visually indicates a UI button to call student attention to it. This can be useful for orientation periods at the beginning of a class, or to remind students during Q&A periods about the location of the Raise Hand and Question buttons.
Fields and options
- UI Element: Choose from Microphone, Webcam, Screenshare, Troubleshooting, Ask Question, Emojis, or Raise Hand
Participation Level
Changes the voice chat and audience participation settings on the current voice zone occupied by the person controlling the syllabus. These zone settings are persistent, so they will remain in the last setting chosen until they are changed through the Moderator tools crowd manager interface or a subsequent syllabus step.
Fields and options
| Permission setting | Result |
|---|---|
| Quiet | Enables Quiet Mode, disables Audience Mode. Only those seated in presenter seats can access voice chat. |
| Voice Only | Disables Quiet Mode, disables Audience Mode. Voice chat is available to every user located in the voice zone. |
| Full | Disables Quiet Mode, enables Audience Mode. Grants users access to all enabled communication options in that voice zone (e.g., voice chat, webcam, and screen share). |
Send Broadcast
Sends a broadcast message through the standard Moderator tools messaging feature. The message will be sent as if originating from the primary controller of the syllabus (such as the Instructor).
Fields and options
- Broadcast Message: Whatever you want the message to say.
Show Toast
Displays a temporary popup message on the screen that fades away after a few seconds.
Fields and options
- Target Audience: Choose from User or Everyone. Everyone is only available in Instructor-led courses.
- Toast Message: Whatever you want the message to say.
Start Quiz
Starts a quiz. The quiz must be part of the same course as the syllabus itself.
Fields and options
- Quiz Name: Select from active quizzes in the same course.
- Question Selection: Select “All,” or alternatively, select one or more individual questions. Quizzes can be given in whole or in parts, with the expectation that the other quiz questions will be answered later in the syllabus.
Stop Quiz
Cancels a quiz. Any late joiners to the class will not be presented with the quiz. It is recommended that you stop quizzes past the point at which it makes sense to allow students to continue working on them.
Fields and options
- Quiz Name: Select from active quizzes in the same course. Will do nothing if you didn't begin the quiz on a previous step.
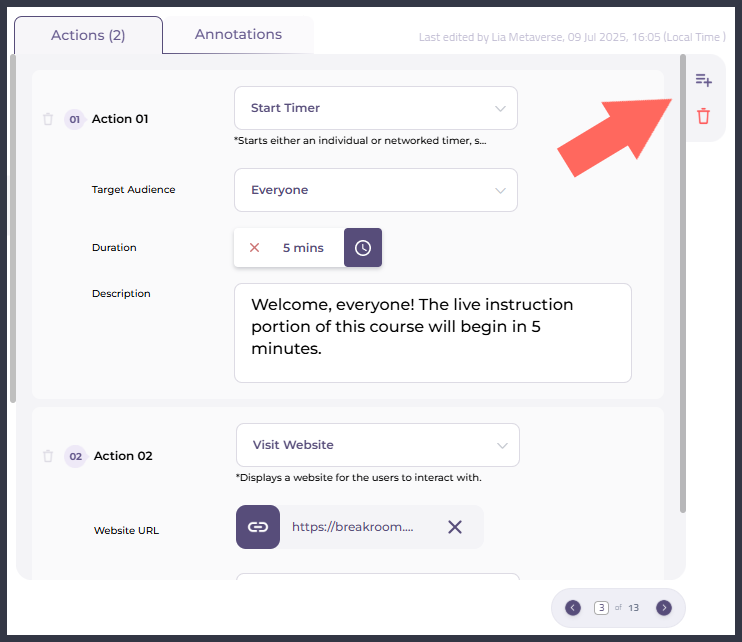
Start Timer
Starts a countdown timer that will be visible on screen.
Fields and options
- Target Audience: Choose from User or Everyone. Everyone is only available in Instructor-led courses.
- Duration: How long the timer runs down, in hours and minutes.
- Description: An indication of what the timer is counting down. Will be displayed as a tooltip when users hover their mouse over the timer.
Start Waiver
Starts a waiver. The waiver must be part of the same course as the syllabus itself.
Fields and options
- Waiver Name: Select from active waivers in the same course.
Take Tour
If a Breakroom Tour Camera exists in the Region, this action will trigger the tour as if the Take Tour button normally found on the Start Here panel has been clicked. This works even if the Start Here panel is not present in the Region.
Fields and options
- No parameters required.
- Students can stop the tour at any time by pressing the Esc key on their keyboard.
Teleport
Teleports users to a different location within the Region. This uses the Crowd Manager controls built into the Moderator tools, and operates along the same principles.
Fields and options
- Target Audience: Choose from User or Everyone. Everyone is only available in Instructor-led courses.
- Location: Choose from common locations such as the Auditorium, or from custom locations by picking Other. Other locations can be any valid Breakroom voice zone or teleport target. If the target shows up under the Crowd Manager in the Moderator controls, then it can also be a location here. This includes multi-zone landmarks that scatter the students among multiple locations if desired.
View Image
Displays an uploaded image in a specified location. Images can be uploaded in advance through the Media Library on the Dashboard, or uploaded directly through this step.
Fields and options
- Image: Select or upload the image to display.
- Display Location:
- Presentation: Displays the image on the main screen in the voice zone. This is the same screen that displays webcams and screenshares. The image will appear as another window alongside these, as if someone were sharing it. The display may appear 2D or 3D depending on whether the user has clicked the Screen Appearance button on the conference system controls.
- Screen: Displays in a separate 2D window on the user's screen as part of an LMS Media window that appears when needed. This screen can be repositioned by the user.
- Placed: Indicates that the image was placed in the scene through some other means, such as a Breakroom Image Viewer item.
Visit Website
Displays or opens a website URL in the specified location.
Fields and options
- Website URL: The website you wish the students to read / view.
- Display Location:
- Screen: Displays in a separate 2D window on the user's screen as part of an LMS Media window that appears when needed. This screen can be repositioned by the user.
- Placed: Indicates that the website is visible on a Breakroom Web Browser item already placed separately in the Region.
- External: Opens the website URL in an external browser tab.
Watch Video
Plays an uploaded video in a specified location. Videos can be uploaded in advance through the Media Library on the Dashboard, or uploaded directly through this step.
Fields and options
- Video: Select or upload a video. Should be in MP4 format for best results.
- Display Location:
- Presentation: Displays the image on the main screen in the voice zone. This is the same screen that displays webcams and screenshares. The image will appear as another window alongside these, as if someone were sharing it. The display may appear 2D or 3D depending on whether the user has clicked the Screen Appearance button on the conference system controls.
- Screen: Displays in a separate 2D window on the user's screen as part of an LMS Media window that appears when needed. This screen can be repositioned by the user.
- Placed: Indicates that the image was placed in the scene through some other means, such as a Breakroom Video Player item.
Building a syllabus on the Dashboard
Pictured: The Syllabus editing panel.
The following sections offer guidance for creating a syllabus and executing it in a Region. For this example, we will create a 13-step syllabus that begins with a bonus "setup" step, and ends with students seated to watch a video.
As a first point of syllabus design, it's important to recognize that steps must be manually executed by the student or Instructor, while all actions associated with a step will deploy at once. It may be helpful to envision steps as concrete events that you want to trigger with a click, or as events you want to pause on for thematic or instructional purposes. This can help you decide how many actions to group under a single step.
For maximum impact, each step should be designed around a singular primary goal. For example:
- "I want users to watch this video"
- "I want users to take this quiz"
- "I want users to read this annotation"
The primary goal should be supported by any additional, secondary actions on the step. E.g., "I want users to watch this video (primary goal), therefore their camera angle needs to change (secondary action)."
Multiple primary goals will confuse users, e.g., "I want them to watch this video and take a quiz at the same time." This setup isn't practical and will offer a poor user experience.
In the image above, you can see that our tutorial syllabus consists of thirteen steps, and that each step consists of one or more actions and annotations. We will now explore how to add, edit, and manage steps through the Dashboard, before conducting a walkthrough of the tutorial syllabus as an Instructor.
Adding steps

Highlighted: The Add Step button.
To add a new step to a syllabus, follow the instructions below.
- Navigate to your Dashboard.
- Click on the Learning Management tab, then click on the course you want to edit.
- Click the vertical ellipses icon in the relevant syllabus card, and select Edit Syllabus Content from the menu that appears.
- Click the orange Add Step button located in the upper right corner.
When a new step is created using this method, it will be unlabeled and appear at the bottom of the step list (as the last step to be executed). It will take on the name of the first action you add to the step.

Highlighted: The Add Step Below button.
Alternatively, you can add a step below any existing step by following these instructions.
- Navigate to your Dashboard.
- Click on the Learning Management tab, then click on the course you want to edit.
- Click the vertical ellipses icon in the relevant syllabus card, and select Edit Syllabus Content from the menu that appears.
- Locate the existing step you want to create a new step beneath, and click the Add Step Below button.
When a new step is created using this method, it will be unlabeled and appear beneath the originating step. It will take on the name of the first action you add to the step.
Deleting steps
Highlighted: The location of the Add Action and Delete Step buttons.
To delete a step from a syllabus, follow the instructions below.
- Navigate to your Dashboard.
- Click on the Learning Management tab, then click on the course you want to edit.
- Click the vertical ellipses icon in the relevant syllabus card, and select Edit Syllabus Content from the menu that appears.
- Locate the step you want to delete in the step list, and click on it.
- In the Actions panel, click the Delete Step button.
Duplicating steps

Highlighted: The Duplicate button.
To duplicate an existing step, follow the instructions below.
- Navigate to your Dashboard.
- Click on the Learning Management tab, then click on the course you want to edit.
- Click the vertical ellipses icon in the relevant syllabus card, and select Edit Syllabus Content from the menu that appears.
- Locate the existing step you want to duplicate, and click the Duplicate button.
The new step will be a perfect duplicate, including any associated annotations. It will appear in the step list beneath the original step.
Bookmarking steps
Bookmarking steps allows you to easily identify and review them. This can be useful for a number of applications. For example, you might:
- Bookmark all media steps of the same kind (e.g., all videos) in order to replace files when necessary.
- Bookmark the beginning of each content section in order to streamline course editing.
- Bookmark steps that are still being designed or edited for improved accessibility.

Highlighted: The Bookmark button.
To bookmark a step, follow the instructions below.
- Navigate to your Dashboard.
- Click on the Learning Management tab, then click on the course you want to edit.
- Click the vertical ellipses icon in the relevant syllabus card, and select Edit Syllabus Content from the menu that appears.
- Locate the existing step you want to bookmark, and click the Bookmark button.
Highlighted: The Show Bookmarked Steps Only toggle.
Notice that it has been toggled on, and that only steps 5 and 13 are displayed in the step list.
Once bookmarked, a purple star will appear to the left of the numbered step on the Dashboard. In order to display only bookmarked steps in the step list, click the Show Bookmarked Steps Only toggle.
Bookmarking a step has no impact on how it executes in-world.
Reordering steps

Highlighted: The Move Up and Move Down buttons.
To reorder existing steps within the step list, follow the instructions below.
- Navigate to your Dashboard.
- Click on the Learning Management tab, then click on the course you want to edit.
- Click the vertical ellipses icon in the relevant syllabus card, and select Edit Syllabus Content from the menu that appears.
- Locate the existing step you want to reorder, and click the Move Up and Move Down buttons until the step appears at the correct point in the list.
You can also drag and drop steps to reorder them in the list.
Bulk editing steps
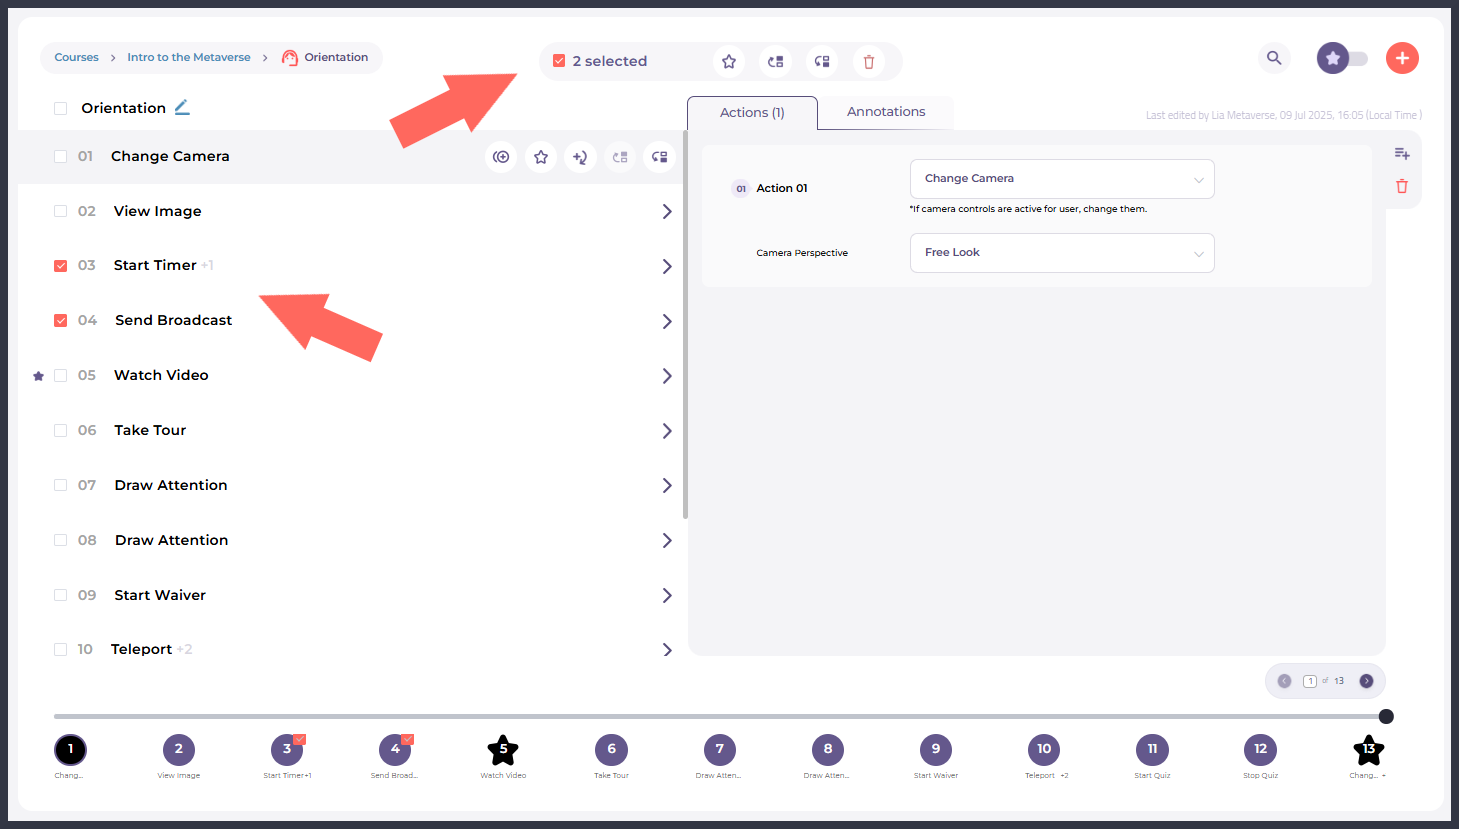
Highlighted: Multiple steps selected in the step list, and the location of the bulk editing controls.
You can also edit steps using the bulk editing controls. This interface allows you to:
- Bookmark more than one step at a time
- Reorder groups of steps within the list, while preserving their internal order
- Delete multiple steps at once
To bulk edit steps, follow the instructions below.
- Navigate to your Dashboard.
- Click on the Learning Management tab, then click on the course you want to edit.
- Click the vertical ellipses icon in the relevant syllabus card, and select Edit Syllabus Content from the menu that appears.
- Locate the steps you want to edit, and check the box located to the left of each step.

Pictured: The bulk editing controls.
- The bulk editing controls will appear at the top of the syllabus editing panel. Here, you can:
- Bookmark the steps
- Move the group of steps up one level
- Move the group of steps down one level
- Delete the selected steps
Adding actions to a step
Highlighted: The location of the Add Action and Delete Step buttons.
To add an action to a step, follow the instructions below.
- Navigate to your Dashboard.
- Click on the Learning Management tab, then click on the course you want to edit.
- Click the vertical ellipses icon in the relevant syllabus card, and select Edit Syllabus Content from the menu that appears.
- Locate the step you want to edit in the step list, and click on it.
- In the Actions panel, click the Add Action icon.
Deleting actions from a step

Highlighted: The Delete Action button.
To delete an action from a step, follow the instructions below.
- Navigate to your Dashboard.
- Click on the Learning Management tab, then click on the course you want to edit.
- Click the vertical ellipses icon in the relevant syllabus card, and select Edit Syllabus Content from the menu that appears.
- Locate the step you want to edit in the step list, and click on it.
- In the Actions panel, identify the action you want to delete and click the Delete Action icon associated with it.
Adding annotations to a step
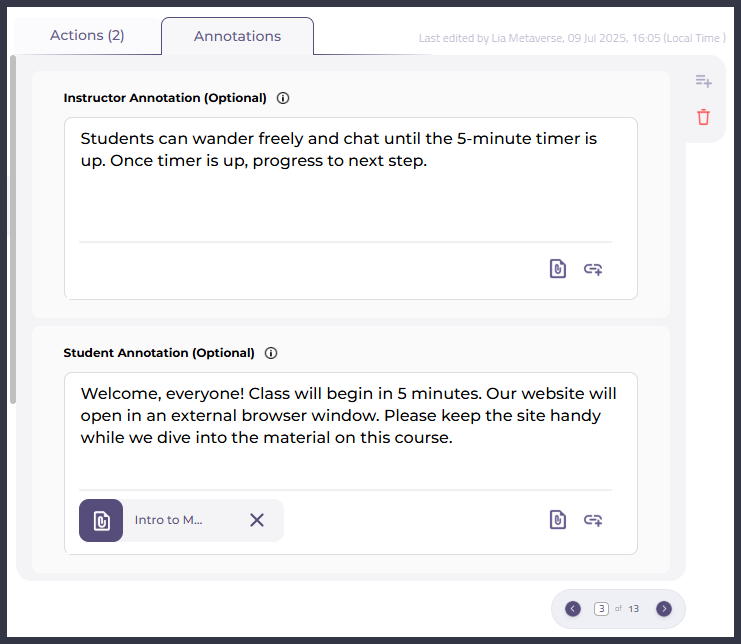
Pictured: The Annotation tab for a step, with two annotations entered.
To add Instructor or student annotations to a step, follow the instructions below.
- Navigate to your Dashboard.
- Click on the Learning Management tab, then click on the course you want to edit.
- Click the vertical ellipses icon in the relevant syllabus card, and select Edit Syllabus Content from the menu that appears.
- Locate the step you want to edit in the step list, and click on it. Then click on the Annotations tab.
- In the Annotations panel, enter your desired student and/or Instructor annotation. Annotations can include any combination of:
- Text
- An image from your Media Library
- A website URL
In-world syllabus execution and walkthrough
In addition to demonstrating how our tutorial syllabus will deploy in-world, this section serves as a quick-start guide to executing an Instructor-led syllabus. For more detailed information about accessing Breakroom for Training, either as an Instructor or a student, please review the linked portions of our documentation.
Instructor login
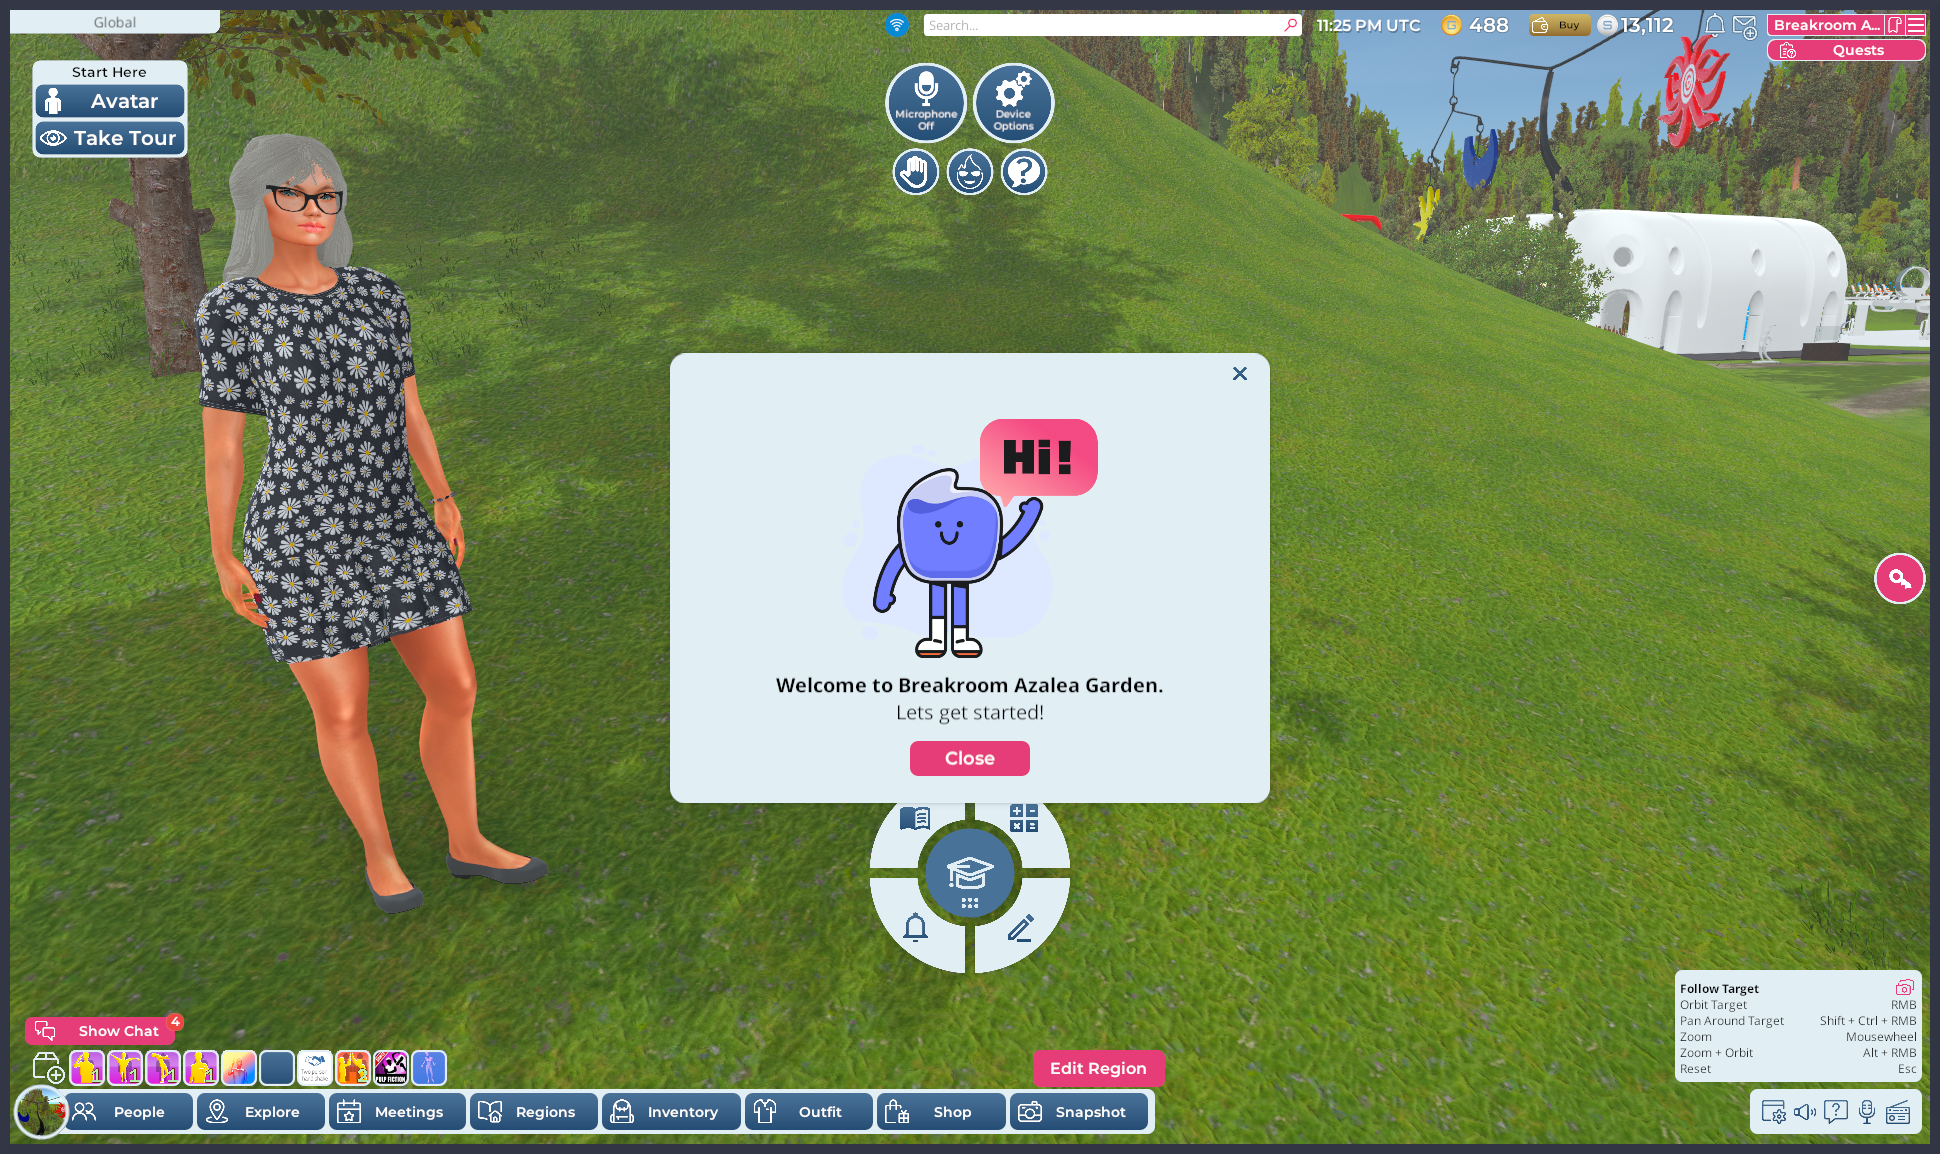
Pictured: An avatar being welcomed as a student.
When a user navigates their avatar to a Region where Breakroom for Training is installed, they will initially be welcomed as a student. They will see an orientation pop-up and the Breakroom for Training widget appear on their screen (as pictured above).
Pictured: The Breakroom for Training widget, relocated to the lower right corner of the screen.
Under the default UI color scheme, the Breakroom for Training widget appears blue on student screens, and pink on Instructor screens. Once it appears on-screen, it's good practice to move it to the lower right corner for ease of access. You can do this by clicking and dragging on the center of the widget.
Highlighted: The location of the Instructor Mode button.
Users who have access to Breakroom's moderator tools can become Instructors on the Breakroom for Training system. This list includes:
- The World Owner
- World-level Administrators, Moderators, and Developers
- Region-level Owners, Administrators, and Moderators
This section of the documentation refers to these individuals collectively as "Instructors." To enter Instructor mode, follow these steps.
- Navigate your avatar to the Region where you'll be instructing.
- Click the Moderator tools/Key button located on the right side of the screen.
- Click the Instructor Mode button at the top of the moderator tools.
- When prompted to confirm your choice, click the Yes button.
Highlighted: The location of the Leave Instructor Mode button.
To leave Instructor mode, repeat steps 1-4 above. You can also click the Leave Instructor Mode button on the top right of the Breakroom for Training widget.
Launching a syllabus
Highlighted: The location of the Course Info button.
Once you're in Instructor mode, you can launch a syllabus by clicking the Course Info button in the top left corner of the Breakroom for Training widget.
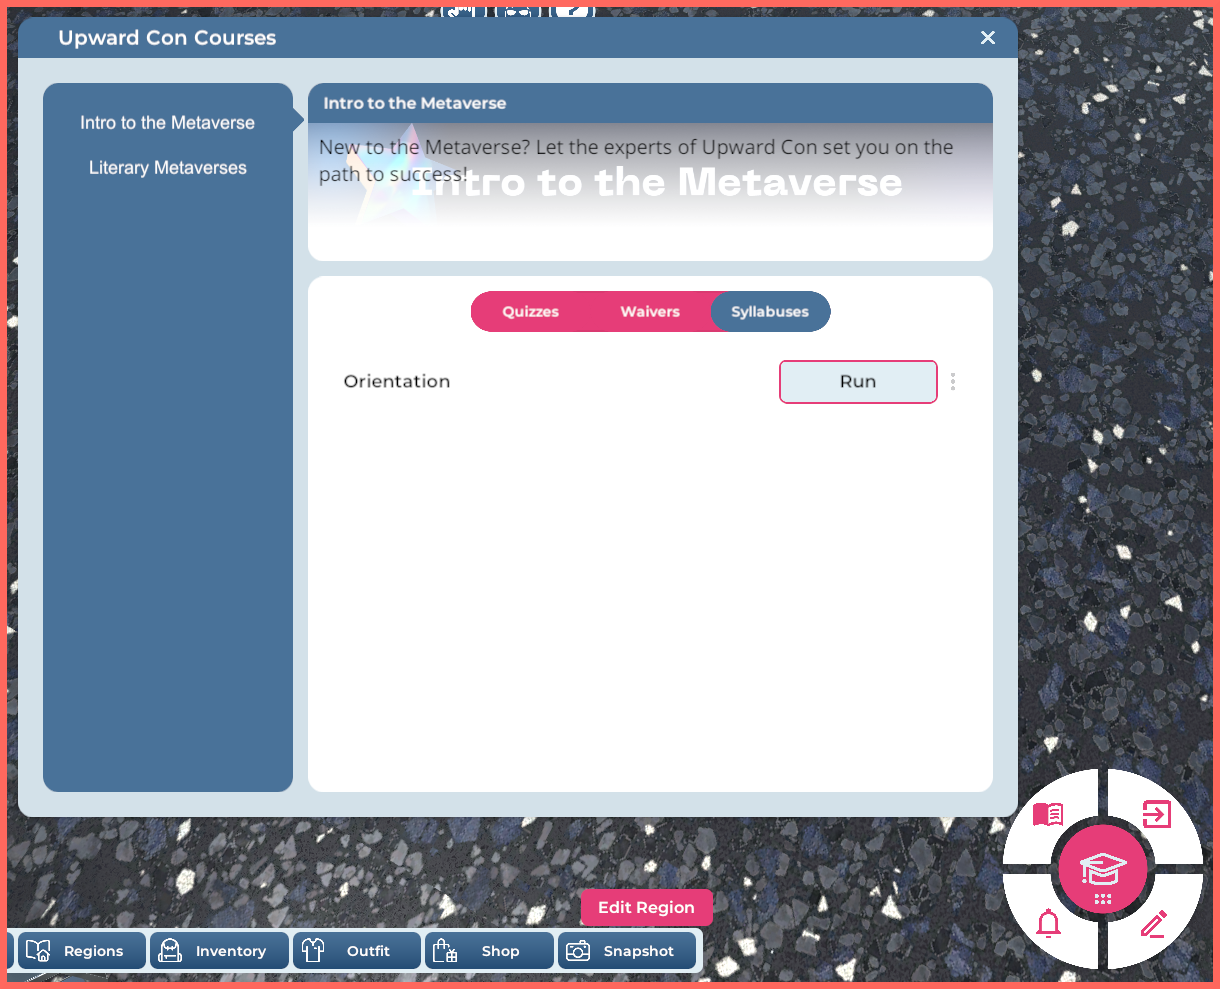
Pictured: Available syllabuses under the Intro to the Metaverse course.
Click on the relevant course, then click on the Syllabuses tab. Locate the syllabus you want to launch, and click the Run button.
Pictured: The Syllabus and Breakroom for Training widgets.
Once a syllabus is launched, a Syllabus widget will appear on all Instructor and student screens (or the individual student's screen, if the syllabus is student-led). Here's an overview of the associated UI.
| Button | Purpose |
|---|---|
| Drag handle | Allows you to move the widget around the screen by clicking and dragging on it. |
| Annotation button | Toggles the Annotation panel. |
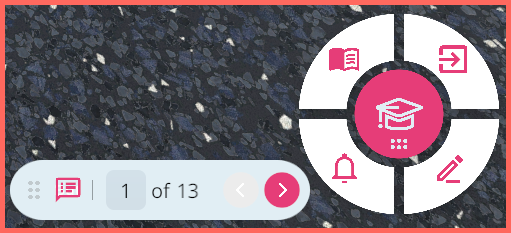
| Step indicator | Displays the current syllabus step. Allows you to navigate to a specific step by typing a number into the step field and pressing the Enter key. |
| Total steps | Displays the total number of steps in the syllabus. |
| Arrow buttons | Allows whoever is managing the syllabus to rewind and advance through the steps. |
"Done This Before"
When rewinding syllabus steps, it's important to note that the Breakroom for Training system remembers the highest step you have reached. Certain actions will not be repeated when you advance through that step again, even if they were triggered during the first use.
This also applies if you choose to manually jump over a step and then backtrack, rather than advancing through the content using the arrow buttons on the Syllabus widget.
For example:
- You are on step 15 in a syllabus.
- You advance to step 16. All actions for step 16 happen, as you’ve never been this far in the syllabus before.
- You then use the rewind arrow to backtrack to step 12. Steps 16-12 (working backwards) are considered "already done" and will not trigger the actions listed below. All other actions will be repeated.
- Starting at step 12, you then use the arrow button to advance the syllabus until you are at step 17. Steps 13-16 are still considered to have been "already done." You've never been on step 17, however, so all actions on step 17 will be executed.
The “skipped if already done” actions currently include:
- Take Tour
- Start Timer
- Start Quiz
- Start Waiver
- Custom Functions can be set up this way by the designer
Running our tutorial syllabus
Step 1: Change Camera
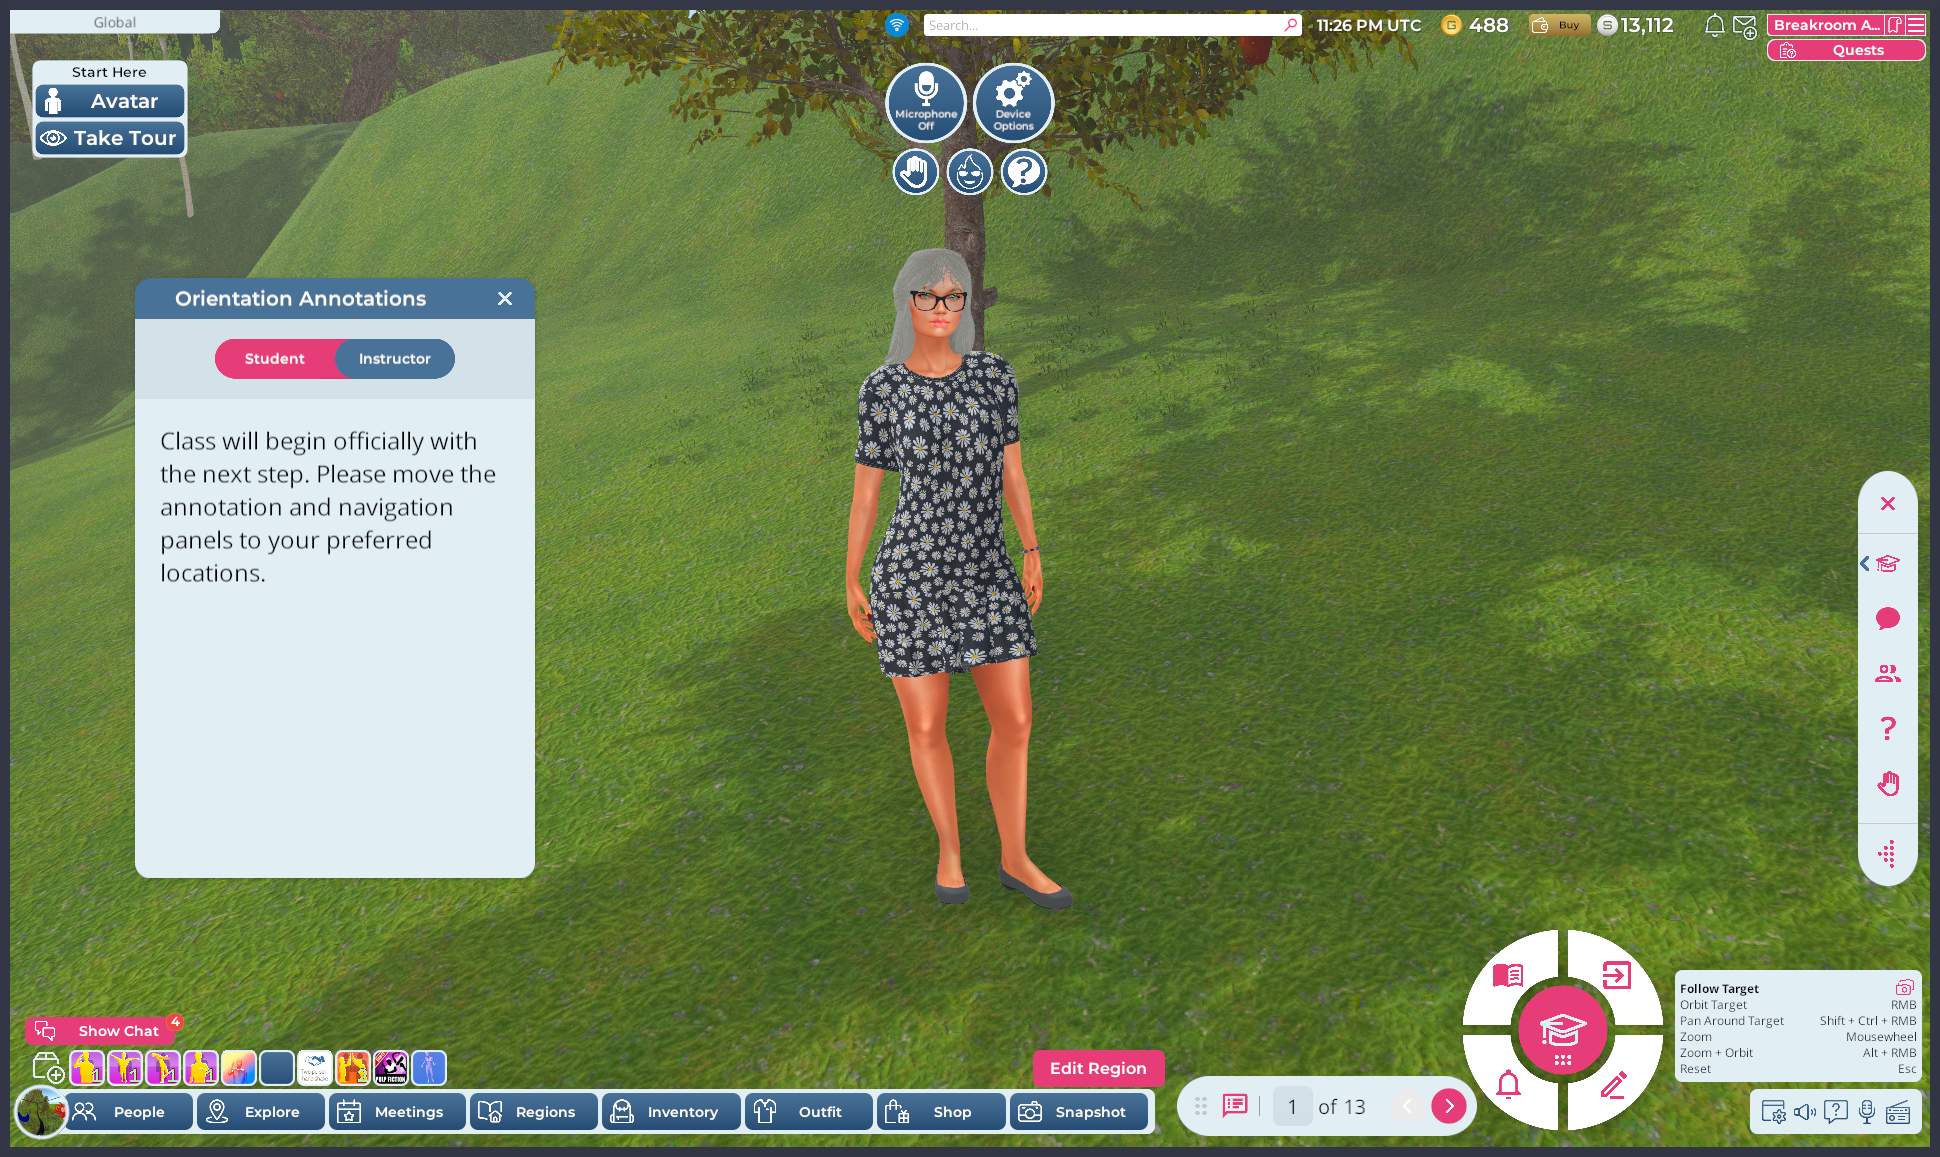
The first step of our tutorial syllabus is intended to act as a "blank," allowing Instructors and students time to familiarize themselves with the UI. It consists of a simple camera action and an Instructor annotation, advising the user to relocate the panels and widgets as needed
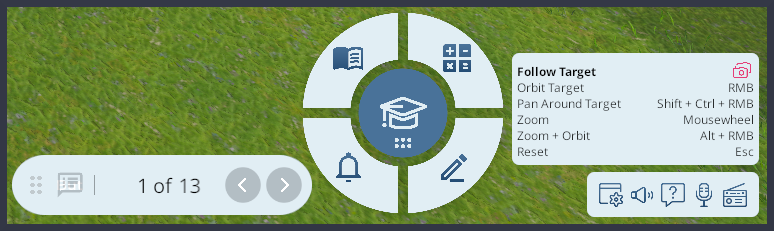
Pictured: The Breakroom for Training widgets.
For both Instructors and students, we recommend moving the Breakroom for Training and Syllabus widgets to the lower right portion of the screen. This prevents the widgets from getting lost beneath additional pop-ups.
Step 2: View Image
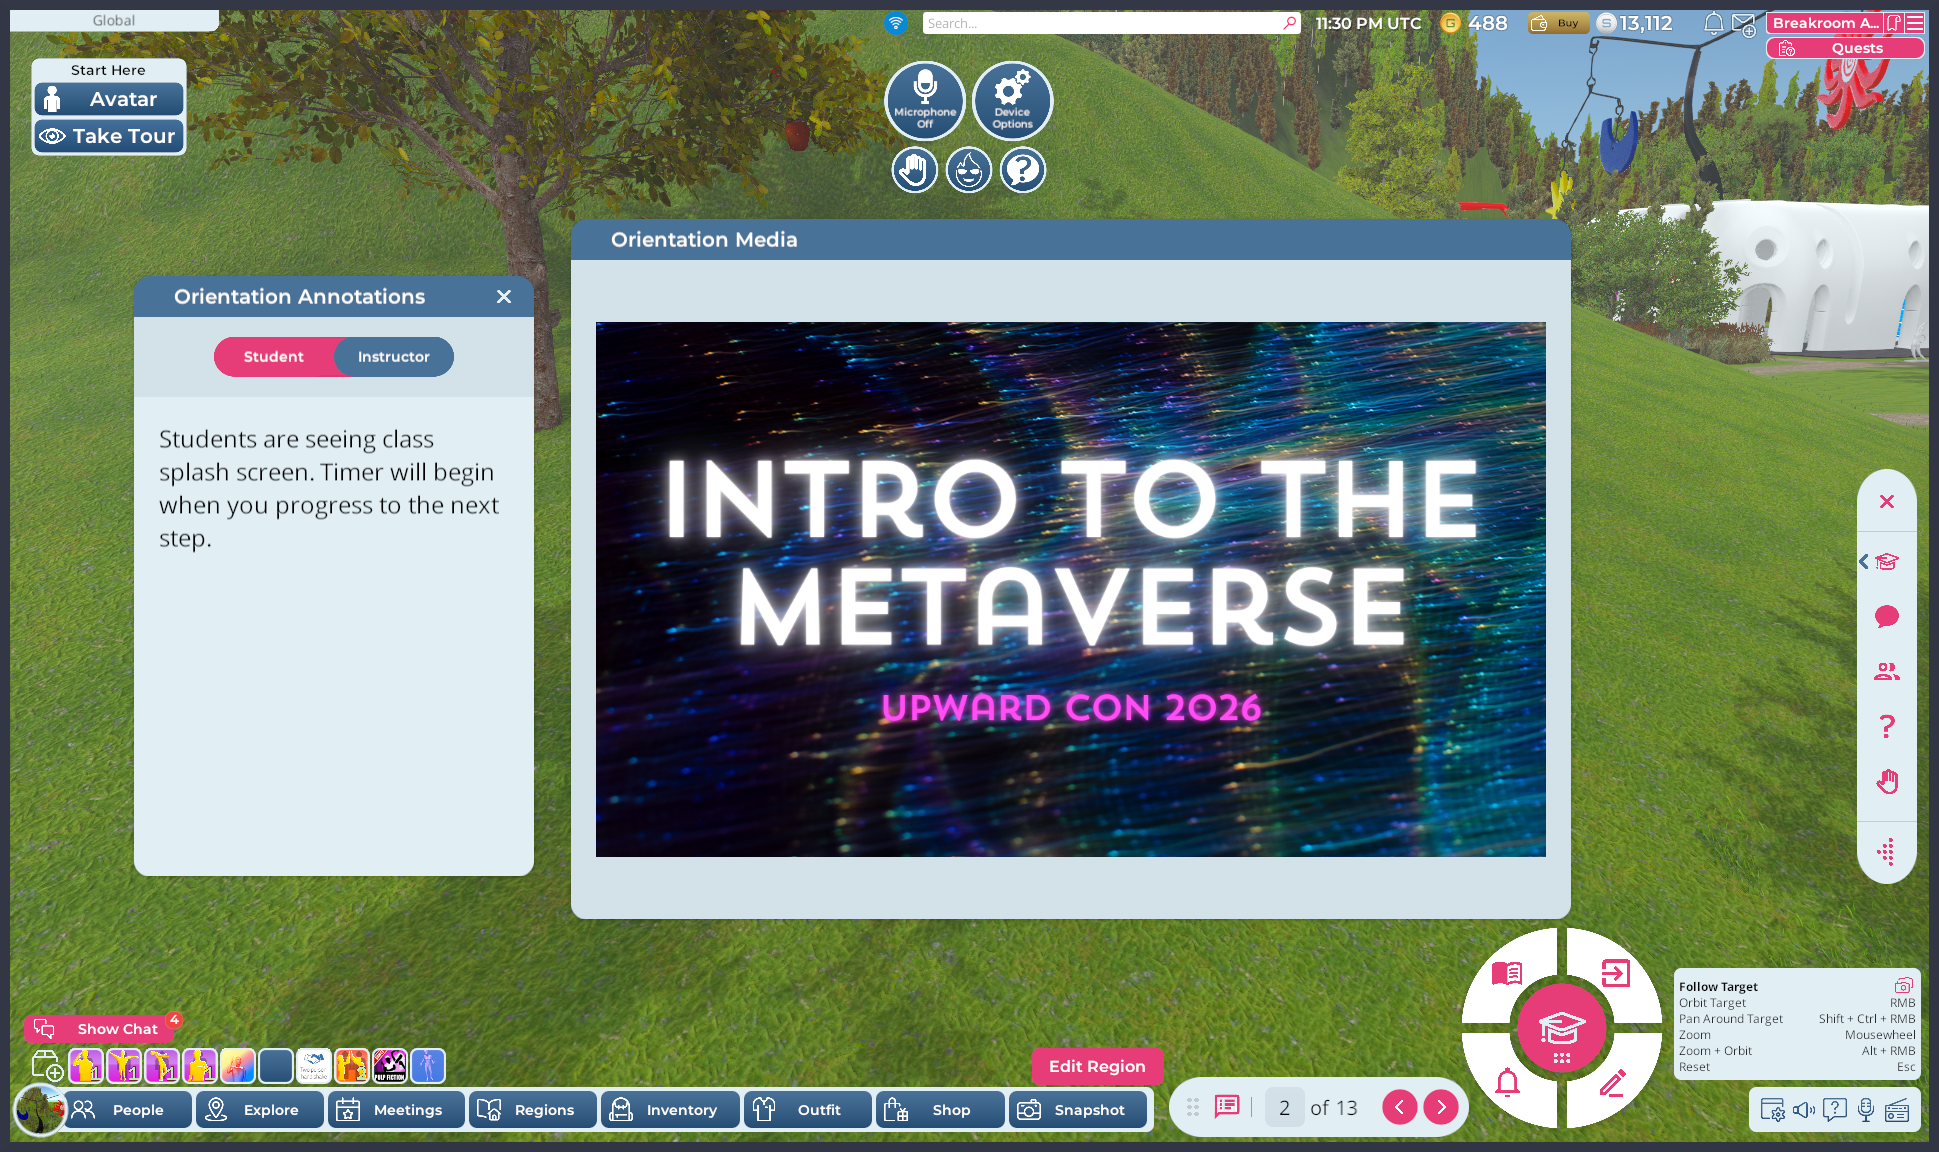
The second step displays a splash image on the user's screen. Only instructors see an annotation, advising them of what students are seeing and that a timer will begin with the next syllabus step. Users can reposition this media screen wherever they prefer.
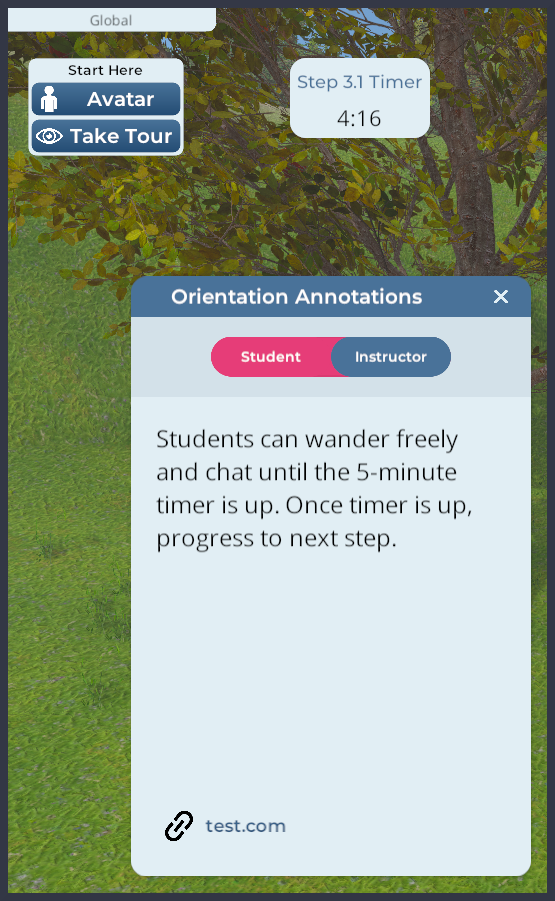
Step 3: Start Timer
Pictured: Instructor view of step 3. 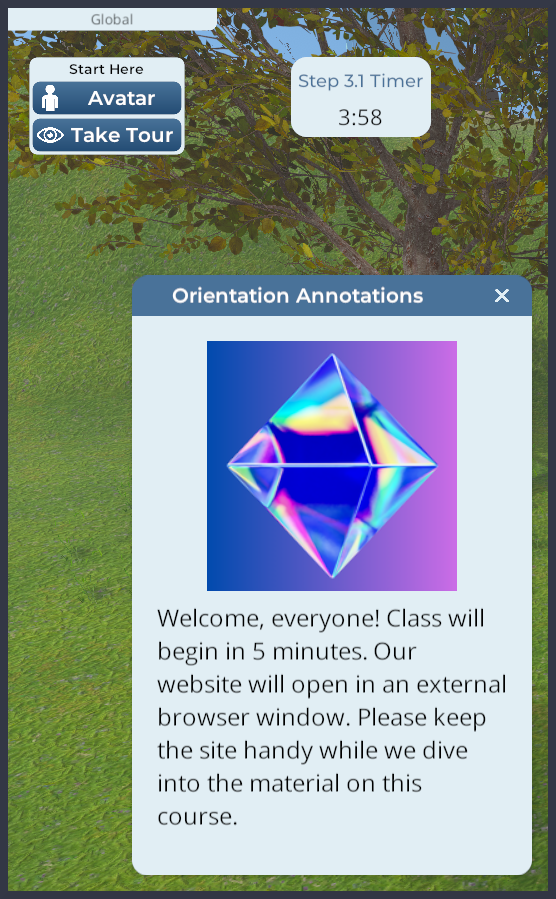
Pictured: Student view of step 3.
The third step starts a five-minute countdown timer and opens a website in each student's external browser. Annotations advise the Instructor as to next steps, while students see a welcome image and text.
Step 4: Send Broadcast
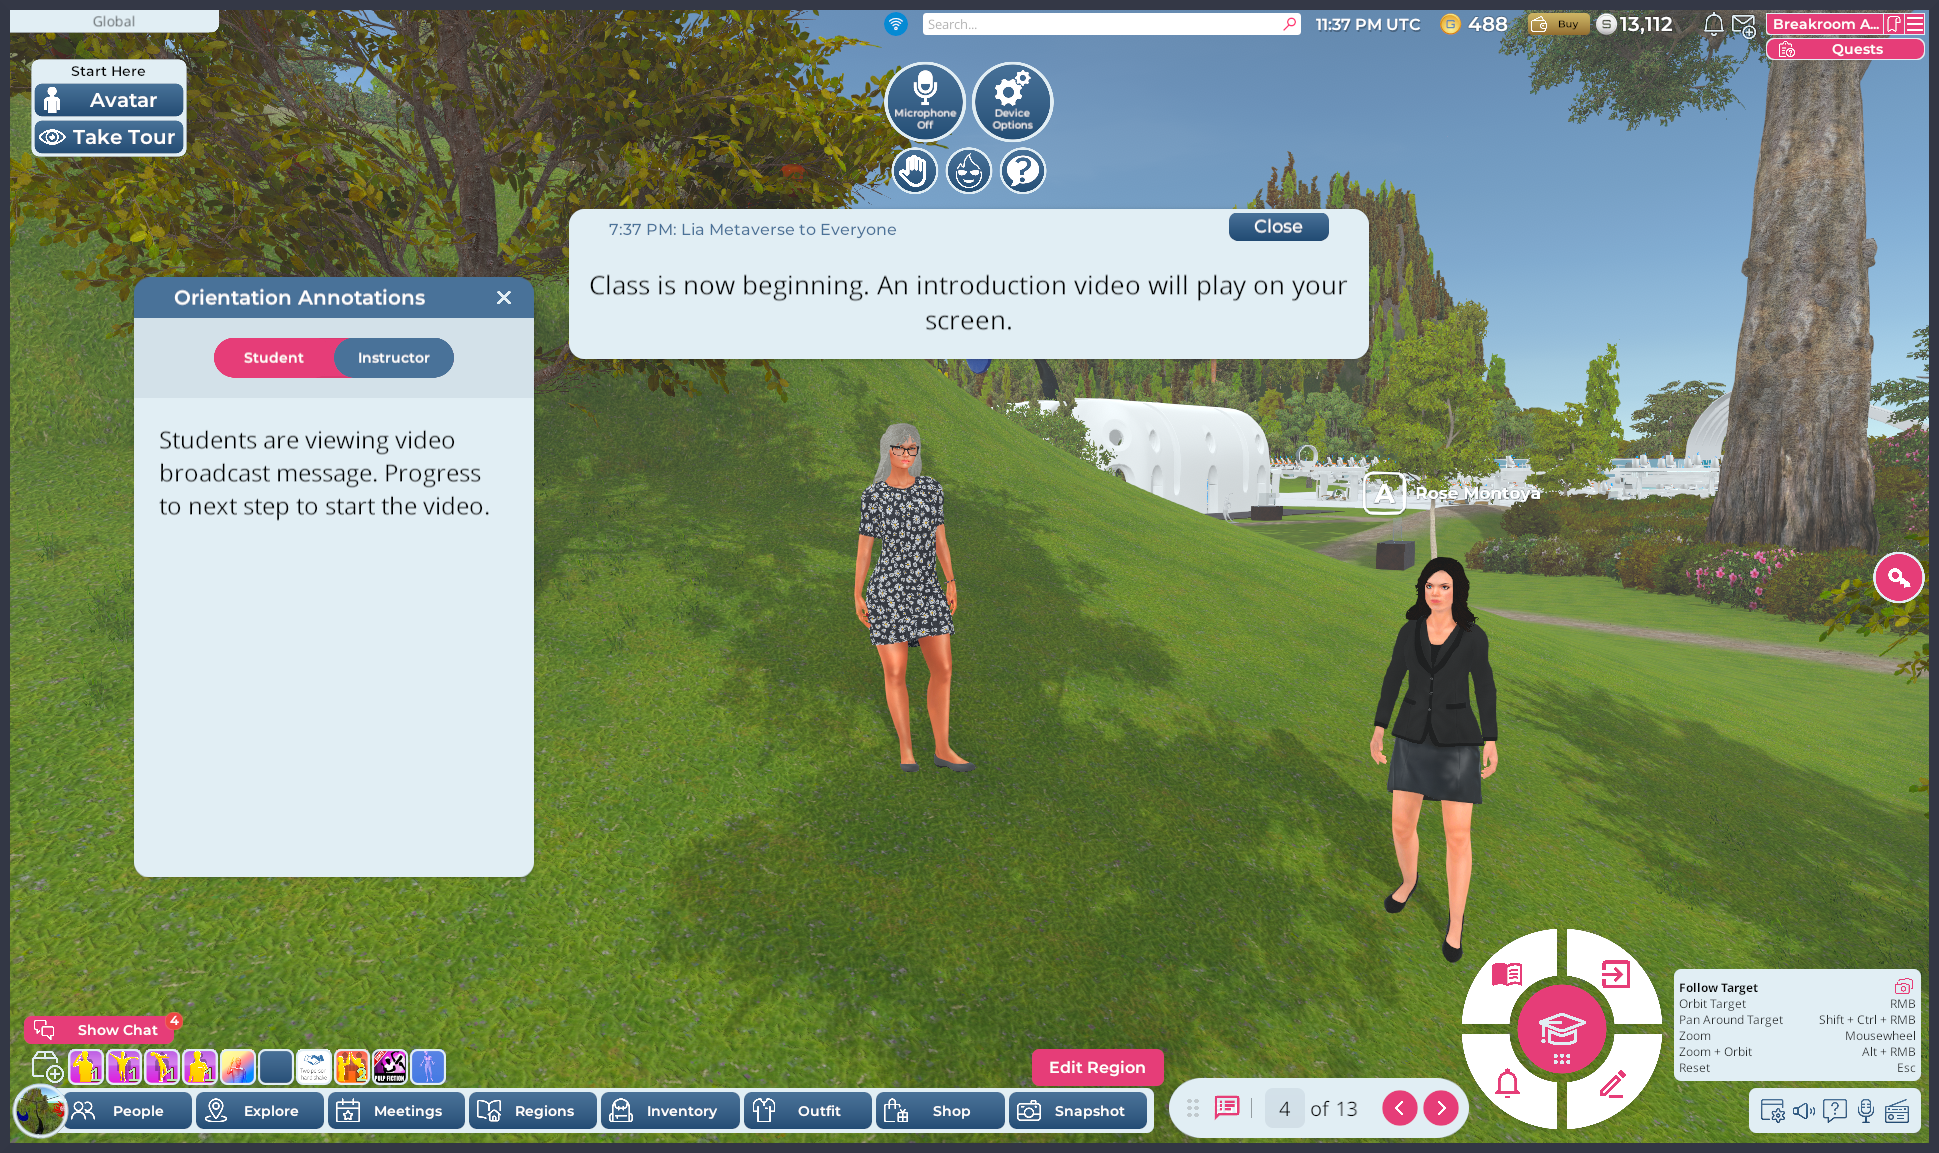
The fourth step sends a broadcast message to everyone, explaining that class is starting and a video will be played. An annotation advises the Instructor to progress to the next step to start the video.
Step 5: Watch Video
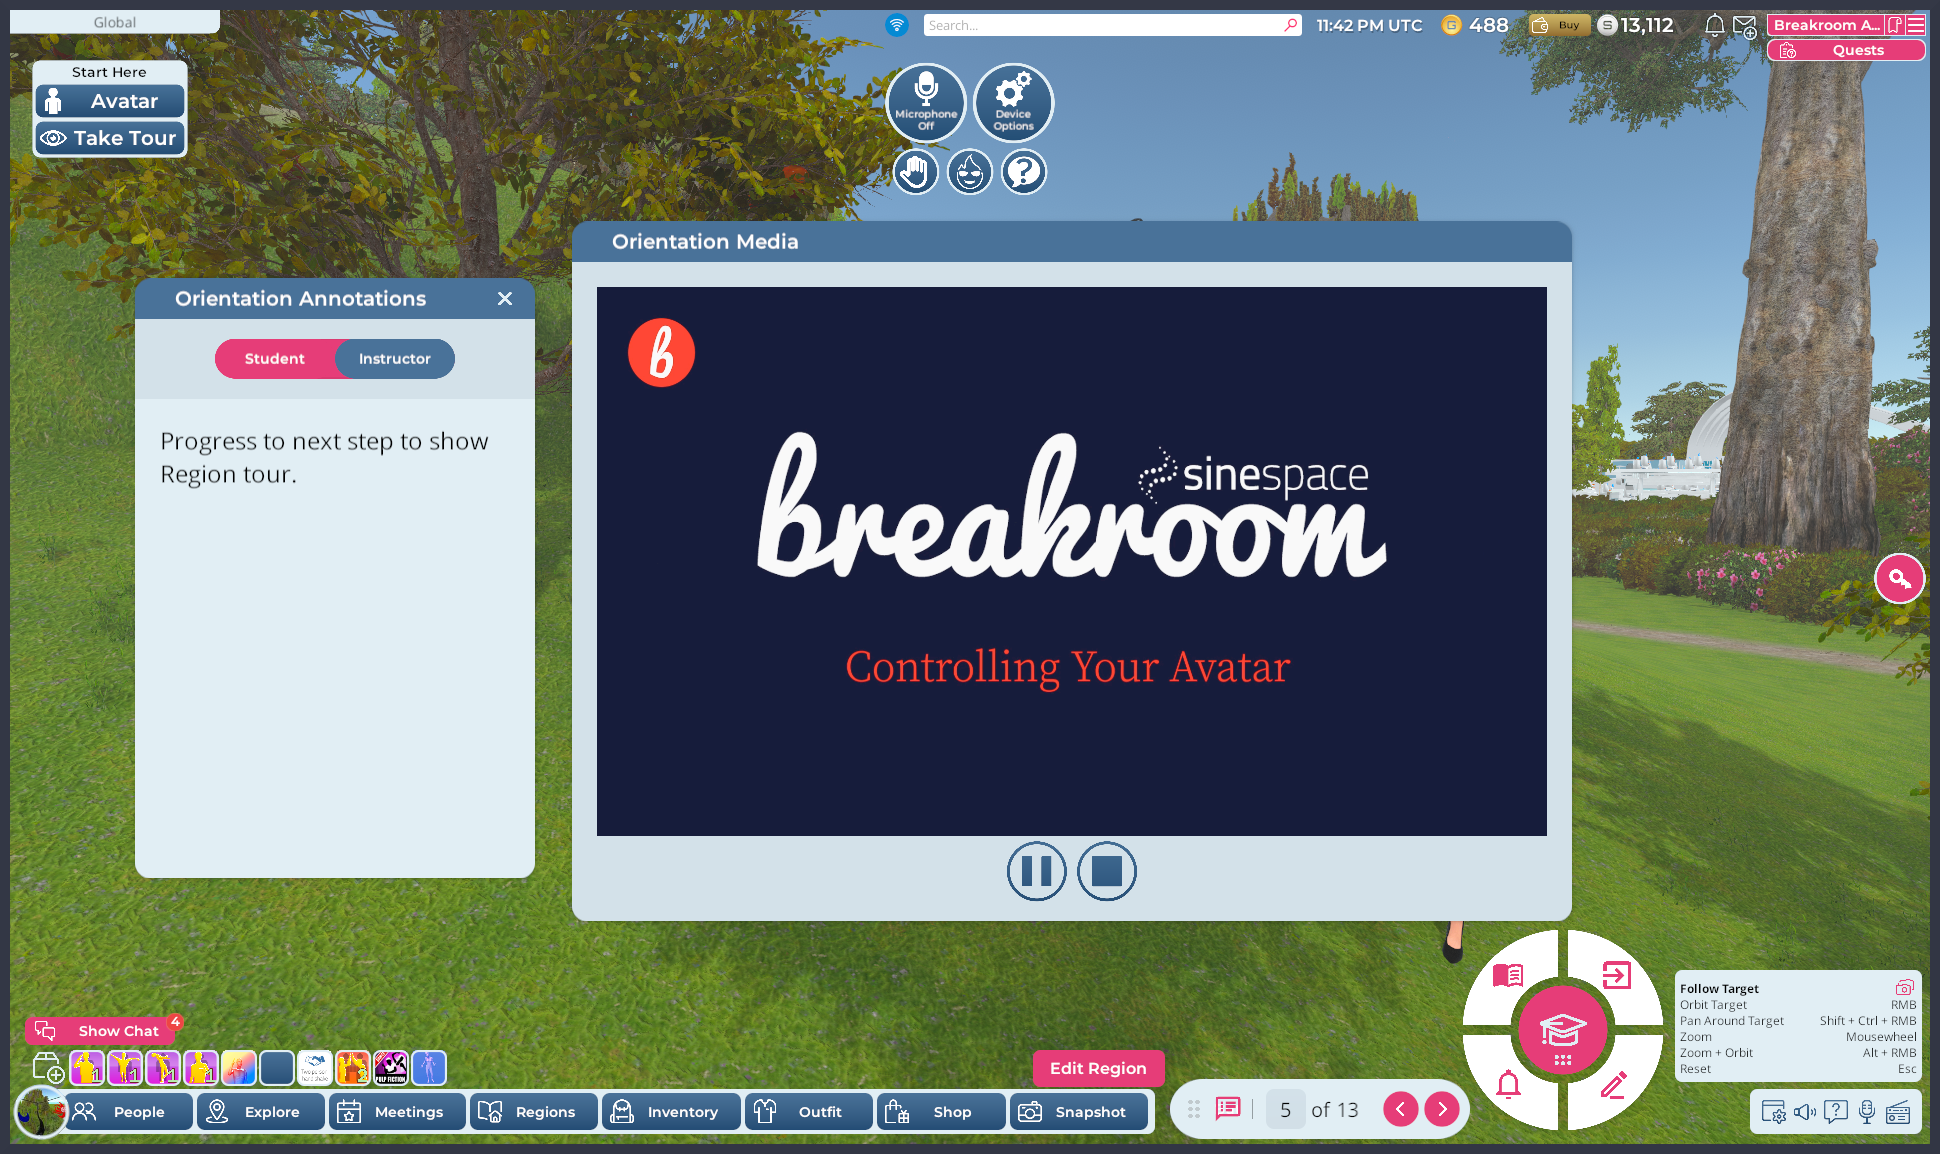
The fifth step displays an introductory video on the user's media screen, as well as an informative annotation for the Instructor. It's important to note that videos shared this way must be triggered by the individual user, and thus will not play in sync. This can be useful for certain applications.
Step 6: Take Tour
This step triggers the Breakroom Tour Camera system already set up in the Region, compelling users to watch the tour. Users can cancel the tour at any time by pressing the Esc key on their keyboard.
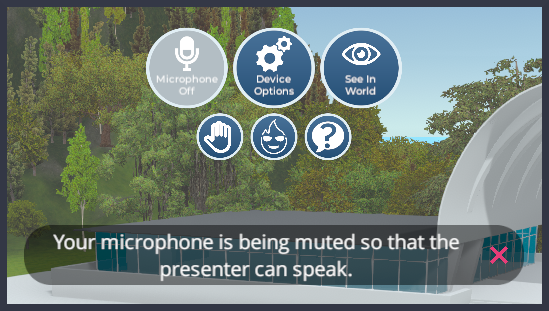
Steps 7-8: Draw Attention
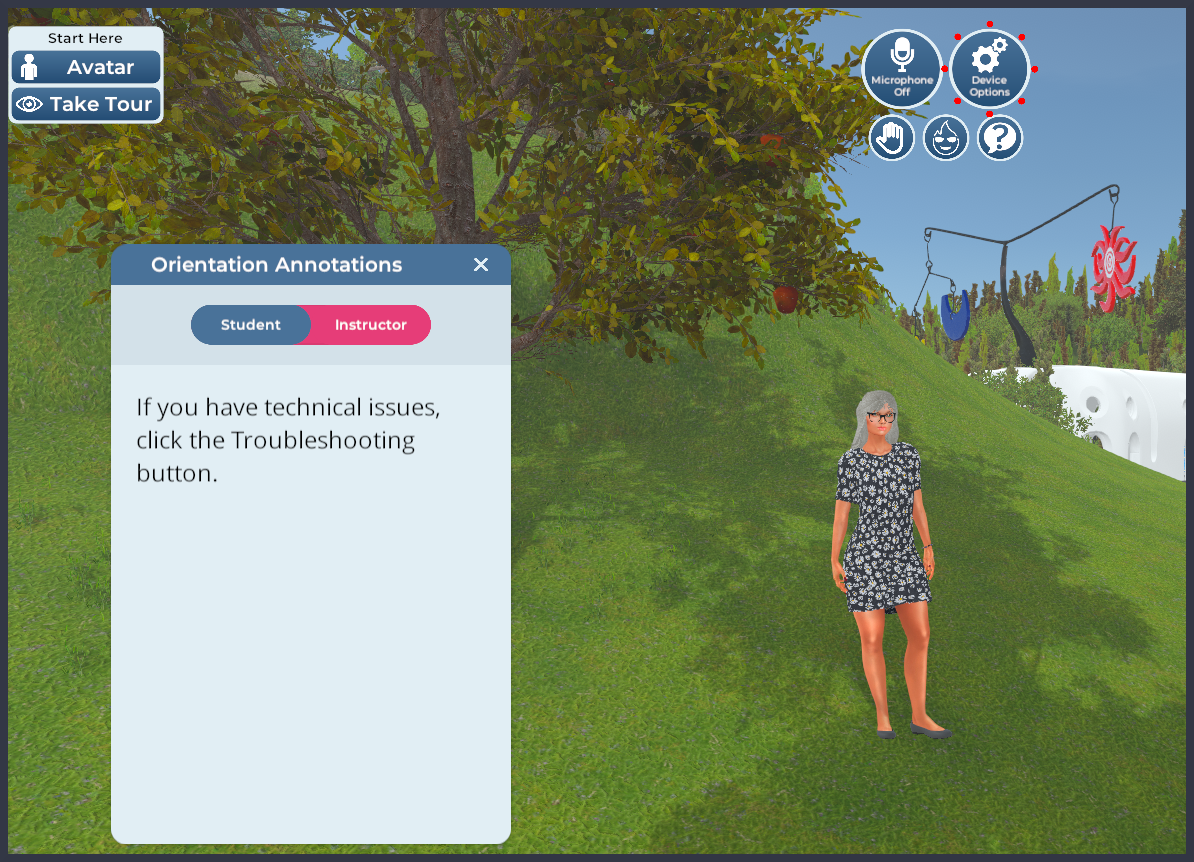
The seventh and eighth steps use the Draw Attention action to call user attention to Microphone and Device Options buttons. Annotations inform students how they can use these tools to communicate and troubleshoot any technical issues.
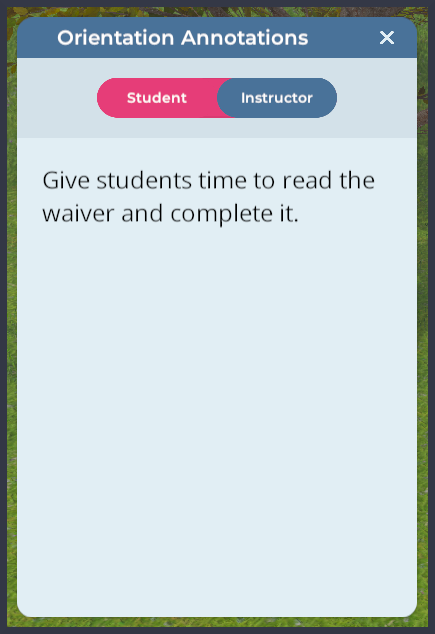
Step 9: Start Waiver
Pictured: Instructor view of step 9. 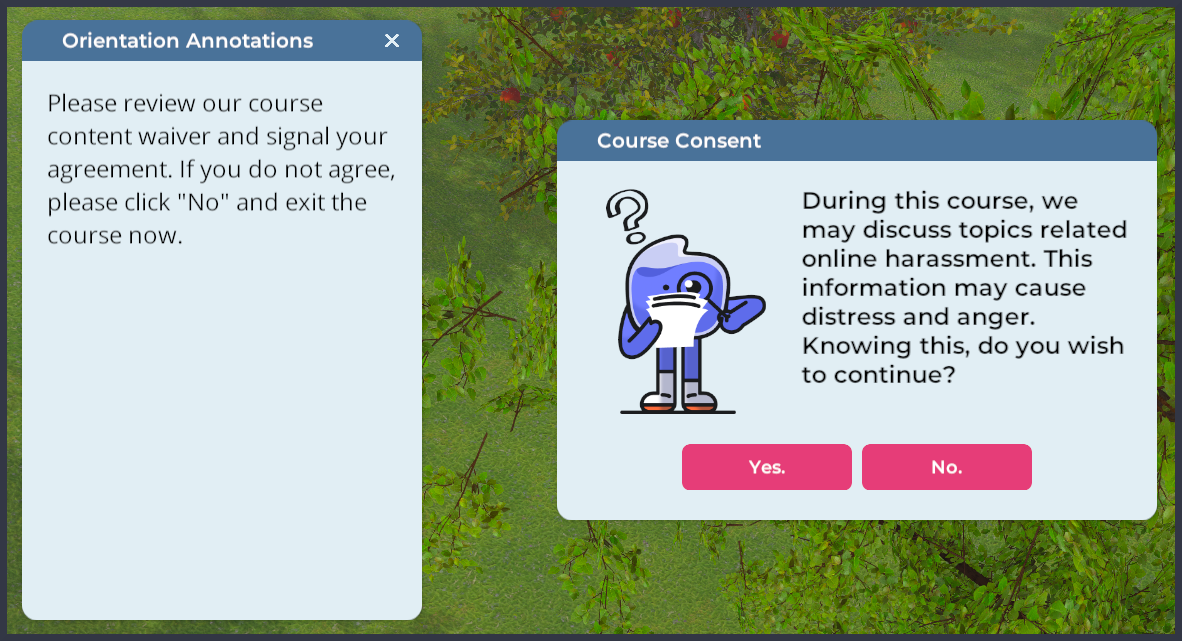
Pictured: Student view of step 9.
The ninth step triggers a waiver associated with the course. Annotations advise the Instructor to give students time to read the waiver, while students are provided with directions for completing it. To review responses within the platform in real time, you can follow the steps outlined in our Instructor orientation.
Step 10: Teleport
The tenth step consists of three actions:
- Teleports everyone to the Region's auditorium
- Changes the participation level to Quiet, so that only those seated in presenter seats can access voice chat
- Shows a toast message informing students what is happening
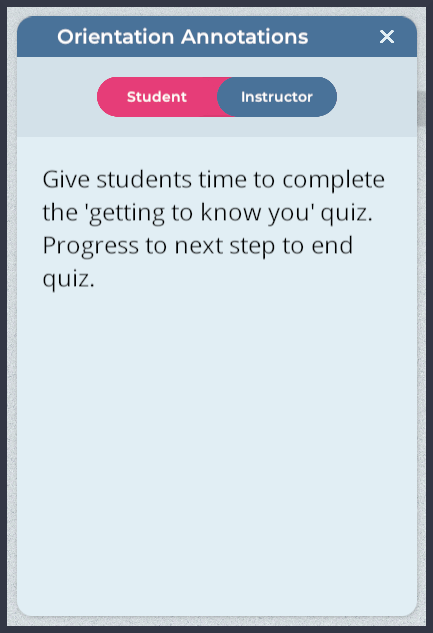
Steps 11-12: Start Quiz and Stop Quiz
Pictured: Instructor view of step 11. 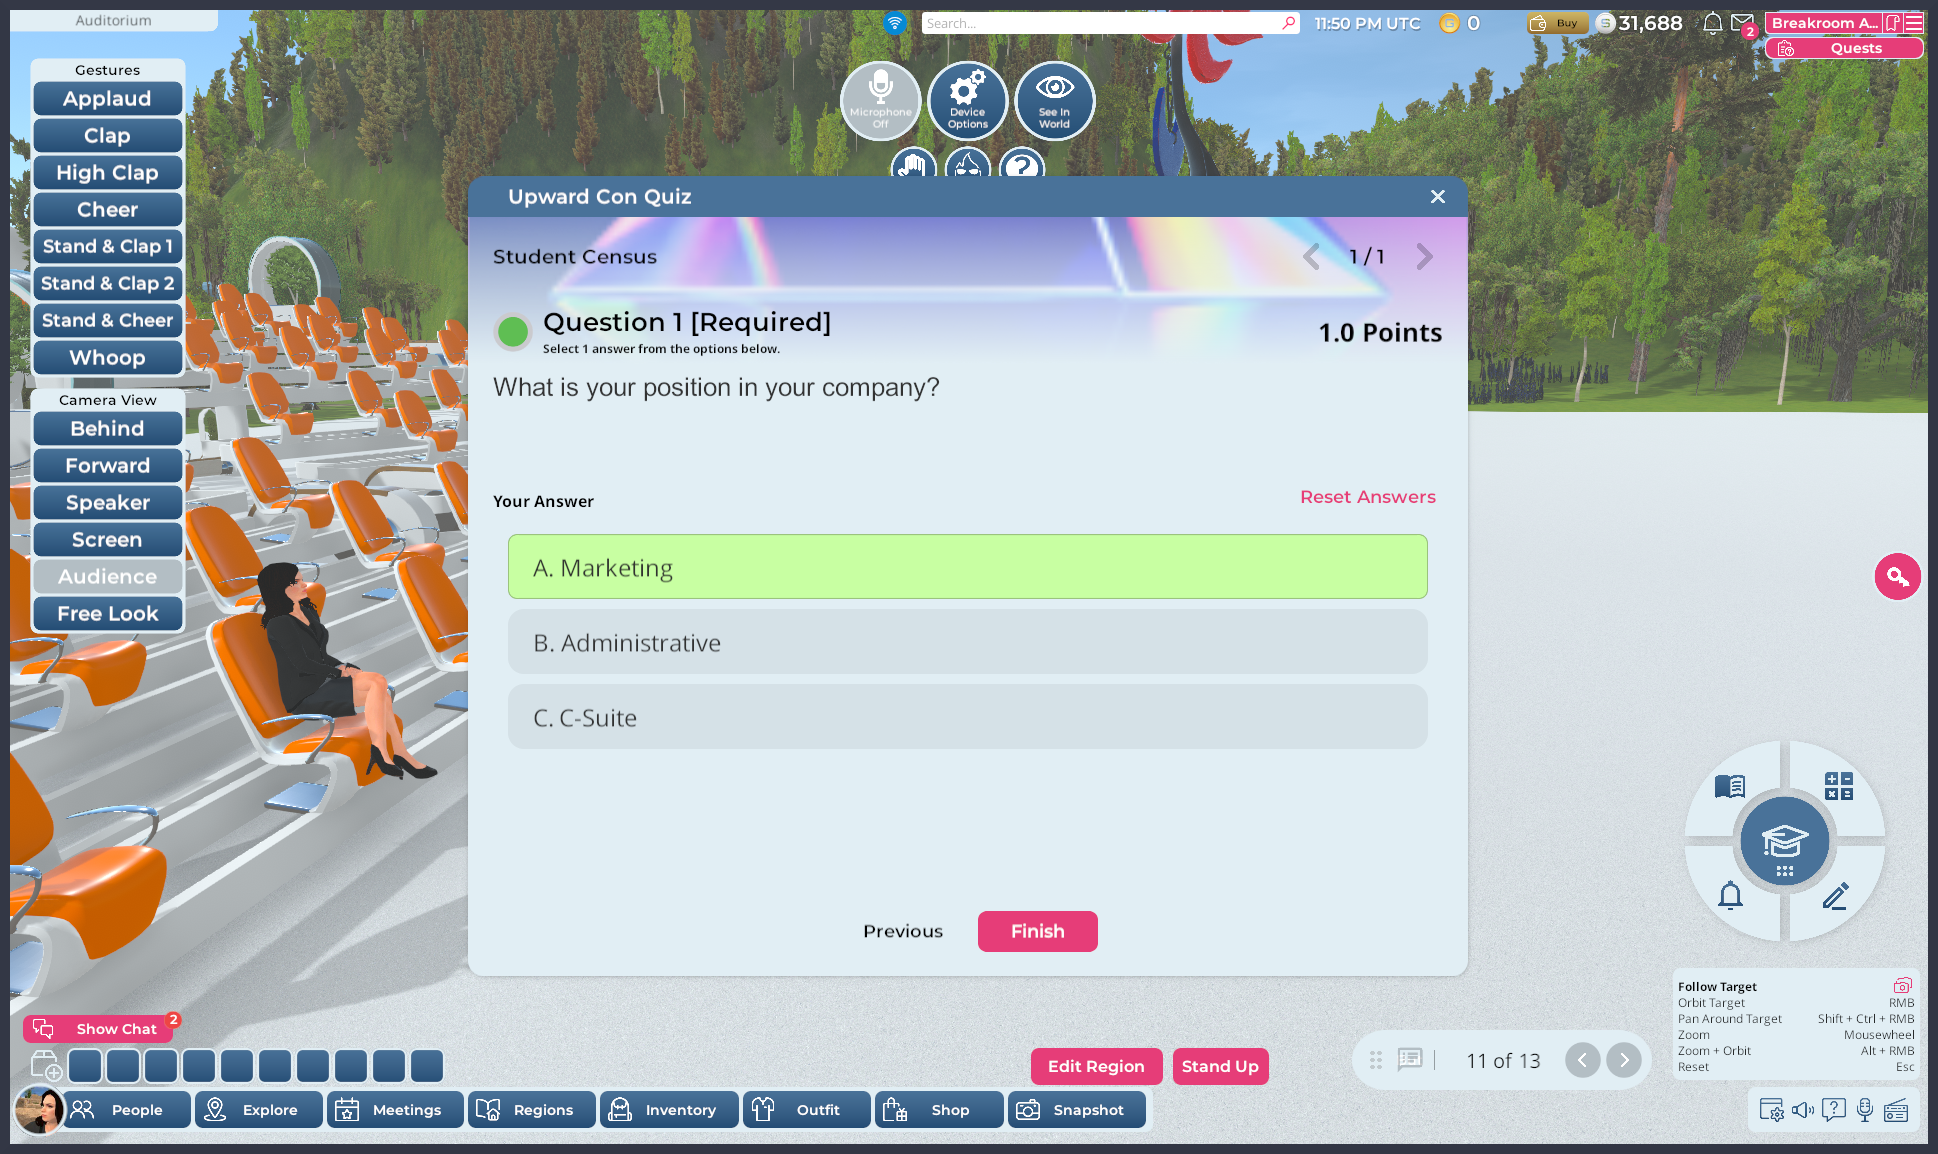
Pictured: Student view of step 11.
The eleventh step triggers a quiz and displays an annotation for the Instructor. Step twelve ends the quiz after students have been given time to complete it. To review responses within the platform in real time, you can follow the steps outlined in our Instructor orientation.
Step 13: Change Camera
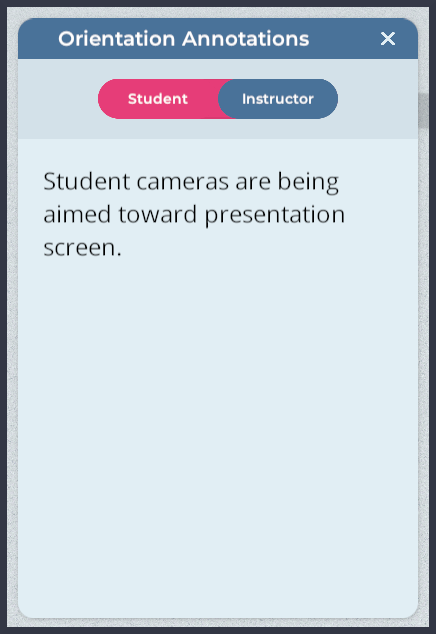
Pictured: Instructor view of step 13. 
Pictured: Student view of step 13.
The final step in our example contains two actions:
- Changes everyone's camera to the Auditorium presentation screen
- Plays a video on the presentation screen
Instructors also see an annotation describing the current student experience.
Finishing a syllabus
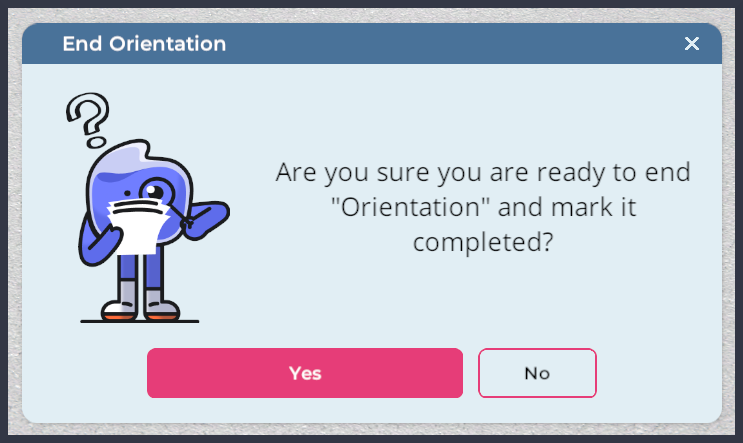
To finish an Instructor-led syllabus, the Instructor should click the advancement arrow on the final step in the Syllabus widget, and then click Yes in the pop-up that appears.
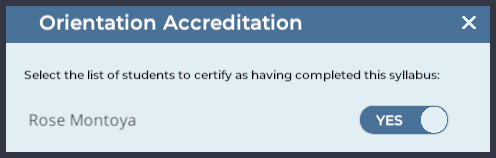
The Instructor will be presented with a list of students who were in the Region at any point during the session. The Instructor has discretion as to whether a particular student should be marked as having completed the course. By default, all students are marked as completed. Click the toggle located to the right of any student name to disqualify that student from accreditation, and then click Submit.
Creating a student-led syllabus
After designating a syllabus as student-led, either during initial setup or through changing the syllabus settings, you will need to manually edit the Breakroom LMS Core in order to make the syllabus available to students within your chosen Region.
The instructions provided below presume an advanced working knowledge of Breakroom. Please consult our documentation if you need help installing and positioning virtual objects, or editing the RoomFurniture component.
To finalize a student-led syllabus, follow these steps.
- Navigate your avatar to the Region where you want the student-led syllabus to be available.
- Open the Region Editor by clicking the Edit Region button located in the bottom toolbar.
- Click the Objects Button to launch the Objects window.
- In the Objects window, search for the Breakroom LMS Core object. Click on it in order to highlight it. The Inspector window will launch for that object.
- In the Inspector window, click the > arrow located to the left of the RoomFurniture component.
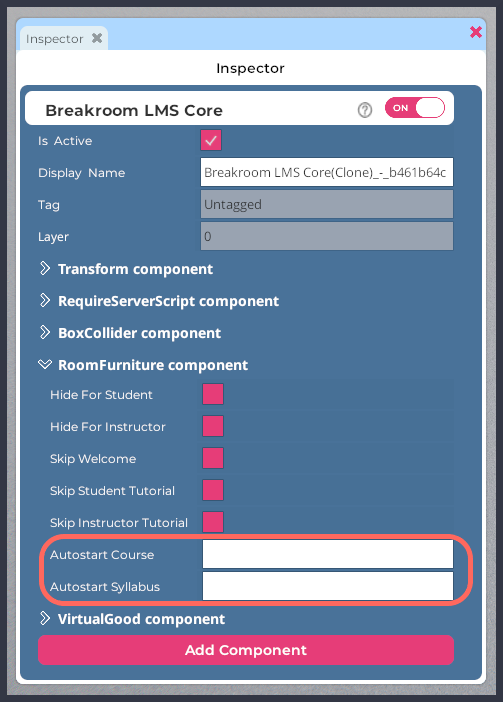
Highlighted: The location of the Autostart Course and Autostart Syllabus fields under the Breakroom LMS Core RoomFurniture component.
- In the Autostart Course name field, type the name of the course containing the student-led syllabus you want to run.
- In the Autostart Syllabus field, type the name of the student-led syllabus you want to run. If you enter the name of an Instructor-led syllabus, it will do nothing.
The course and syllabus names must match those used on the Dashboard exactly, including punctuation marks and spacing. We recommend cutting and pasting the names directly from the Dashboard for improved accuracy and convenience.
Once you're satisfied, click the Save button to store your changes and the Close button to exit the Region Editor. Anyone entering the Region will automatically enter into a single-user, student-led syllabus experience. For more information about interacting with Breakroom for Training as a student, please see our Getting Started section.
The ideal use case for a student-led syllabus is in a Region that shards for each user, so that the Region experience is wholly devoted to that user. This is not necessary, strictly speaking, and will depend on your chosen course design and objectives. However, a syllabus in which the Region itself plays a central role—such as by changing shapes, layouts, lighting, props, and so forth—may offer a suboptimal experience if multiple users are engaged with the environment at the same time.