LogoLogo
Tutorial VideosScripting DocumentationLegalHome
Breakroom
Breakroom
  • Welcome to Breakroom
  • GETTING STARTED
    • Helpful terms
    • UI tour
    • Keyboard shortcuts
    • Customizing your avatar
      • Choosing a starter avatar
      • Editing avatars in the Outfit window
      • Using the Sine Wave Shop
    • Controlling your avatar
    • Controlling your camera
    • Communicating with other users
    • Using the conference system
      • Troubleshooting audio and video issues
    • Using Breakroom for Training
    • Settings
    • Language and accessibility
    • Reporting issues
  • EXPLORING BREAKROOM
    • Region navigation tools
    • Bookmarks and teleport invites
    • Using the Explore window
    • Using the Meetings window
    • Networking with other users
      • People
      • Groups
    • Snapshots
  • BUILDING NEW WORLDS
    • Breakroom Dashboard tour
    • Creating and managing Regions
    • Default Landing and Orientation Regions
    • Region settings
    • Region template descriptions
  • CREATING CUSTOM EXPERIENCES
    • Branding tools
    • UI customization options
    • Filtering the Sine Wave Shop
    • Selecting default avatars
      • Default avatar collections
    • Using the Region Editor
      • Editing and moving objects
      • Editing terrain and sky
      • The Region Editor ADVANCED window
    • Exploring the Breakroom Toolkit
      • Breakroom Video Player
      • Breakroom Web Browser
      • Breakroom Image Viewer
      • Breakroom Info Kiosk
      • Breakroom Teleport Portal
      • Breakroom Web Collab
      • Breakroom Note Board
      • Breakroom Games
      • Breakroom Reactives
      • Breakroom Orientation Quest
      • Breakroom Tour Cameras
      • Conference rooms and booths
      • Add-on seats
      • Breakroom Start Here UI
      • Breakroom Basic Emojis
      • Breakroom 360° Video Player
    • Managing your Media Library
  • OPENING THE DOORS
    • Seats and concurrency
    • Creating and managing user accounts
      • World-level user permissions
      • Region-level user permissions
      • Single sign-on
      • Eventbrite integration
    • World Stream
      • Purchasing and managing World Credits
      • Pre-allocation campaigns
      • World Stream viewer toolbars
      • World Stream keyboard shortcuts
      • Troubleshooting World Stream issues on Chrome
      • Troubleshooting World Stream issues on macOS
    • Desktop viewers
    • Privacy Policies, EULAs, and data collection
    • Analytics
    • Toggling World availability
  • RUNNING YOUR EVENT
    • Understanding the conference system
      • Voice zones, zone types, and conference permissions
      • Voice chat and spatial audio
    • Customizing the conference system components
      • Adding breakout areas
      • Creating custom voice zones
      • Setting up Presenter and Audience zones
      • Designating triage zones
      • Troubleshooting duplicate zone errors
      • The RoomFurniture component
    • Setting up Breakroom for Training courses
    • Moderator tools
      • Broadcast messages
      • Crowd management
      • Audience questions
      • Raised hands
      • Presentation controls
      • Hidden UI toggle
      • Participation
      • Audio streams
  • TIPS FOR SUCCESS
    • Region Editor best practices
    • Onboarding new users
  • ADVANCED TUTORIALS
    • Uploading your own Region
      • Installing Unity and the Breakroom SDK
      • Reducing poly counts on CAD files
      • Uploading a Region from Unity to Breakroom
      • Creating and uploading custom chairs
      • Testing items on the preview server
      • Pushing items to the live server
      • Installing the conference system components
    • Uploading your own virtual objects
    • Uploading your own virtual clothing
    • Creating and copying avatar shapes
    • Installing the Quest System
    • Registration and grid APIs
    • Video streaming
    • Sinespace scripting documentation
  • HELP
    • Where to find support
    • Tutorial video playlists
      • Platform basics
      • Dashboard
      • Moderator tools
      • Breakroom Games
      • Creator Core
      • Breakroom for Training - Students
      • Breakroom for Training - Instructors
      • Breakroom for Training - Dashboard and Backend
    • Account management
    • System requirements
    • Troubleshooting network ports and firewalls
  • RELEASE NOTES
    • Breakroom SDK
    • Breakroom Viewer
    • Breakroom Dashboard
Powered by GitBook

©2008-2024 Sine Wave Entertainment Ltd. All Rights Reserved.

On this page
  • Overview
  • Taking your World offline
  • Bringing your World online
Export as PDF
  1. OPENING THE DOORS

Toggling World availability

Need to restrict access to users with advanced permissions, or want to automatically throw open the doors on a particular date? Breakroom makes it easy to secure the borders of your virtual kingdom.

PreviousAnalyticsNextUnderstanding the conference system

Last updated 10 months ago

Overview

Breakroom's World Status toggle allows you to restrict access to your World with the flip of a switch. When your World status is set to Off, only users with will be able to log in. You can also schedule a day and time when your world will automatically become accessible to a larger audience, and post a customized message to keep everyone in the loop.

When your world status is set to Off, only World Owners, World Administrators, World Moderators, and World Developers will be able to log in. Members and Guests will no longer have access.

Only and can access the Dashboard.

Taking your World offline

To take your World offline, follow these steps.

  1. Click on the Settings tab.

  2. Toggle the World switch to Off, and the Take World Offline window will open. In this window you can:

    1. Select a World Online date and time (required): This is the time that your Breakroom World will once again become accessible. This time will be displayed to users who try to log in while your World is offline.

    2. Enter a World Offline Notice (optional): In addition to your chosen go-live time, this notice will be displayed to users who try to access your World while it is offline.

    3. Enter a User Ejection Notice (optional): This notice will be displayed to online users before they are ejected from your World.

    4. Select any User Types to Be Ejected (optional): All online users of the selected types will be forcibly logged out once your World goes offline.

  3. Once you're satisfied, click the Take World Offline button. You will be asked to confirm your choice.

Bringing your World online

To bring your World back online before your specified go-live time, follow these steps.

  1. Click on the Settings tab.

  2. Toggle the World switch to On, and confirm your choice by clicking the Bring World Online button.

Navigate to your .

Once your World is offline, the Settings tab will change to display your chosen go-live time and offline message. You can change these at any time by clicking the relevant Edit links. A link is also provided so that you can change your World's to a temporary placeholder, as this can assist with messaging.

Navigate to your .

Dashboard
Dashboard
advanced permissions
login screen
World Owners
World Administrators
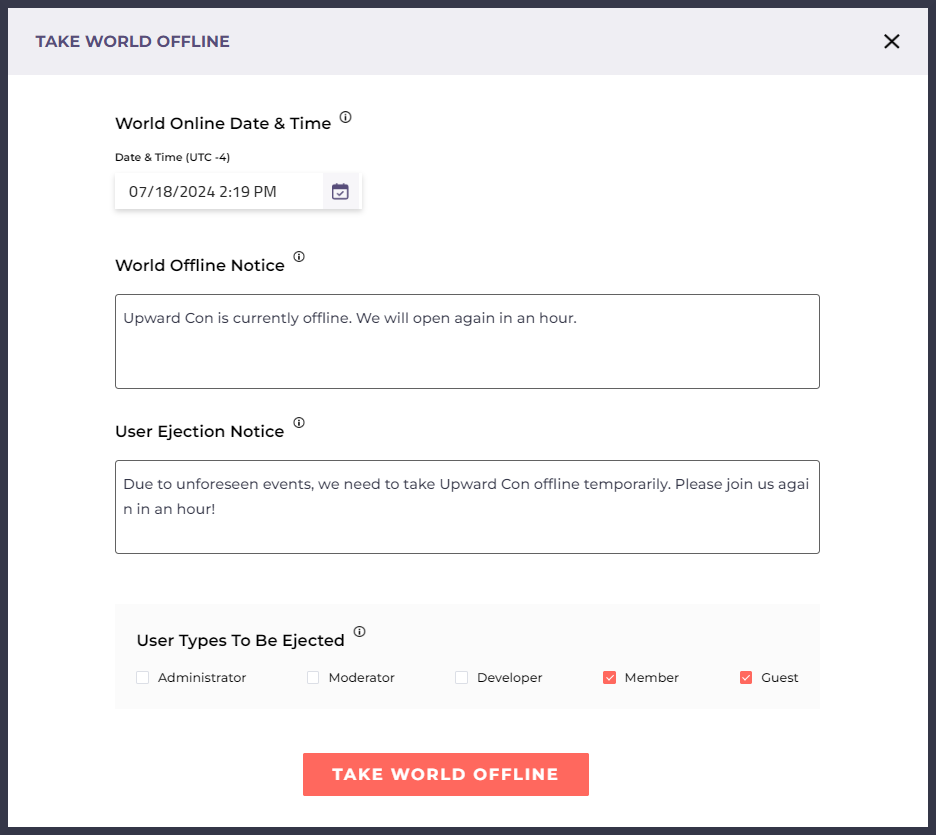
Pictured: An example of the Take World Offline window.
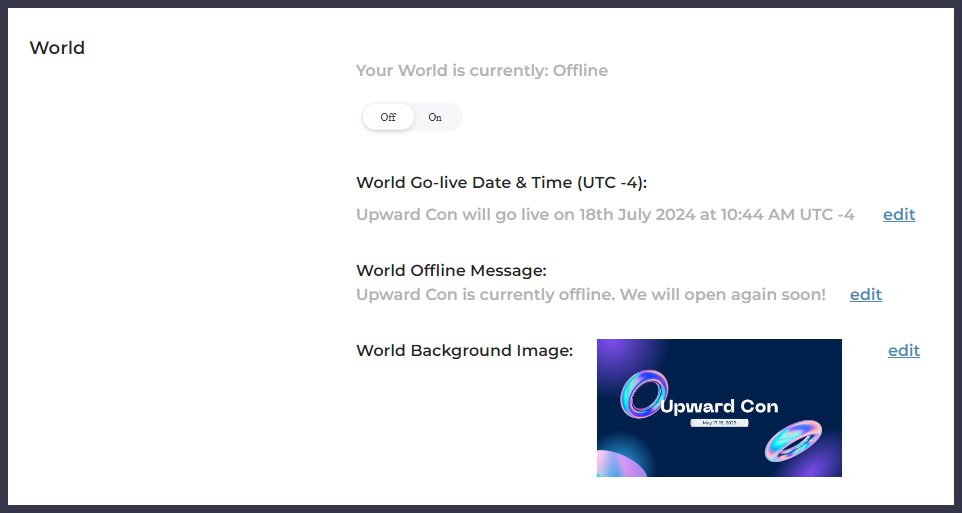
Pictured: Example settings for an offline World.