The RoomFurniture component
Overview
When you select a prefab breakout area or voice zone object in Breakroom's Region Editor, you'll see a number of components listed in the Inspector window for that object.
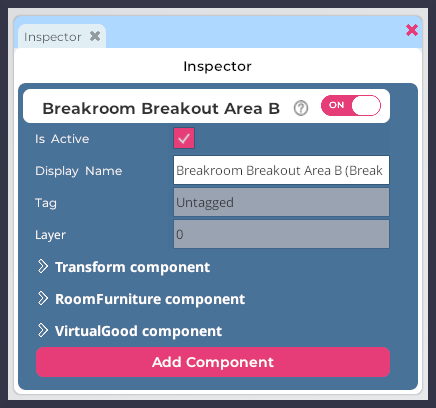
Pictured: An example Inspector window, with three components listed for the selected object.
These components contain properties that can be edited to customize various object factors and behaviors. For example, the Transform component contains information about a virtual object's position and size. You can edit these properties manually by entering new values into the fields.
When it comes to editing and customizing prefab breakout areas and voice zones, the RoomFurniture component is of key importance. In the sections that follow, we'll explore the various object factors that the RoomFurniture component controls.
The instructions provided in this section presume an advanced working knowledge of Breakroom. Please consult our documentation if you need help installing and positioning virtual objects, or editing the RoomFurniture component.
After using the Region Editor to add or edit a voice zone, always remember to click the Reset Zones button to reset the conferencing system. If this doesn't seem to push your changes forward, try saving your work, leaving the Region, and entering it again.
Accessing the RoomFurniture component
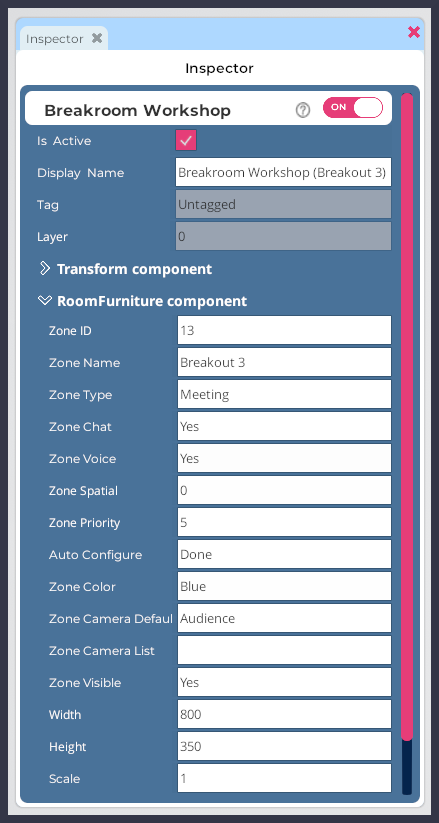
Pictured: The RoomFurniture component, expanded to display all 15 fields.
After you add a Breakroom Breakout Area or Breakroom Voice Zone object to your Region, follow the steps below to locate the RoomFurniture component and view its properties.
- Log in to your Breakroom World and navigate your avatar to the Region you would like to edit.
- Open the Region Editor by clicking the Edit Region button at the bottom of your screen.
- Click the Objects Button to launch the Objects window.
- In the Objects window, locate the Breakroom Breakout Area or Breakroom Voice Zone object you want to edit. (Tip: You can use the search field at the top of the window to search for a specific object.) Click on the object name to launch the Inspector window.
- In the Inspector window, locate the RoomFurniture component. Expand this component by clicking the > arrow located to the left of its name.
In the sections that follow, we'll explain the functions each property controls and discuss ways to customize your Breakroom Region setup.
Zone ID
When you add a new Breakroom Breakout Area or Breakroom Voice Zone object to your Region, it will be automatically assigned a unique Zone ID. This number identifies the zone as a self-contained media point.
To change the Zone ID:
- Follow the steps above to access the RoomFurniture component.
- In the Zone ID field, enter the ID number you want to use.
- Click the Reset Zones button to reset the conferencing system.
- Click the Save button to store your changes. Click the Close button to exit the Region Editor.
Grouping certain types of Zone IDs together can help with project organization. For example, important zones such as a help desk and an auditorium could be identified as Zones 1 and 2 respectively, while breakout rooms could be identified from Zone 10 upwards.
❗ IMPORTANT NOTE ABOUT ZONE IDS ❗
If two breakout areas or voice zones are assigned the same Zone ID, users in those areas will be considered to be within the same voice zone, even if they are separated by the entire length of a Region. This may be just the trick you need to create points of interest and interaction for your users— or it could result in cross-chatter and confusion.

If you are experiencing issues with voice zones, always check your Zone IDs. If you do have duplicate Zone IDs within a Region, the warning pictured above will appear in the Region Editor. Please see our page on troubleshooting duplicate zone errors for more information.
Zone Name
When you add a new Breakroom Breakout Area or Breakroom Voice Zone object to your Region, it is automatically assigned a Zone Name. In the case of prefab breakout areas, this name will take the form of "Breakout N," where N is a unique number. This naming convention ensures that the breakout area is added to the Breakout Rooms panel. In the case of custom voice zones, the zone name will default to "Workshop."
You can rename a breakout area or voice zone at any time. Uses for this may include:
- Fixing issues caused by redundant prefab breakout area names, or manually reordering breakout areas
- Designating a custom voice zone as a breakout area by changing its name to "Breakout N" (where N is a unique number). This will add it to the Breakout Rooms panel and the moderator tools
- Linking a breakout area or custom voice zone to the General Navigation panel or Areas of Interest panel when installing the conference system in a bespoke Region
To change the Zone Name:
- Follow the steps above to access the RoomFurniture component.
- In the Zone Name field, enter the name you want to use.
- Click the Reset Zones button to reset the conferencing system.
- Click the Save button to store your changes.
Zone Type
As explained in our documentation concerning voice zones and conference permissions, there are five types of voice zones available for use in Breakroom. To review, these are:
- Presenter: Presenter zones restrict the use of screen and webcam sharing to only users in a designated presenter seat. Voice chat is available to everyone.
- Audience: Audience zones go a step further than Presenter zones, restricting voice chat and media sharing to only users in a designated presenter seat.
- Meeting: In Meeting zones, voice chat and media sharing are enabled for all users.
- Voice: Within Voice zones, only voice chat will work.
- Silent: In Silent zones, voice chat and media sharing are disabled for all users.
You can change a breakout area or voice zone's Zone Type at any time by following these steps.
- Follow the steps above to access the RoomFurniture component.
- In the Zone Type field, enter the type (presenter, audience, meeting, voice, silent) you want to use.
- Click the Reset Zones button to reset the conferencing system.
- Click the Save button to store your changes.
Zone Voice
The Zone Voice property controls whether voice chat is enabled in a particular breakout area or voice zone.
To enable or disable voice chat:
- Follow the steps above to access the RoomFurniture component.
- In the Zone Voice field, enter the word yes or no.
- Click the Reset Zones button to reset the conferencing system.
- Click the Save button to store your changes. Click the Close button to exit the Region Editor.
Disabling the Zone Voice property may not disable voice chat entirely. For instance, a user standing in a breakout area with Zone Voice deactivated will still be able to hear and participate in chat from the surrounding voice zone (e.g. the Global voice zone), as nested voice zones can impact one another.
However, this property is useful in certain cases. For example, you may want to create a custom voice zone where users can share their screens while they participate in Global chat.
Zone Spatial
The Zone Spatial property controls the spatial audio effect that users will experience when standing in a breakout area or voice zone. When spatial audio is enabled, voice zones behave much like you would expect in the "real world"—other avatars (or people) standing nearby will be easy to hear, while avatars standing at a distance may be more difficult to hear, if you can hear them at all.
By entering 0 in the Zone Spatial field, you can turn off spatial audio entirely. This means that everyone in the voice zone will be heard at the same volume, with no spatial audio effect.
If you enter a 1 or above in the Zone Spatial field, you will enable spatial audio. The number represents the number of meters surrounding each avatar wherein their voice feed can be heard by others. 1 equals one meter, 5 equals five meters, etc.
To edit the Zone Spatial property:
- Follow the steps above to access the RoomFurniture component.
- In the Zone Spatial field, enter either a 0 or the number of meters you prefer.
- Click the Reset Zones button to reset the conferencing system.
- Click the Save button to store your changes. Click the Close button to exit the Region Editor.
Zone Chat
The Zone Chat property controls whether a dedicated, zone-specific text channel is available to users.
To enable or disable text chat:
- Follow the steps above to access the RoomFurniture component.
- In the Zone Chat field, enter the word yes or no.
- Click the Reset Zones button to reset the conferencing system.
- Click the Save button to store your changes. Click the Close button to exit the Region Editor.
Turning Zone Chat off will not disable text chat as a whole for end users. It will simply remove the option of having a dedicated text chat within the specified voice zone. If you want to disable text chat across the whole of your Breakroom World by customizing the UI, please see our Creating Custom Experiences section.
Auto Configure
This field is for internal Breakroom use. You will not need to manually edit it.
Zone Priority
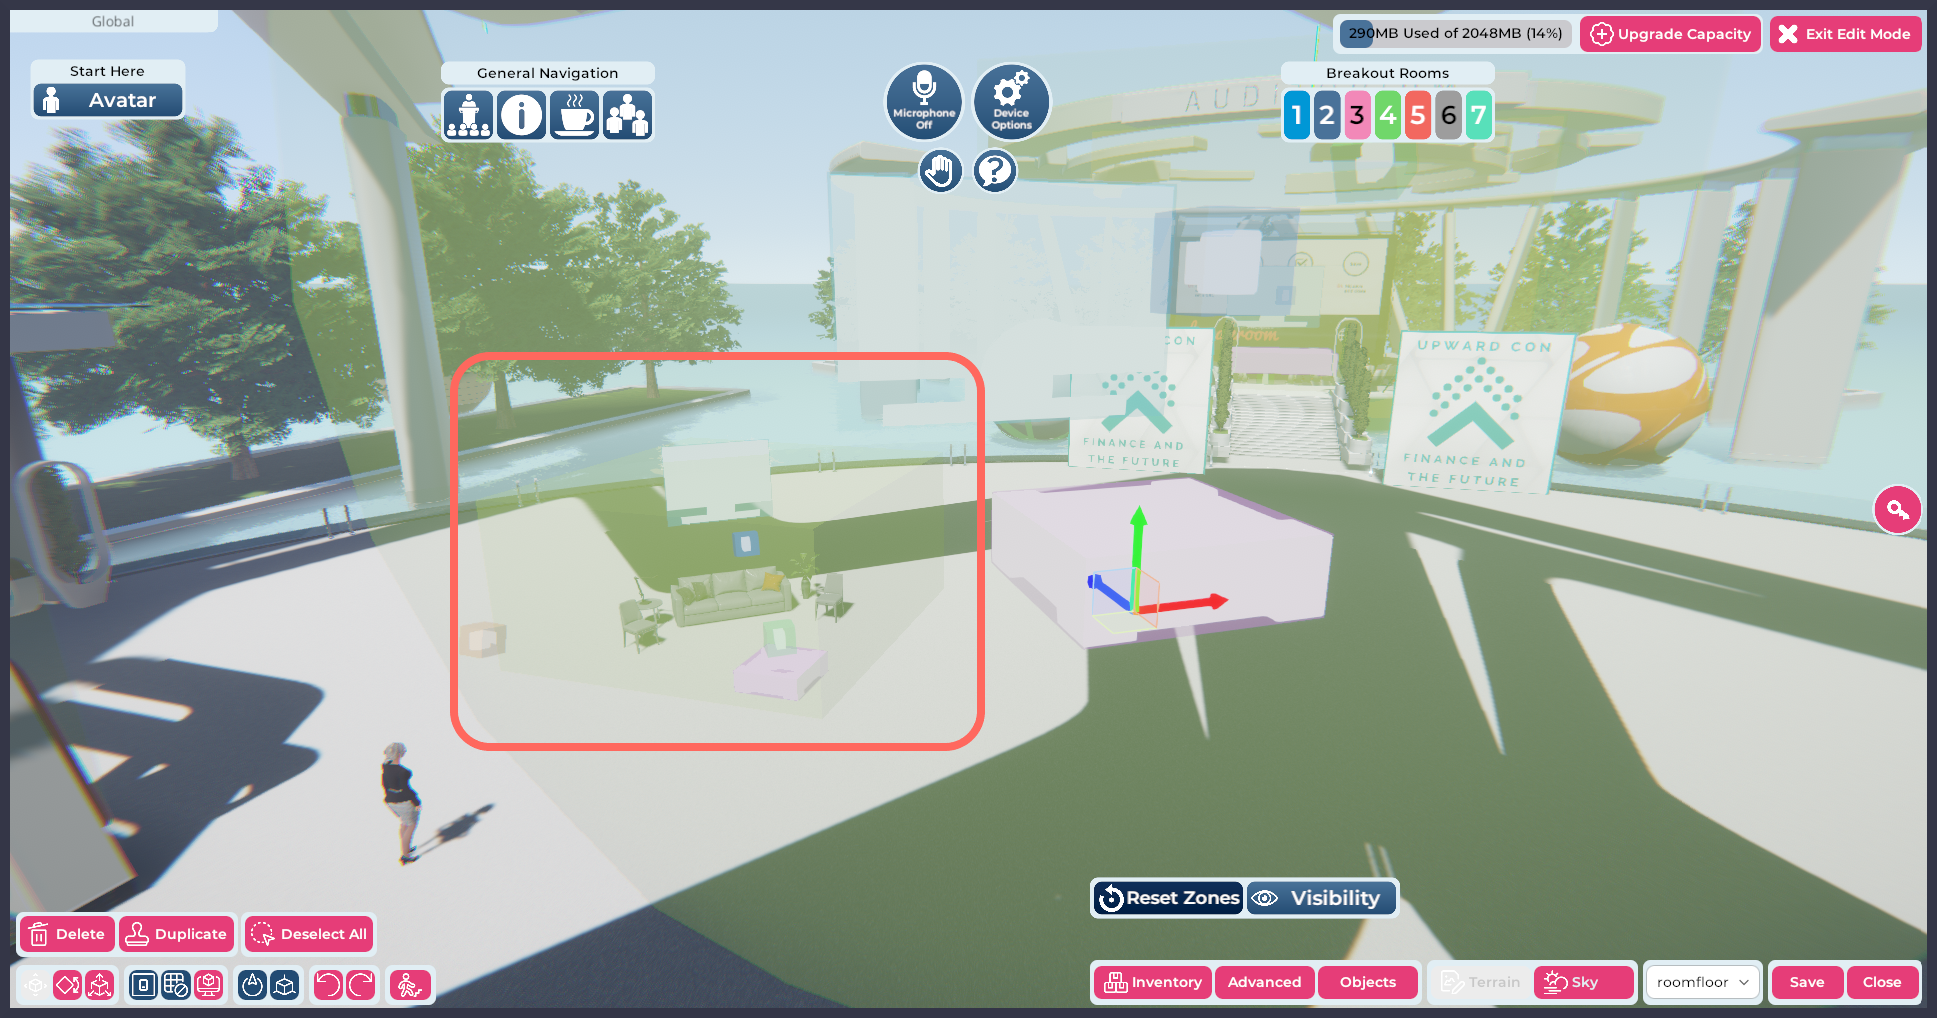
PIctured: An example of two nested voice zones in the Region Editor, with the smaller one highlighted.
The Zone Priority property can be used to create "nested" voice zones, or voice zones located inside other voice zones. In the image above you will see multiple voice zones, some of which are overlapping:
- The cozy chat area (highlighted), located in its own cube-shaped voice zone
- The concourse end (center), located in a spherical voice zone
- The auditorium (back), with its own associated voice zone
- The Global voice zone (not highlighted), which covers the entirety of the Region
Let us consider the voice zones represented by the cube and the sphere, specifically. By setting the large spherical voice zone as Priority 2 and the cube as Priority 3, we can specify that users seated within the cozy chat area should only participate in audio or video chat with each other, even though their avatars are technically also located inside the sphere... which is located inside the Global voice zone.
Creating nested voice zones may appear to be a simple matter stacking voice zones on top of one another. However, doing so may not achieve the effect you want—what matters is the Zone Priority number each voice zone has been assigned. The Global voice zone is always Priority 1; the higher the number, the higher the zone priority.
To edit an area's Zone Priority:
- Follow the steps above to access the RoomFurniture component.
- In the Zone Priority field, enter the priority number you want to assign to the voice zone.
- Click the Reset Zones button to reset the conferencing system.
- Click the Save button to store your changes. Click the Close button to exit the Region Editor.
Zone Color
When you add a new Breakroom Breakout Area to your Region, it will automatically assign itself a unique Zone Color. This color will be applied to the actual breakout space, and will also be used as the teleport button background color in the Breakout Rooms panel.
To change the Zone Color:
- Follow the steps above to access the RoomFurniture component.
- In the Zone Color field, enter one of the following color keywords:
- Blue
- Orange
- White
- Grey
- Magenta
- Teal
- Black
- Cyan
- Red
- Purple
- Pink
- Green
- Yellow
- Click the Reset Zones button to reset the conferencing system.
- Click the Save button to store your changes.
Changing the Zone Color presets
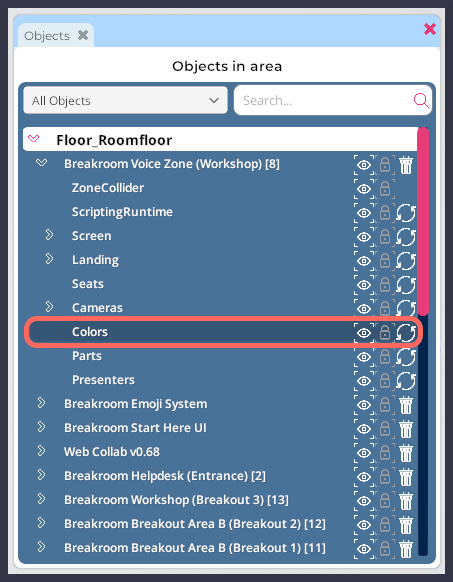
Highlighted: The location of the Colors component.
If you like, you can change the hexadecimal presets for each of the color keywords listed above. To do so, follow these steps.
- Log in to your Breakroom World and navigate your avatar to the Region you would like to edit.
- Open the Region Editor by clicking the Edit Region button at the bottom of your screen.
- Click the Objects Button to launch the Objects window.
- In the Objects window, locate the Breakroom Breakout Area or Breakroom Voice Zone object you want to edit. (Tip: You can use the search field at the top of the window to search for a specific object.) Expand that object by clicking the > arrow located to the left of the object name.
- Locate the Colors component and click on it. This will launch the Inspector window.
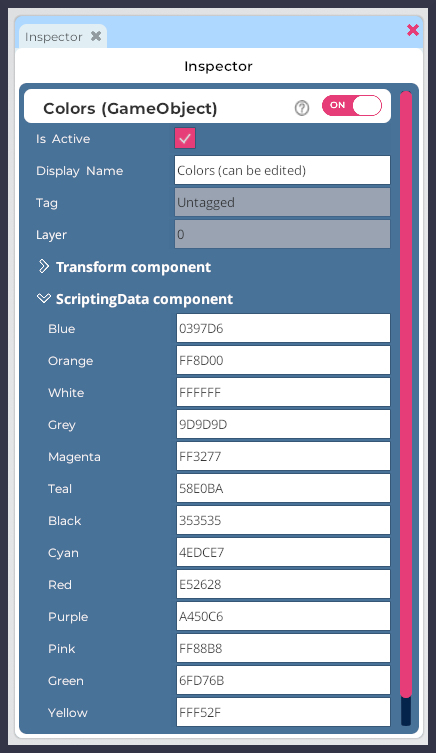
- In the Inspector window, expand the ScriptingData component by clicking the > arrow next to its name.
- Enter the hexadecimal color codes you would like to assign to each keyword.
- Click the Reset Zones button to reset the conferencing system.
- Click the Save button to store your changes. Click the Close button to exit the Region Editor.
Color keywords can only be edited on a per-object basis. They cannot be changed on a global basis.
Zone Camera Default
By editing the Zone Camera Default property, you can change which camera angle users see when they first sit down in a breakout area or voice zone. Camera options include:
- Behind
- Forward
- Speaker
- Screen
- Audience
- Free
To change the default camera:
- Follow the steps above to access the RoomFurniture component.
- In the Zone Camera Default field, enter the name of the camera you would like to use (behind, forward, speaker, screen, audience, or free).
- Click the Reset Zones button to reset the conferencing system.
- Click the Save button to store your changes. Click the Close button to exit the Region Editor.
Zone Camera List
By editing the Zone Camera List, you can change which camera angles users will be able to access through the gesture and camera panel. Camera options include:
- Behind
- Forward
- Speaker
- Screen
- Audience
- Free
By default, the Zone Camera List is blank, indicating that users have access to all of the cameras listed above. If you enter one or more specific camera names, users will be restricted to only those choices.
To edit the Zone Camera List:
- Follow the steps above to access the RoomFurniture component.
- In the Zone Camera List field, enter the camera names you want to make available, separated by commas. For example:
Behind,Speaker
- Click the Reset Zones button to reset the conferencing system.
- Click the Save button to store your changes. Click the Close button to exit the Region Editor.
Zone Visible
The Zone Visible property controls whether a breakout area or custom voice zone appears in any navigation tools. This includes the Breakout Rooms panel and the Areas of Interest panel.
To add or remove a breakout area or custom voice zone from Region navigation tools:
- Follow the steps above to access the RoomFurniture component.
- In the Zone Visible field, enter the word yes or no.
- Click the Reset Zones button to reset the conferencing system.
- Click the Save button to store your changes. Click the Close button to exit the Region Editor.
Screen options (Width, Height, Scale)
The Width, Height, and Scale properties can be used to change the aspect ratio or size of the screen used to display user-driven media inside a breakout area or voice zone. By manually editing the Width and Height fields, you can create custom aspect ratios.
You can also edit the final display size of the screen overall by changing the number in the Scale field. The value in this field is a multiplier with a default of 1, so you might enter .5 to create a screen half the size, or 2 to create a screen double the size. Our custom voice zone walkthrough contains an illustrated example of how you might edit this field.
As a brief overview, to edit a voice zone screen's aspect ratio or size:
- Follow the steps above to access the RoomFurniture component.
- In the Width, Height, or Scale fields, enter the value(s) you prefer.
- Click the Reset Zones button to reset the conferencing system.
- Click the Save button to store your changes. Click the Close button to exit the Region Editor.