Adding breakout areas
Overview
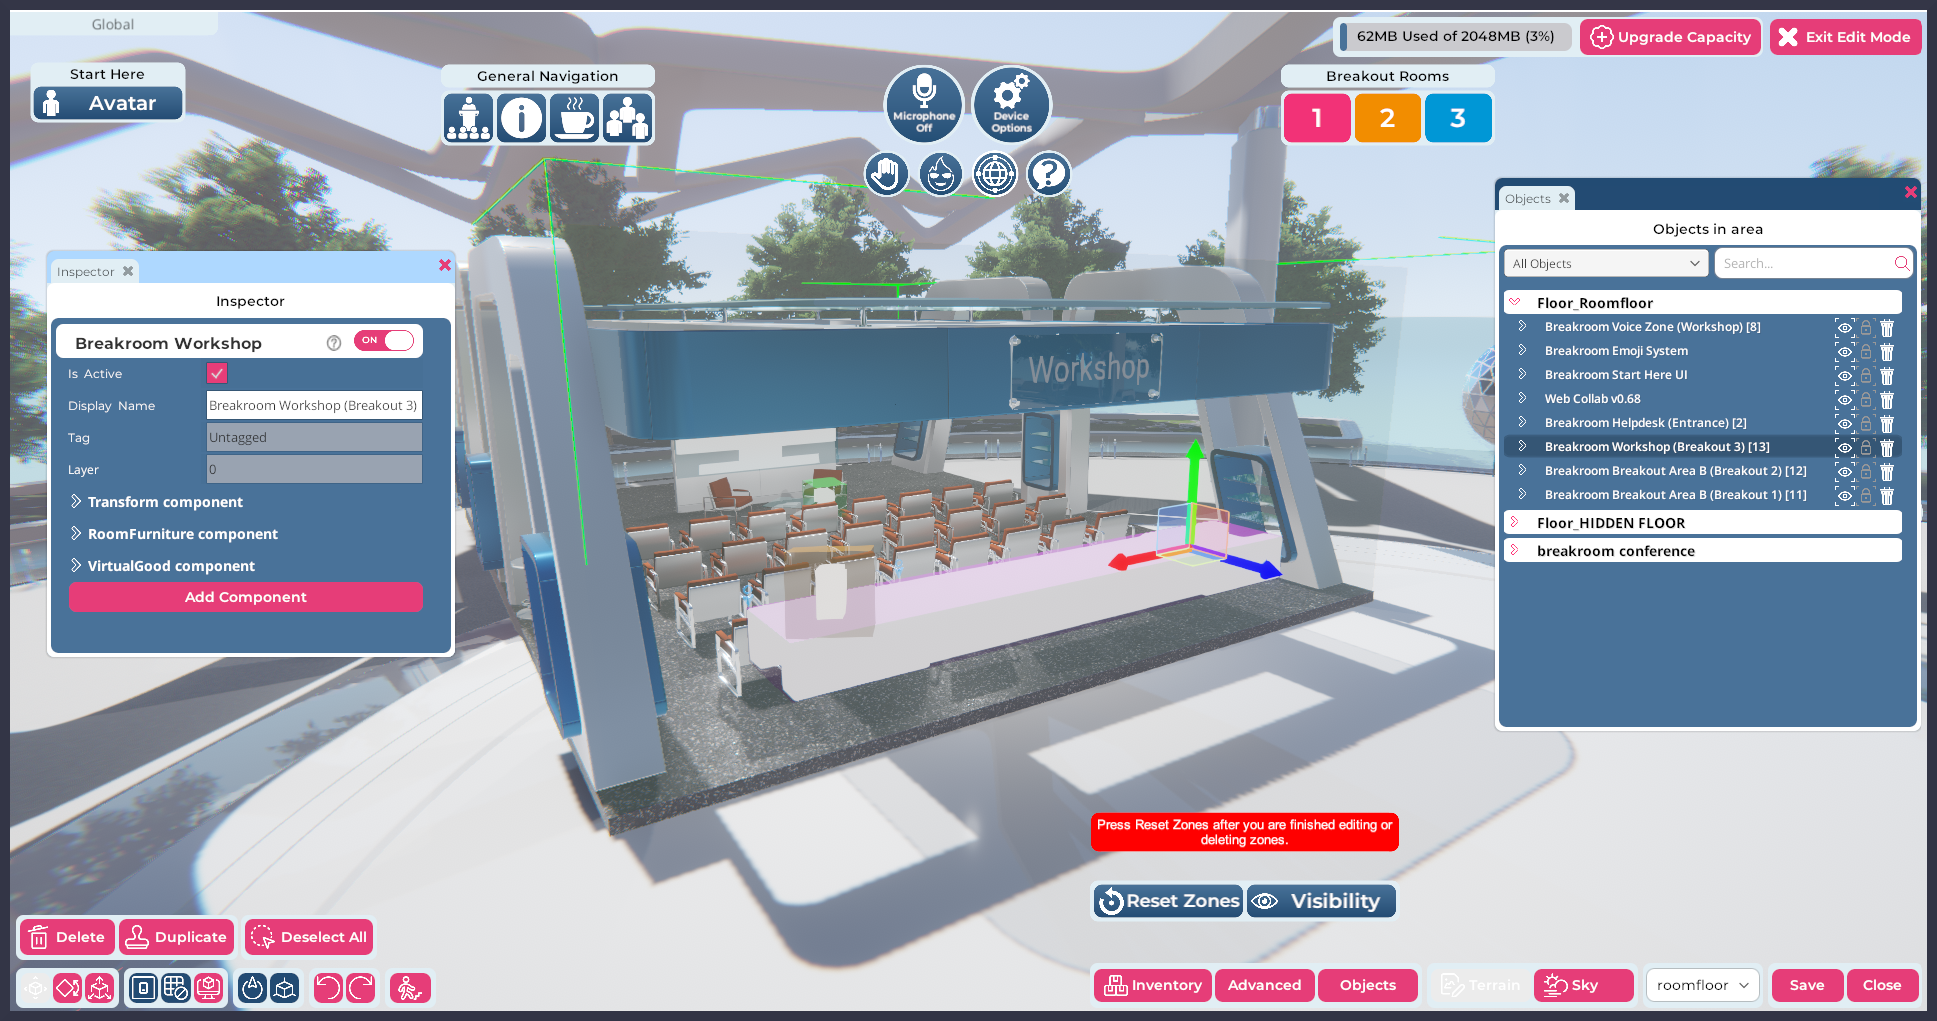
Pictured: A breakout area being added to a Region.
Breakroom's prefab breakout areas come with voice zones and conference tools pre-installed. Each breakout area object you install in your Region will automatically receive its own custom Zone ID, Zone Color, and a unique Zone Name that will be added to the Breakout Rooms panel. These options can all be changed to suit the needs of your event.
The instructions provided in this section presume an advanced working knowledge of Breakroom. Please consult our documentation if you need help installing and positioning virtual objects, or editing the RoomFurniture component.
After using the Region Editor to add or edit a voice zone, always remember to click the Reset Zones button to reset the conferencing system. If this doesn't seem to push your changes forward, try saving your work, leaving the Region, and entering it again.
Locating the breakout area objects
A selection of prefab breakout rooms, booths, offices, and workshops can be found in the Breakroom Toolkit. Detailed descriptions of each breakout area object are also available.
Adding breakout areas using the Region Editor
You can add any of the breakout area objects to your Region using the Region Editor. The quick-start instructions below are provided for your convenience.
- Log in to your Breakroom World and navigate your avatar to the Region you would like to edit.
- Open the Region Editor by clicking the Edit Region button at the bottom of your screen.
- Click the Inventory Button to launch your Inventory window.
- Locate the Breakroom Breakout Area object you want to use. Add it to your Region using your preferred method.
- The breakout area will automatically receive its own Zone ID, Zone Color, and a unique Zone Name. If you want to edit any of these properties, please refer to the section that follows.
- Using the Region Editor tools, position the breakout area to meet your specifications.
- Click the Reset Zones button to reset the conferencing system.
- When you are satisfied, click the Save button to store your changes. Click the Close button to exit the Region Editor.
Understanding breakout area Display Names
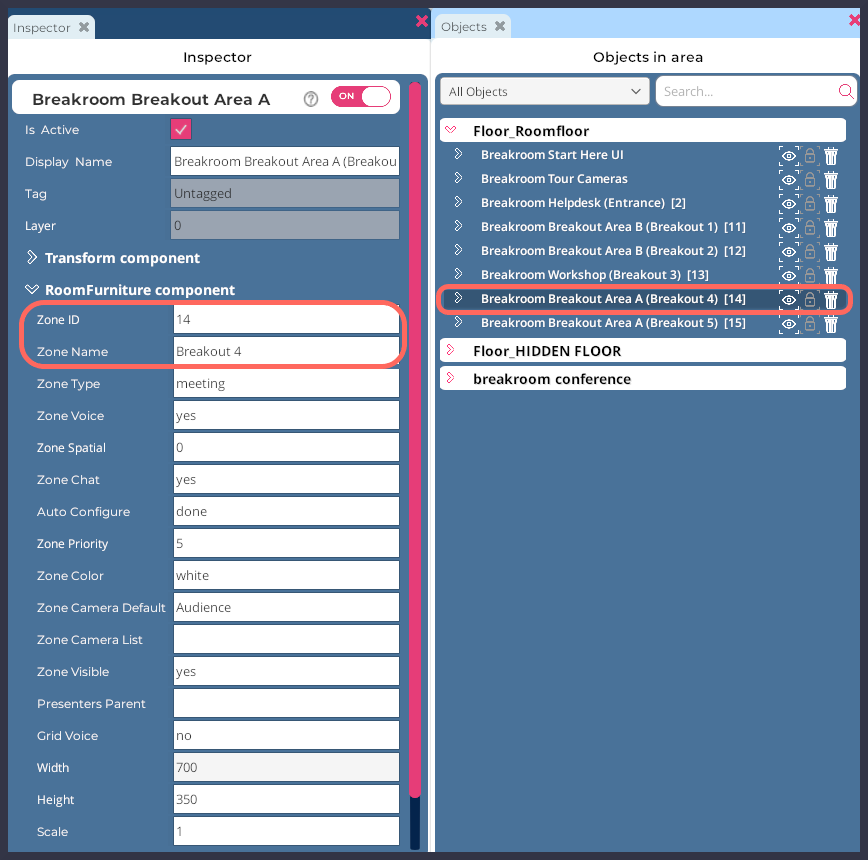
Pictured: The Objects and Inspector windows. Notice how the highlighted Breakroom Breakout Area A object is tagged with both its Zone ID and Zone Name.
If you add multiple copies of any object to your Region, you will notice that every copy is identified by the same name in the Objects window. The same is true of breakout area and voice zone objects. However, to facilitate Region setup and management, these objects will acquire two additional information tags after installation:
- Zone ID: This number will be displayed using [brackets]
- Zone Name: This information will be displayed in (parenthesis)
These information tags can help you identify your breakout areas and resolve duplicate zone errors.
Editing breakout area details
Breakout areas are designed to automatically set themselves up. However, you may run into situations where you need to change some breakout area details. To do this, you will need to locate and edit the object's RoomFurniture component.
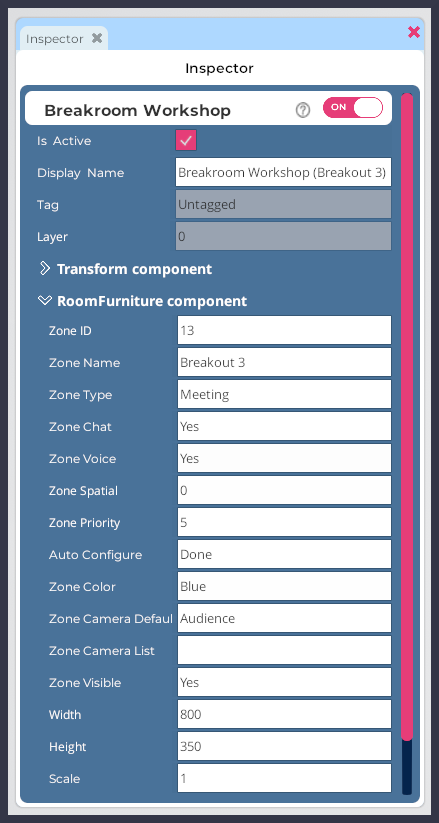
Pictured: The RoomFurniture component, expanded to display all 15 fields.
- Log in to your Breakroom World and navigate your avatar to the Region you would like to edit.
- Open the Region Editor by clicking the Edit Region button at the bottom of your screen.
- Click the Objects Button to launch the Objects window.
- In the Objects window, locate the Breakroom Breakout Area object you want to edit. (Tip: You can use the search field at the top of the window to search for a specific object.) Click on the object name to launch the Inspector window.
- In the Inspector window, locate the RoomFurniture component. Expand this component by clicking the > arrow located to the left of its name.
The RoomFurniture component properties are covered in more detail in our RoomFurniture component documentation. There you can learn how to enable or disable chat in voice zones, adjust the screen aspect ratio and size, change a breakout area's zone type, and other advanced tricks.
For the purposes of quick Region setup, this page will focus on the following properties:
- Zone ID: The ID number of the audio zone associated with the breakout area
- Zone Name: The name/room number associated with the audio zone
- Zone Color: The color of the breakout area and its corresponding teleport button
There are certain situations where you may want to manually change the values in these property fields.
Zone ID

If two breakout areas or voice zones are assigned the same Zone ID, users in those areas will be considered to be within the same audio zone, even if they are separated by the entire length of a Region. Such a setup may result in cross-talk and general confusion.
If you encounter a situation like this and want to resolve it, or if you want to renumber your breakout areas and voice zones for more efficient Region management, you can do so by following these steps.
- Log in to your Breakroom World and navigate your avatar to the Region you would like to edit.
- Open the Region Editor by clicking the Edit Region button at the bottom of your screen.
- Make sure the Objects window is open by clicking the Objects button located on the bottom right.
- Locate the Breakroom Breakout Area object you want to edit in the Objects window, and click on it. This will open the Inspector window for that object.
- Expand the RoomFurniture component in the Inspector window by clicking the > icon located to the left.
- Locate the Zone ID property. In the associated field, enter the ID number you wish to use for that breakout area.
- Click the Reset Zones button to reset the conference system.
- Click the Save button to store your changes. Click the Close button to exit the Region Editor.
If you need additional help resolving duplicate zone errors in your Region, please visit our dedicated troubleshooting page.
Zone Name

Each breakout area has a Zone Name in the format of "Breakout N," where N is a unique number. This name relays several important pieces of information to the Breakroom conference system. Most importantly, it indicates:
- That the breakout area should be included in the Breakout Rooms panel
- How many breakout areas there are, and which number identifies this particular breakout area
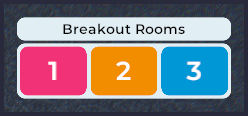
Pictured: An example Breakout Rooms panel.
There may come times when you need to edit the teleport button lineup—for instance, if the first breakout area you set down (which automatically became "Breakout 1" and was assigned to the "1" button) has been moved to a far-off area, and you'd rather make it "Breakout 5." Alternatively, you may wish to create a custom voice zone and add it to the Breakout Rooms panel.
You can edit the Zone Name by following the steps below.
- Log in to your Breakroom World and navigate your avatar to the Region you would like to edit.
- Open the Region Editor by clicking the Edit Region button at the bottom of your screen.
- Make sure the Objects window is open by clicking the Objects button located on the bottom right.
- Locate the Breakroom Breakout Area object you want to edit in the Objects window, and click on it. This will open the Inspector window for that object.
- Expand the RoomFurniture component in the Inspector window by clicking the > icon located to the left.
- Locate the Zone Name property. In the associated field, enter a new name for the breakout area. This name must be input as "Breakout N," where N is the new number.
- Click the Reset Zones button to reset the conference system.
- Click the Save button to store your changes. Click the Close button to exit the Region Editor.
Zone Color

When you add a new prefab breakout area to your Region, it will automatically assign itself a unique Zone Color. This color will be applied to the actual breakout area object, and will also be used as the teleport button background color in the Breakout Rooms panel.
If you want to change a breakout area's color, you can do so by following these steps.
- Log in to your Breakroom World and navigate your avatar to the Region you would like to edit.
- Open the Region Editor by clicking the Edit Region button at the bottom of your screen.
- Make sure the Objects window is open by clicking the Objects button located on the bottom right.
- Locate the Breakroom Breakout Area object you want to edit in the Objects window, and click on it. This will open the Inspector window for that object.
- Expand the RoomFurniture component in the Inspector window by clicking the > icon located to the left.
- Locate the Zone Color property. In the associated field, enter any of the following colors:
- Blue
- Orange
- White
- Grey
- Magenta
- Teal
- Black
- Cyan
- Red
- Purple
- Pink
- Green
- Yellow
- Click the Reset Zones button to reset the conferencing system.
- Click the Save button to store your changes.
If you want to change the hexadecimal code associated with any of these color keywords, you can find instructions by reviewing our RoomFurniture component documentation.
Editing breakout area cameras
All of Breakroom's voice zones, including those built into the prefab breakout areas, come equipped with cameras. These cameras integrate with the conference system gesture and camera controls, allowing users to switch between a variety of camera angles while seated.
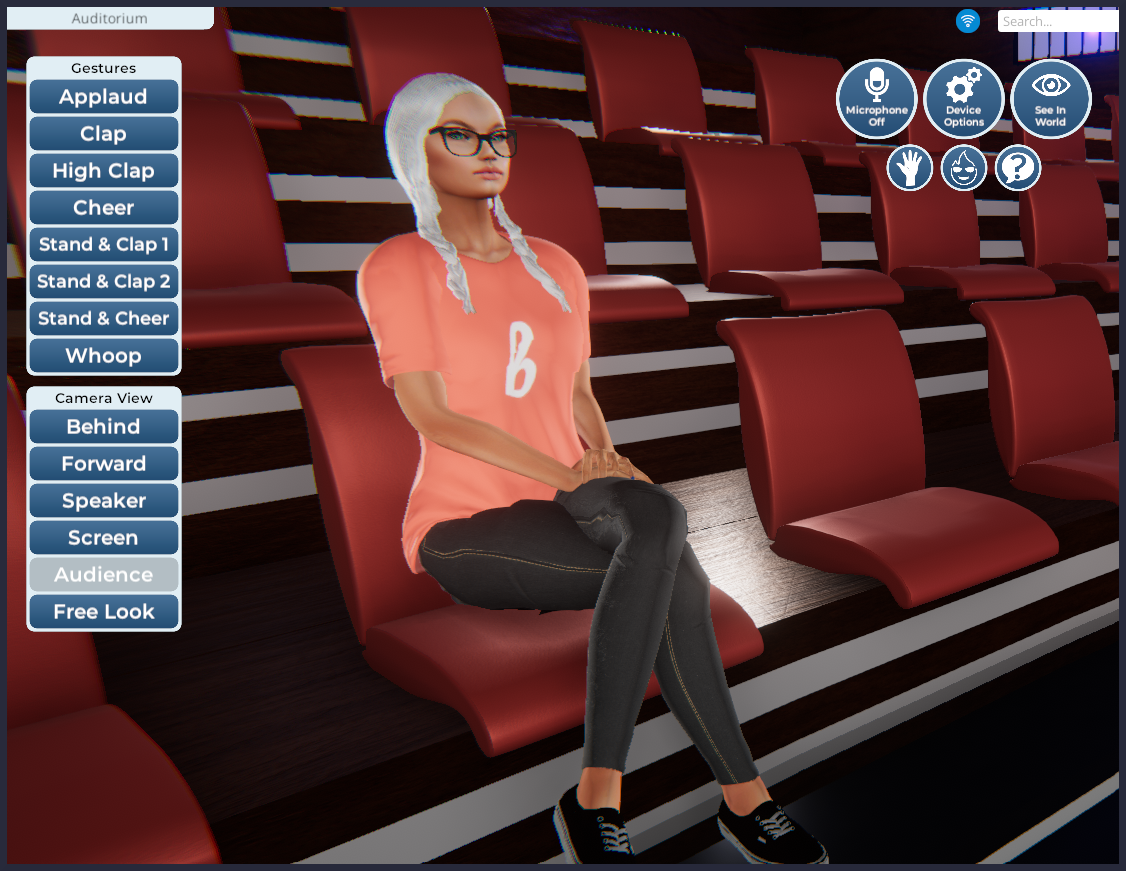
Pictured: An avatar seated in an audience seat. Note the Gestures and Camera View panels on the left side of the screen.
The Behind Camera and Forward Camera are fixed relative to the user. However, the angle and location of the Speaker Camera, Screen Camera, or Audience Camera can be customized to support your individual needs.
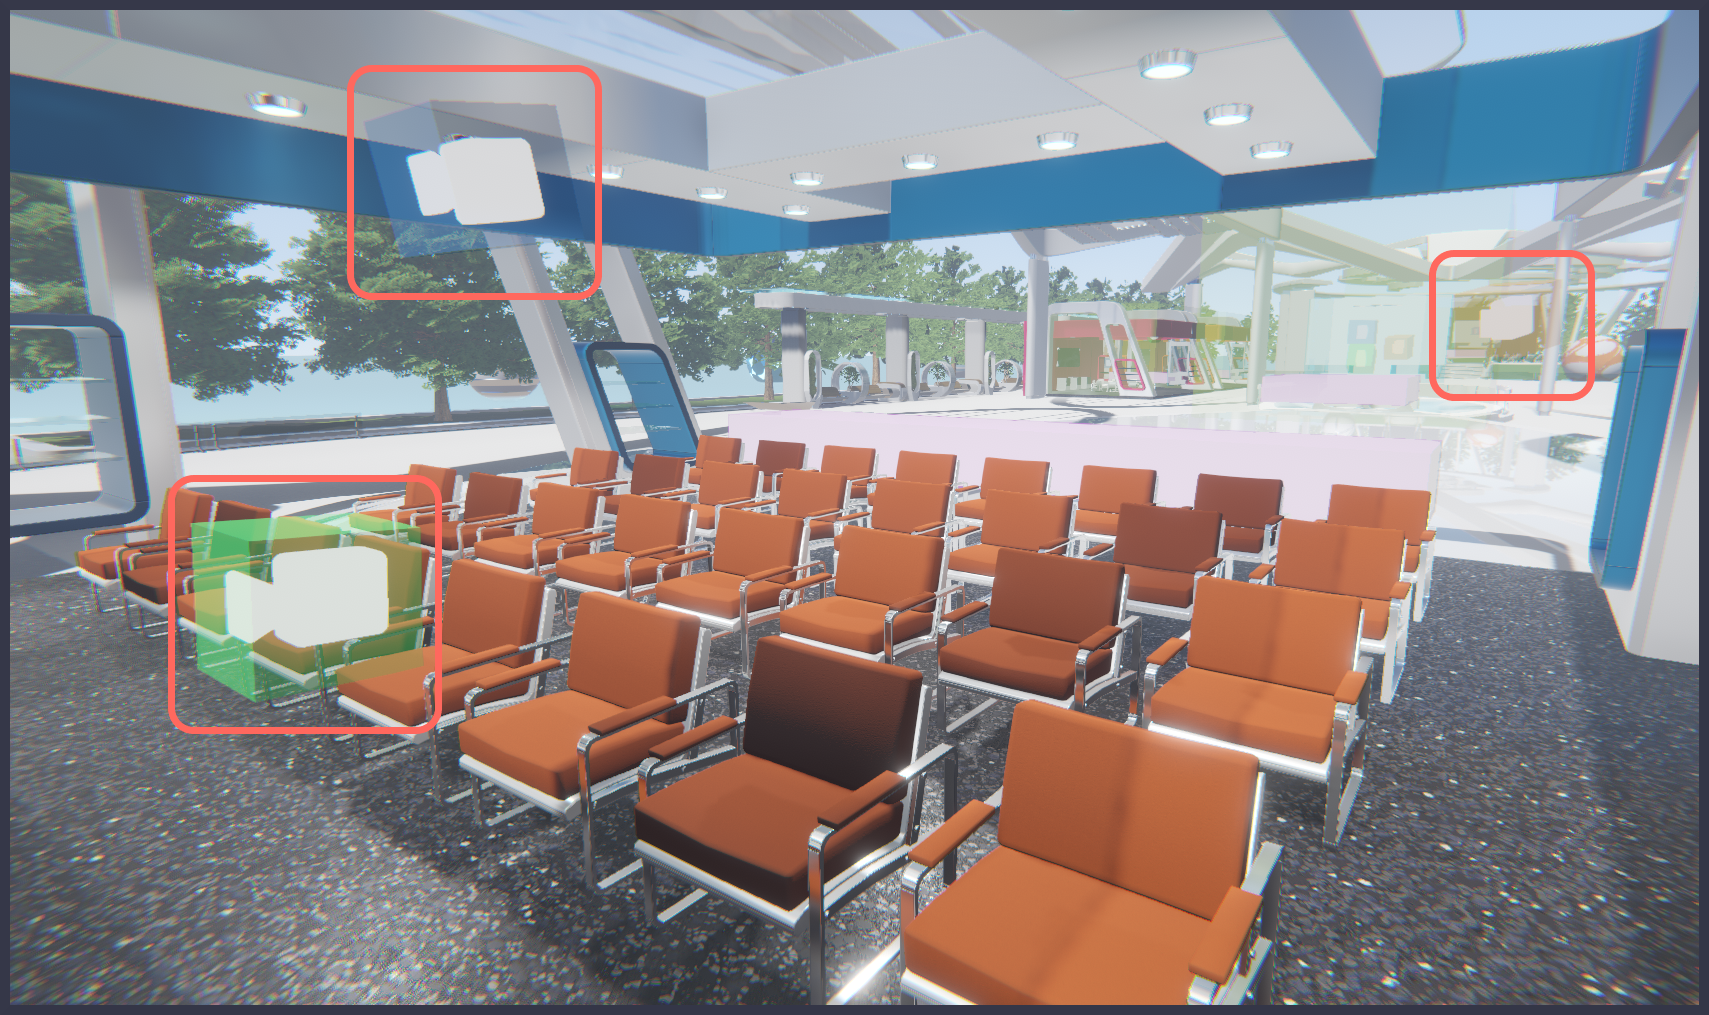
In the image above, you can see the location of these cameras highlighted in the Region Editor. There are three cameras, each represented by a 3D camera icon bounded by a translucent box. The box color corresponds to the camera type, and these colors are consistent between all voice zones and breakout areas.
| Box Color | Camera Name | Camera Focus |
|---|---|---|
| Orange | Audience | The audience as a whole. |
| Blue | Screen | The presentation screen. |
| Green | Speaker | The presenting speaker's avatar. |
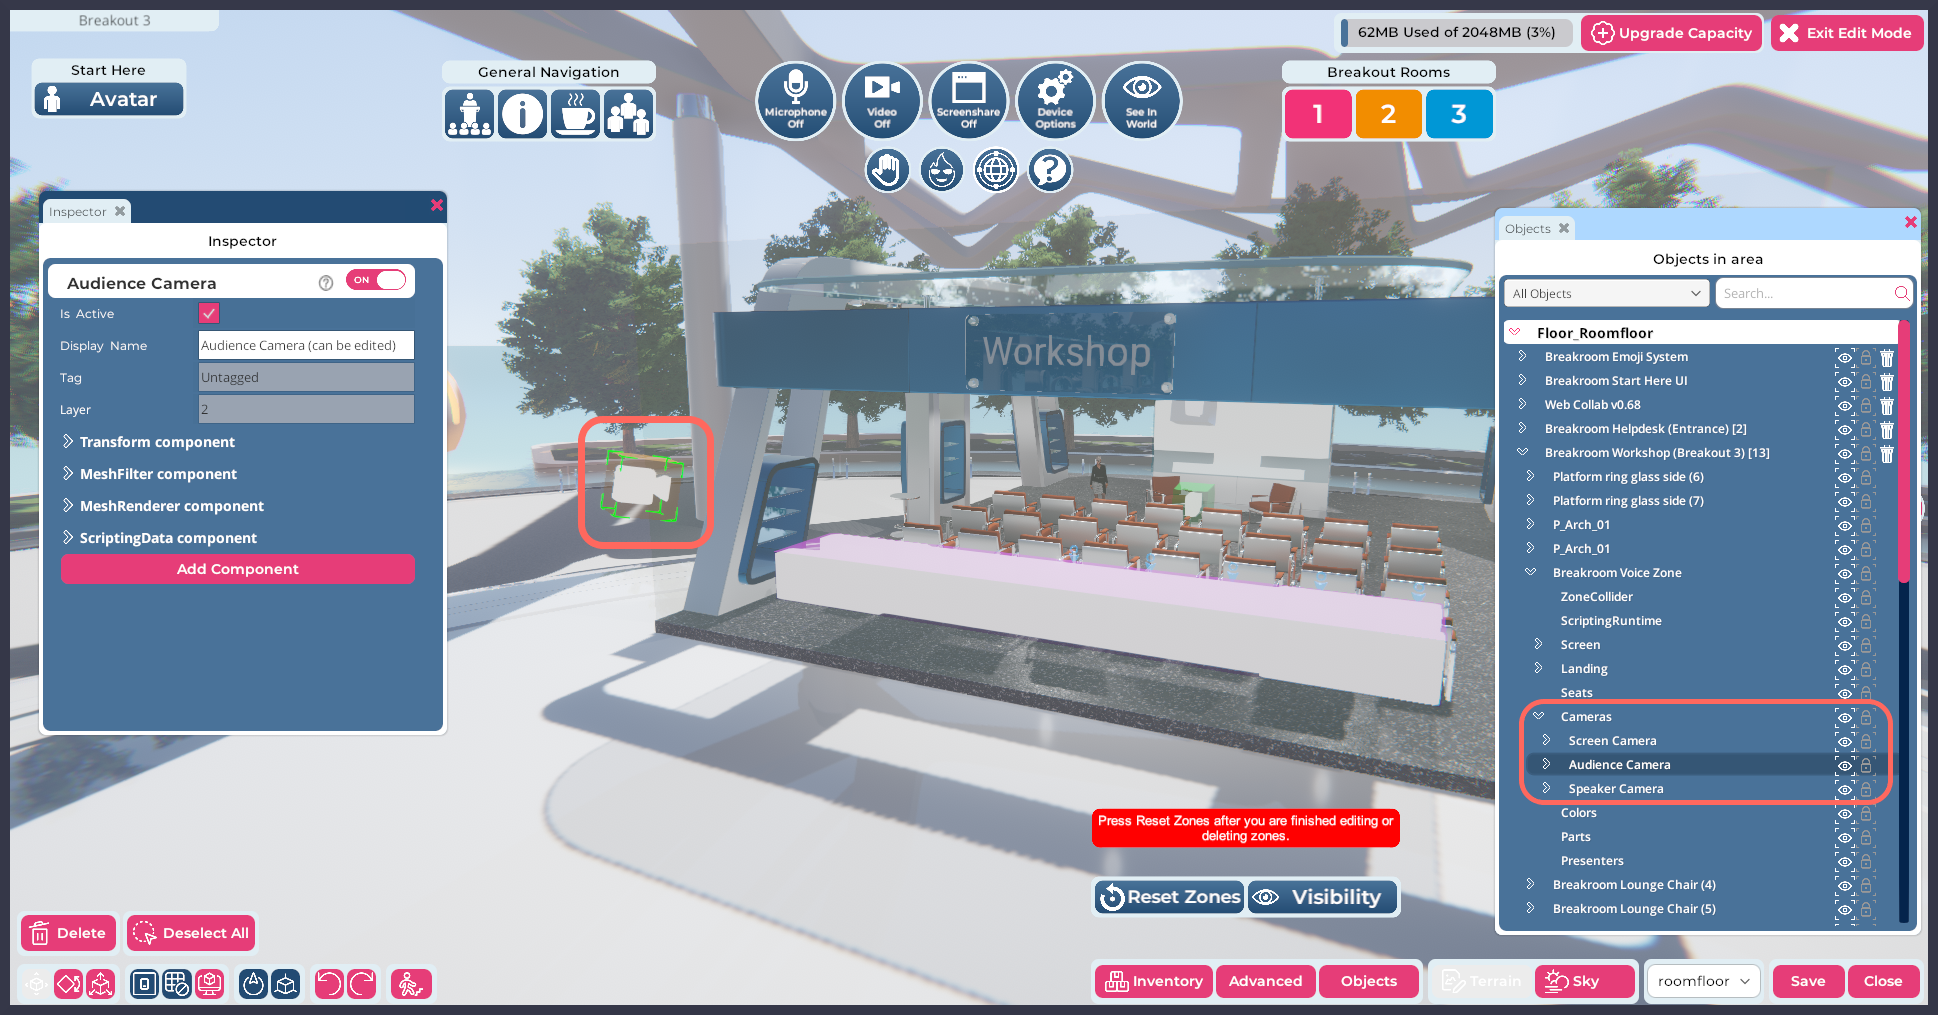
Highlighted: The static audience camera selected in Region Editor. Notice how the Workshop object has been expanded in the Objects window.
If you want to change the angle of any of these cameras, you can do so by following the instructions below.
Note: In this section, we will refer to the built-in camera that you want to move as the static camera, and your own user camera as the working camera.
- Log in to your Breakroom World and navigate your avatar to the Region you would like to edit.
- Open the Region Editor by clicking the Edit Region button at the bottom of your screen.
- Make sure the Objects window is open by clicking the Objects button located on the bottom right.
- Locate the Breakroom Breakout Area object you want to edit in the Objects window. Click the > icon to the left of the object name to expand it.
- Locate the Breakroom Voice Zone object, and click the > icon to the left of the object name to expand it.
- Locate the Cameras object, and click the > icon to the left of the object name to expand it.
- Click on the static camera you want to move (either the Screen Camera, Audience Camera, or Speaker Camera). This static camera will be highlighted on your screen, and the movement gizmo will center on it.
- Leaving the static camera object selected, move your working camera into position. This angle and position will replace the current angle of the selected static camera.

Highlighted: The location of the Move Object to Camera button.
- Click the "Move Object to Camera" button located in the bottom toolbar. The static camera will snap into its new position.
- Click the Reset Zones button to reset the conference system, and click the Save button to store your changes.
- Click the Close button to exit the Region Editor. To make sure your UI is refreshed, exit the breakout area or voice zone. When you return to that zone, your new camera angle will now be accessible.