Breakroom Games
Overview
The Breakroom Games system allows you to fill your Regions with activities and minigames that your users can complete for points. The system includes several required and optional components, which can be combined in order to:
- Encourage and reward exploration
- Create obstacle courses and scavenger hunts
- Host trivia competitions
- Foster engagement with social media
In order for the Breakroom Games components to work, users with appropriate World- or Region-level permissions will need to place them in a Region and edit their components. The instructions provided below presume an advanced working knowledge of Breakroom. Please consult our documentation if you need help installing and positioning virtual objects or editing the RoomFurniture component.
Introduction to the Breakroom Games components
Before we walk through a sample Breakroom Games installation, it’s important to identify the individual system components and describe how they function. For your convenience, we've included video tutorials and text-based instructions for working with each system component.
Leaderboard
The Breakroom Games Leaderboard object displays the ten highest scores for a single game in the Region, as well as the individual viewer’s personal score. A single game can consist of one or more activity and minigame objects (for example, a Leaderboard may show scores for a single Trivia object, or it may show the combined scores for ten separate Clickable objects set up for a scavenger hunt).
In your Inventory, you'll see the Breakroom Games Leaderboard represented by this icon: 
Setting up the Leaderboard object
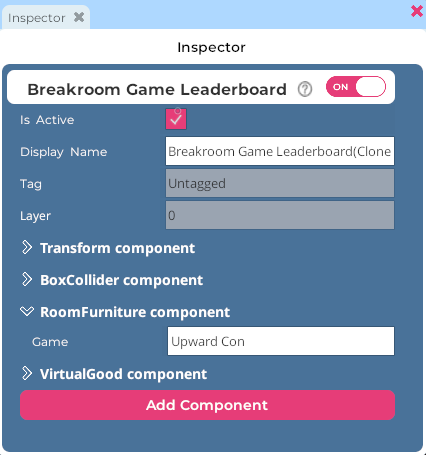
Pictured: The Inspector window for the Breakroom Games Leaderboard object.
After positioning the Breakroom Games Leaderboard object in your Region, you will need to edit its RoomFurniture component. The steps below are provided for easy reference.
- Open the Region Editor by clicking the Edit Region button in the top toolbar.
- Click the Objects Button to launch the Objects window.
- In the Objects window, locate the Breakroom Games Leaderboard object you want to edit. (Tip: You can use the search field at the top of the window to search for a specific object.) Click on the object name to launch the Inspector window.
- In the Inspector window, locate the RoomFurniture component. Expand this component by clicking the > arrow located to the left of its name.
- In the Game field, enter the name of the game you want to track.
- Click the Save button to store your changes, and the Close button to exit the Region Editor.
- Click the Reload Game button on the appropriate Breakroom Games Taskboard object.
Each Breakroom Games Leaderboard object you set up will track points for a single game. It is important to emphasize that a single game can consist of one or more activity and minigame objects. You can set up multiple leaderboards within a Region, all tracking the same game (for ease of reference) or tracking different games.
For example, you may wish to set up a leaderboard to track a clickable scavenger hunt in one section of your Region, and a separate leaderboard to track trivia points in a pub on the other side of the Region. To differentiate these games, you might enter the name Scavenger Hunt into the game objects and leaderboards associated with the hunt, and the name Trivia into the game objects and leaderboards associated with the trivia.
Using the Leaderboard object
If you look at the Breakroom Games Leaderboard object, you will see the top ten scores for the game the leaderboard is set up to track, as well as your personal score in the top right corner.
Taskboard
The Breakroom Games Taskboard object shows all activity and minigame objects associated with a single game, sorted by name and category, and indicates whether the individual viewer has completed those activities. The Taskboard also contains administrative control buttons for resetting and reloading game and user data.
In your Inventory, you'll see the Breakroom Games Taskboard represented by this icon: 
Setting up the Taskboard object
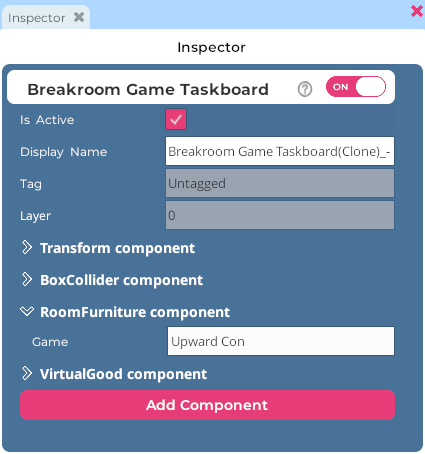
Pictured: The Inspector window for the Breakroom Games Taskboard object.
After positioning the Breakroom Games Taskboard object in your Region, you will need to edit its RoomFurniture component. The steps below are provided for easy reference.
- Open the Region Editor by clicking the Edit Region button in the top toolbar.
- Click the Objects Button to launch the Objects window.
- In the Objects window, locate the Breakroom Games Taskboard object you want to edit. (Tip: You can use the search field at the top of the window to search for a specific object.) Click on the object name to launch the Inspector window.
- In the Inspector window, locate the RoomFurniture component. Expand this component by clicking the > arrow located to the left of its name.
- In the Game field, enter the name of the game you want to track.
- Click the Save button to store your changes, and the Close button to exit the Region Editor.
- Click the Reload Game button on the Breakroom Games Taskboard.
Each Breakroom Games Taskboard object you set up will track the activity and minigame objects associated with a single game. It is important to emphasize that a single game can consist of one or more activity and minigame objects. You can set up multiple taskboards within a region, all tracking the same game (for ease of reference) or tracking different games.
To build on the example given above, after you set up two separate games in your region (named Trivia and Scavenger Hunt, respectively), you may want to add two different taskboards set to track the tasks associated with those games.
Using the Taskboard object
Most users only need to look at the Taskboard object in order to use it. When game tasks are completed, a green check mark will appear in the box associated with that task.
Users with appropriate World- or Region-level permissions can access additional administrative functions through the Taskboard object.
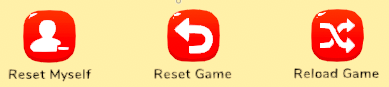
| Button | Function |
|---|---|
| Reset Myself | Resets your personal score for the game in question. |
| Reset Game | Resets any shared game data (e.g. the current trivia question). |
| Reload Game | Reloads the entire game and its components. Does not delete user data (e.g. points earned). |
Rewards
The Breakroom Games Reward object is a generic reward system that unlocks after a player reaches a certain point threshold. Currently the Reward object can only be used as a simple “completion” indicator, but in the future, you'll be able to reward your players with achievements and Silver.
Like the Leaderboard and Taskboard objects, each Reward object can be set up to track a single game. This means that only points earned on activities and minigames associated with that game will count toward the reward. Multiple Reward objects can be set up for the same game.
In your Inventory, you'll see the Breakroom Games Reward object represented by this icon: 
Setting up a Rewards object
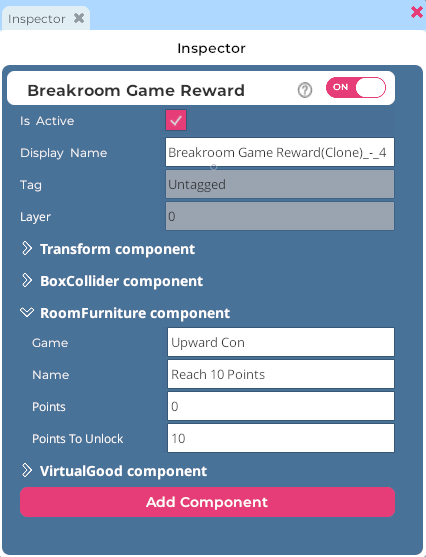
Pictured: The Inspector window for the Breakroom Games Reward object.
After positioning the Breakroom Games Reward object in your Region, you will need to edit its RoomFurniture component. The steps below are provided for easy reference.
As with all invisible system objects, we recommend editing the Transform component to place the Breakroom Games Reward object at 0,0,0. This keeps things tidy in your Region!
- Open the Region Editor by clicking the Edit Region button in the top toolbar.
- Click the Objects Button to launch the Objects window.
- In the Objects window, locate the Breakroom Games Reward object you want to edit. (Tip: You can use the search field at the top of the window to search for a specific object.) Click on the object name to launch the Inspector window.
- In the Inspector window, locate the RoomFurniture component. Expand this component by clicking the > arrow located to the left of its name.
- In the Game field, enter the name of the game you want to track.
- In the Name field, enter the name of your reward activity (e.g. Reach 10 Points, Find 50 Keys).
- In the Points field, enter the number of points you would like to award users for completing the reward activity (optional).
- In the Points To Unlock field, enter the number of points users must accumulate to earn the reward.
- Click the Save button to store your changes, and the Close button to exit the Region Editor.
- Click the Reload Game button on the appropriate Breakroom Games Taskboard object.
Using a Rewards object
Most users will interact with the Reward object in a passive manner. Once they have met the specified point threshold, they will earn the reward.
Findable
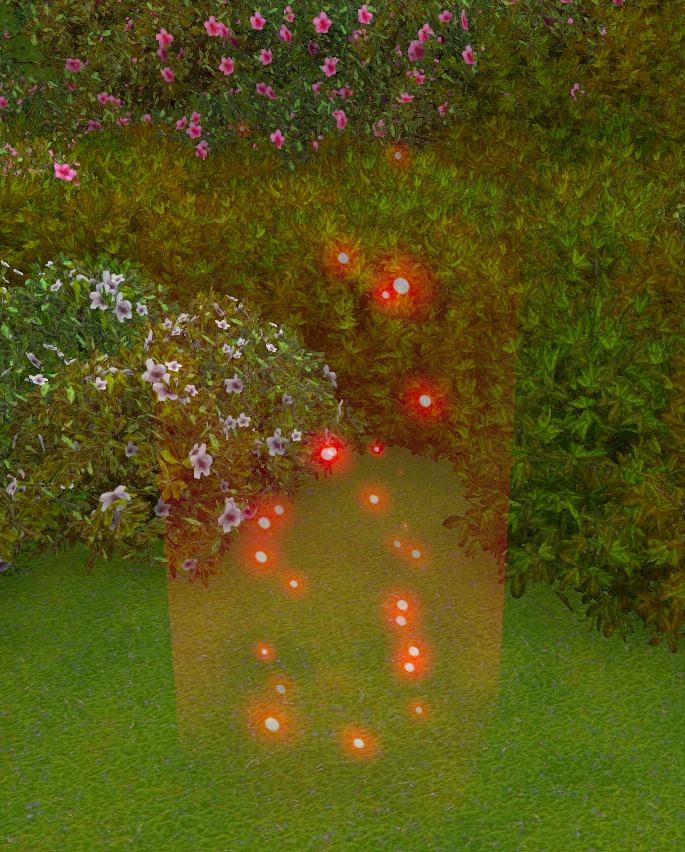
Pictured: A Breakroom Games Findable object nestled in a group of bushes.
Breakroom Games Findable objects are generic, transparent objects that can be placed anywhere in a Region. Findables are triggered by avatar proximity and can be used to create scavenger hunts or obstacle courses. You can highlight these objects with glowing particles for ease of discovery, or make them completely invisible.
In your Inventory, you'll see the Breakroom Games Findable object represented by this icon: 
Setting up a Findable object
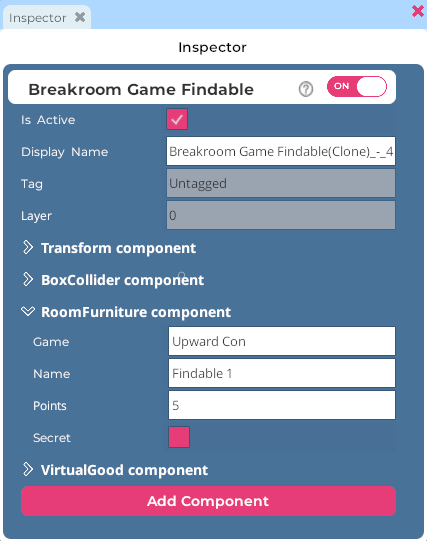
Pictured: The Inspector window for the Breakroom Games Findable object.
After positioning the Breakroom Games Findable object in your Region, you will need to edit its RoomFurniture component. The steps below are provided for easy reference.
- Open the Region Editor by clicking the Edit Region button in the top toolbar.
- Click the Objects Button to launch the Objects window.
- In the Objects window, locate the Breakroom Games Findable object you want to edit. (Tip: You can use the search field at the top of the window to search for a specific object.) Click on the object name to launch the Inspector window.
- In the Inspector window, locate the RoomFurniture component. Expand this component by clicking the > arrow located to the left of its name.
- In the Game field, enter the name of the game that includes the findable activity.
- In the Name field, enter the name of the findable activity (this will be listed on the game Taskboard).
- In the Points field, enter the number of points you would like to award users for completing the findable activity (optional).
- Check the Secret option if you want to turn off the location particles and glow for the findable. This will render the findable completely invisible.
- Click the Save button to store your changes, and the Close button to exit the Region Editor.
- Click the Reload Game button on the appropriate Breakroom Games Taskboard object.
Customizing a Findable collider
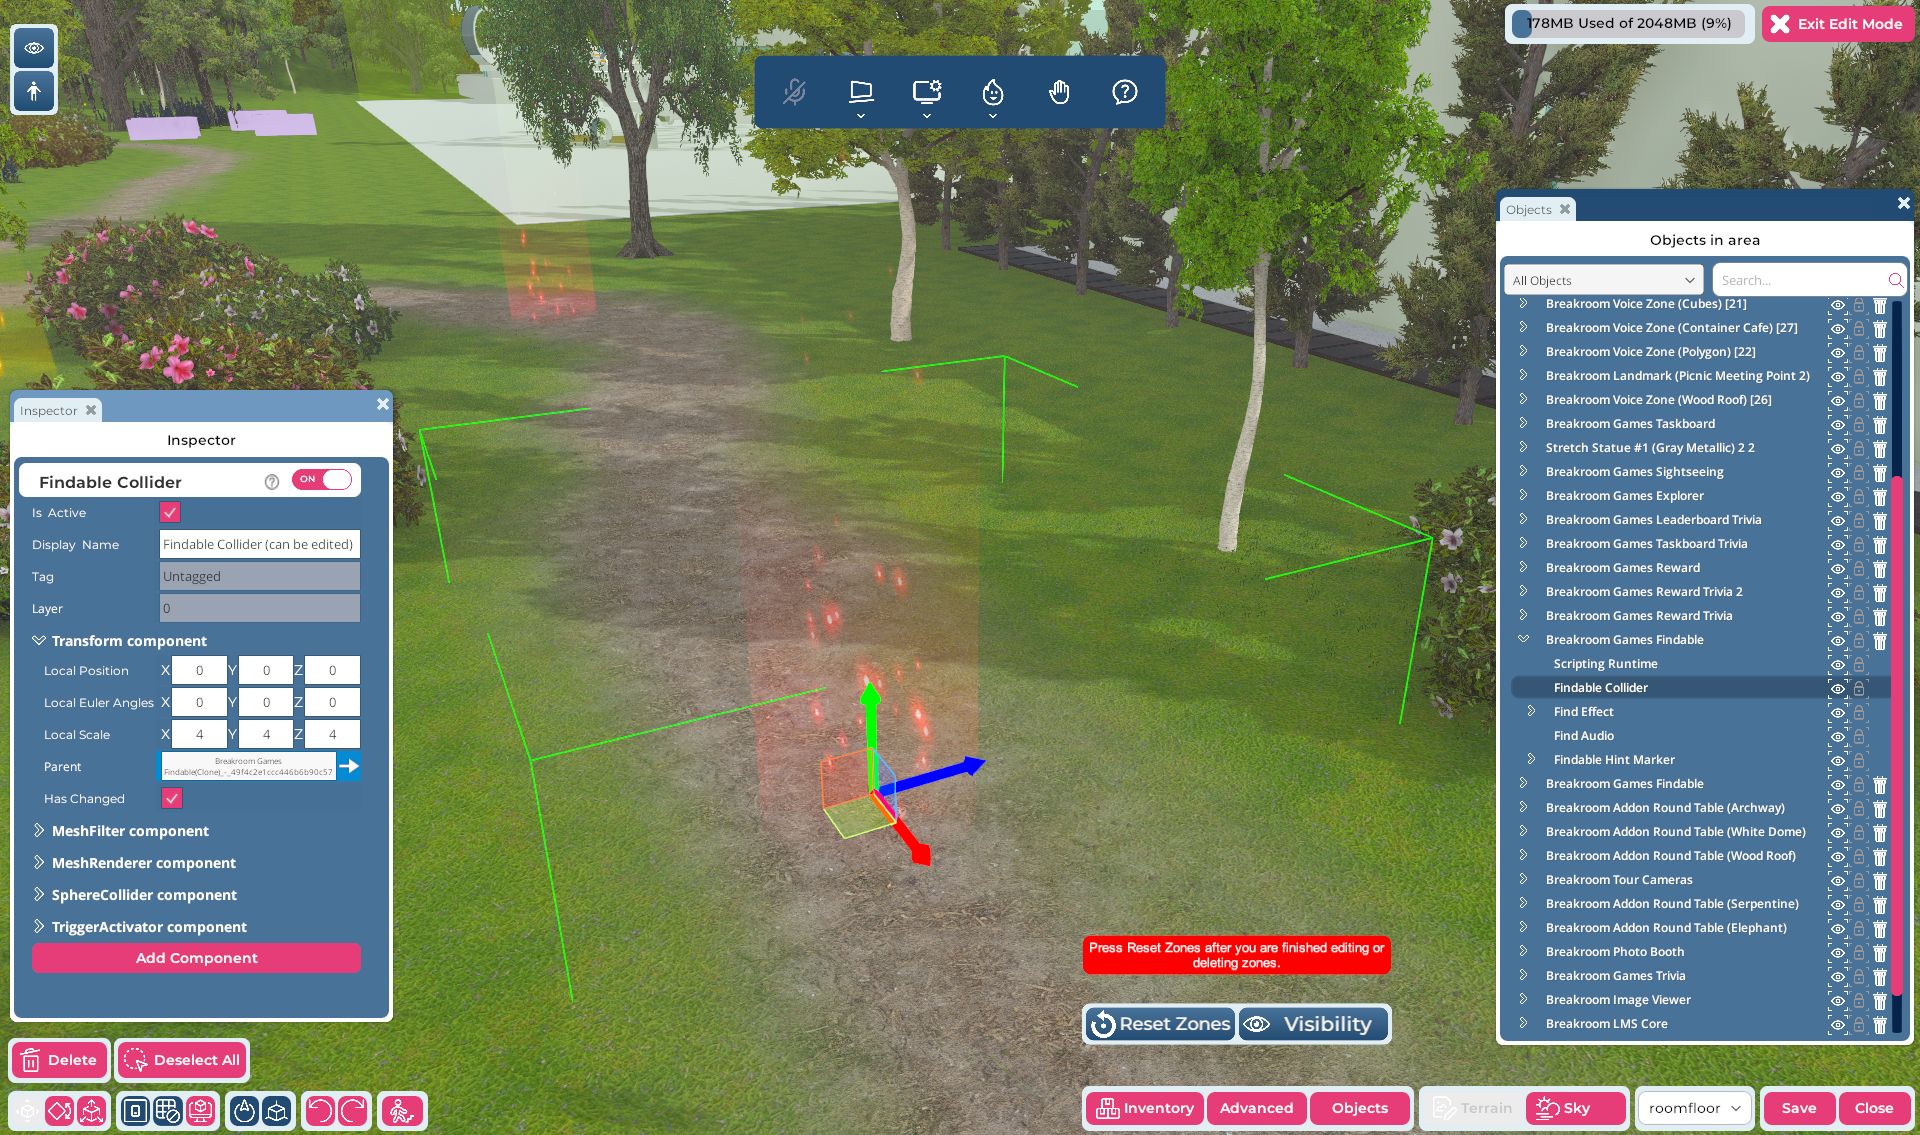
Pictured: A Findable object viewed through the Region Editor. Notice that the object is expanded in the Objects window and that the Findable Collider is highlighted in green.
Findables are triggered by avatar proximity. You can customize the proximity range of a Breakroom Games Findable object by changing the size and shape of its collider. To do so, follow these steps.
- Open the Region Editor by clicking the Edit Region button in the top toolbar.
- Click the Objects Button to launch the Objects window.
- In the Objects window, locate the Breakroom Games Findable object you want to edit. (Tip: You can use the search field at the top of the window to search for a specific object.) Click the > arrow located to the left of the object name to expand it.
- Click on the Findable Collider component to highlight it. Edit the Findable Collider to meet your specifications.
- Click the Save button to store your changes, and the Close button to exit the Region Editor.
- Click the Reload Game button on the appropriate Breakroom Games Taskboard object.
Findables are a great way to set up an obstacle course for your users. Set out some pillars with Findable objects on top and challenge your users to jump between them! Create rings in the sky with Findable objects inside and see if your users can nail those sudden 90° turns while in flight!
Also, did you know that the Points property associated with any activity or minigame object can be 0, as well as a negative number? That means you can set up a Findable object that "awards" negative points for an additional dose of drama!
Using a Findable object
To use a Findable object, all users need to do is move their avatar through its proximity collider. This can be done while walking, running, or flying.
Clickable
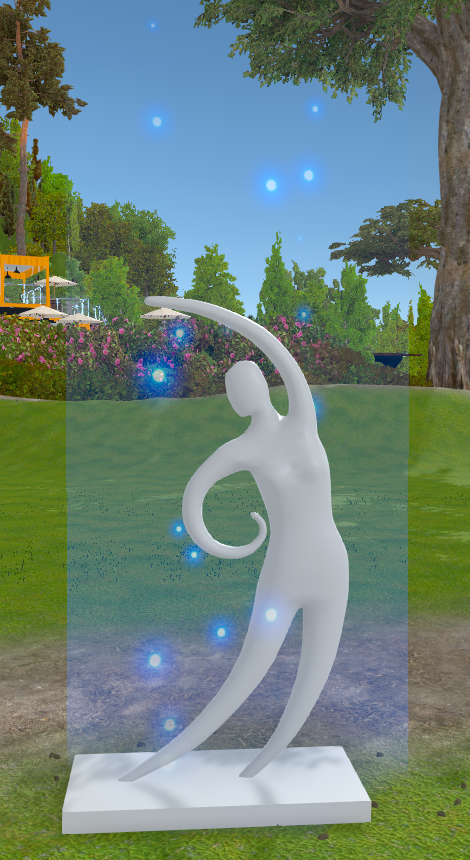
Pictured: A Breakroom Games Clickable object superimposed on a statue.
Breakroom Games Clickable objects are generic, transparent objects that can be placed over another object to turn it into a clickable activity. This functionality is ideal for creating scavenger hunts. You can highlight these objects with glowing particles for ease of discovery or make them completely invisible.
In your Inventory, you'll see the Breakroom Games Clickable object represented by this icon: 
Setting up a Clickable object
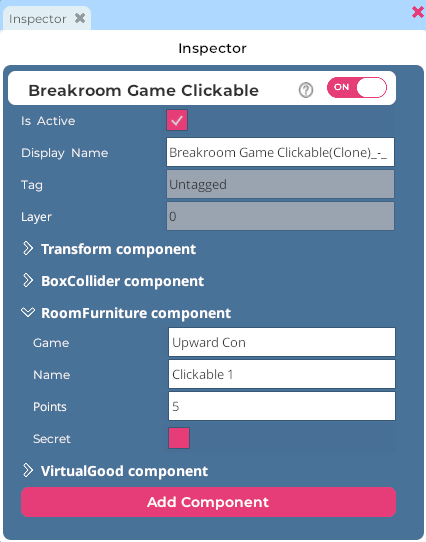
Pictured: The Inspector window for the Breakroom Games Clickable object.
After positioning the Breakroom Games Clickable object in your Region, you will need to edit its RoomFurniture component. The steps below are provided for easy reference.
- Open the Region Editor by clicking the Edit Region button in the top toolbar.
- Click the Objects Button to launch the Objects window.
- In the Objects window, locate the Breakroom Games Clickable object you want to edit. (Tip: You can use the search field at the top of the window to search for a specific object.) Click on the object name to launch the Inspector window.
- In the Inspector window, locate the RoomFurniture component. Expand this component by clicking the > arrow located to the left of its name.
- In the Game field, enter the name of the game that includes the clickable activity.
- In the Name field, enter the name of the clickable activity (this will be listed on the game Taskboard).
- In the Points field, enter the number of points you would like to award users for completing the clickable activity (optional).
- Check the Secret option if you want to turn off the location particles and glow for the clickable. This will render the clickable completely invisible.
- Click the Save button to store your changes, and the Close button to exit the Region Editor.
- Click the Reload Game button on the appropriate Breakroom Games Taskboard object.
Using a Clickable object
To use a Clickable object, users just need to click on it.
Sittable
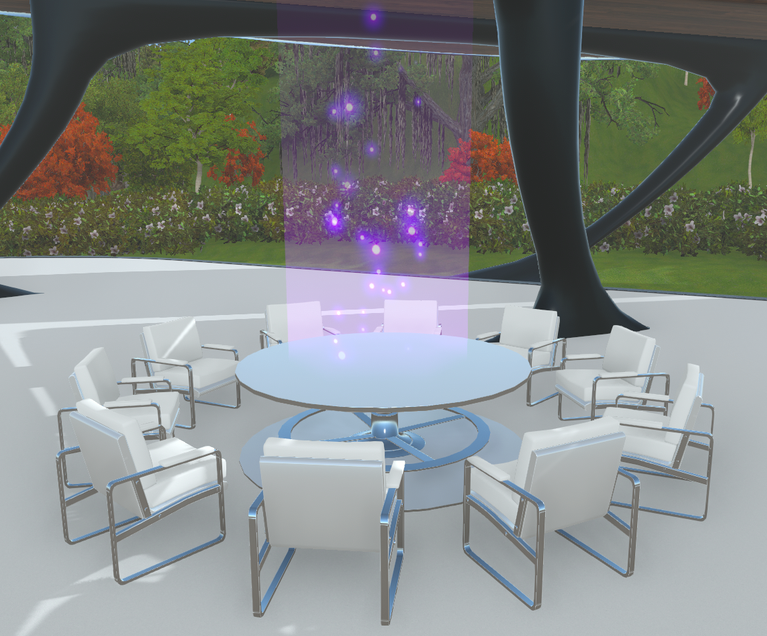
A Breakroom Games Sittable object placed on a table.
Breakroom Games Sittable objects are generic, transparent objects that turn the simple action of sitting down into a gamified activity. Both furniture and vehicle seats will work with sittables, allowing you to reward users for attending meetings or participating in fun rallies. You can highlight these objects with glowing particles for ease of discovery or make them completely invisible.
In your Inventory, you'll see the Breakroom Games Sittable object represented by this icon: 
Setting up a Sittable object
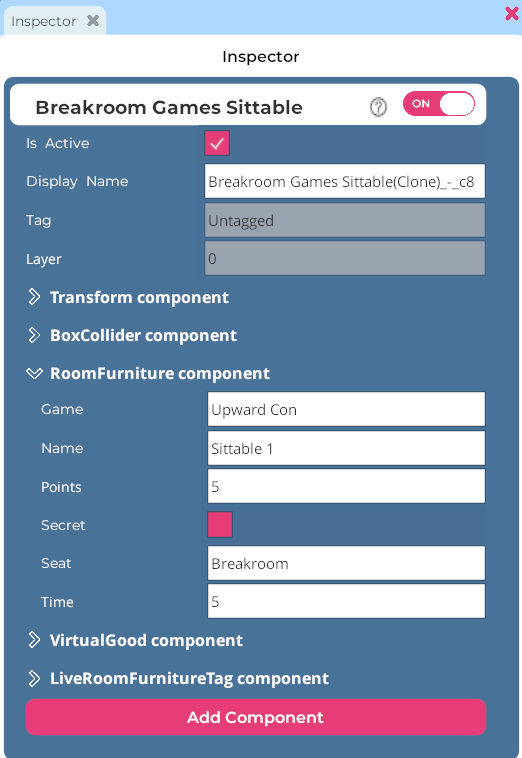
Pictured: The Inspector window for the Breakroom Games Sittable object.
After positioning the Breakroom Games Sittable object in your Region, you will need to edit its RoomFurniture component. The steps below are provided for easy reference.
- Open the Region Editor by clicking the Edit Region button in the top toolbar.
- Click the Objects Button to launch the Objects window.
- In the Objects window, locate the Breakroom Games Sittable object you want to edit. (Tip: You can use the search field at the top of the window to search for a specific object.) Click on the object name to launch the Inspector window.
- In the Inspector window, locate the RoomFurniture component. Expand this component by clicking the > arrow located to the left of its name.
- In the Game field, enter the name of the game that includes the sitting activity.
- In the Name field, enter the name of the sitting activity (this will be listed on the game Taskboard).
- In the Points field, enter the number of points you would like to award users for completing the sitting activity (optional).
- Check the Secret option if you want to turn off the location particles and glow for the sittable. This will render the sittable completely invisible.
- In the Seat field, enter the name of the seat(s) you would like users to sit on. (See below.)
- In the Time field, enter the amount of time users will need to sit in the seat to successfully complete the activity. (Note: Partial times are not recorded. Users must sit in the seat for the full duration in order to complete the activity.)
- Click the Save button to store your changes, and the Close button to exit the Region Editor.
- Click the Reload Game button on the appropriate Breakroom Games Taskboard object.
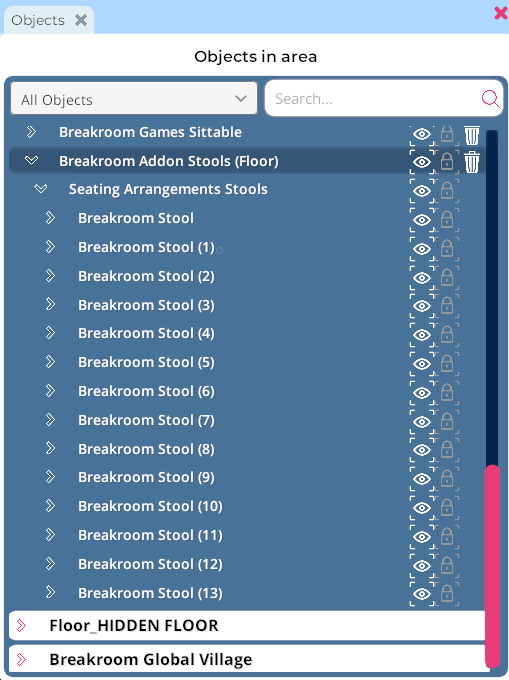
Pictured: The Objects window, with a Breakroom Addon Stools set expanded and highlighted.
When setting up the Breakroom Games Sittable, you must specify which seats qualify for the activity. Because seats can be nested in Breakroom, you can either name a specific seat or refer to a broad grouping of seats.
In the image above, a Breakroom Add-on Stools object has been expanded in the Objects window to reveal its individual stools. If you enter the term Breakroom into the Sittable object's Name field, then users may sit on any stool in order to complete the activity. However, if you enter the term Breakroom Stool (11), then only that specific stool will qualify. If you have multiple copies of Breakroom Stool (11) in your Region, both seats will qualify.
Using a Sittable object
To use a Sittable object, users just need to sit on a qualifying seat for the specified time duration.
Photo Booth
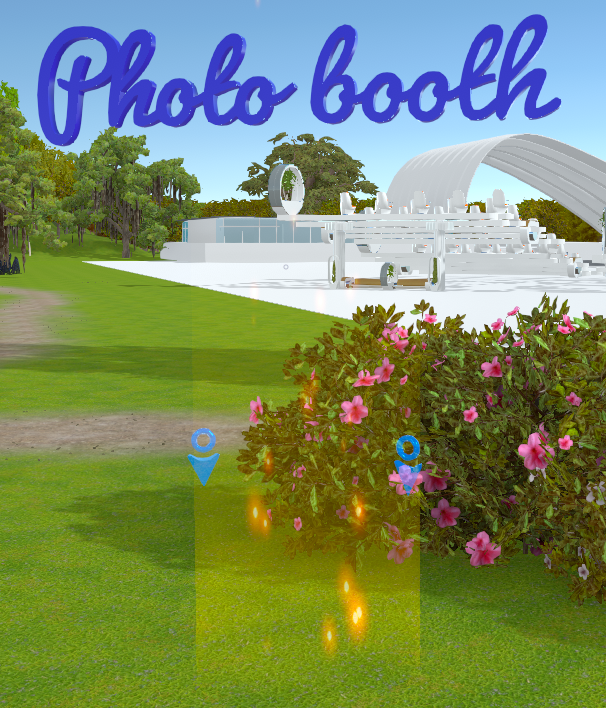
Photo Booths can be set up so that one or two users are required to complete the activity. You can highlight these objects with glowing particles for ease of discovery, or make them completely invisible. Peppering your region with Photo Booths incentivizes use of Breakroom's Snapshot feature, which also gives users the opportunity to share their virtual photos on social media.
In your Inventory, you'll see the Breakroom Photo Booth object represented by this icon: 
Setting up a Photo Booth object
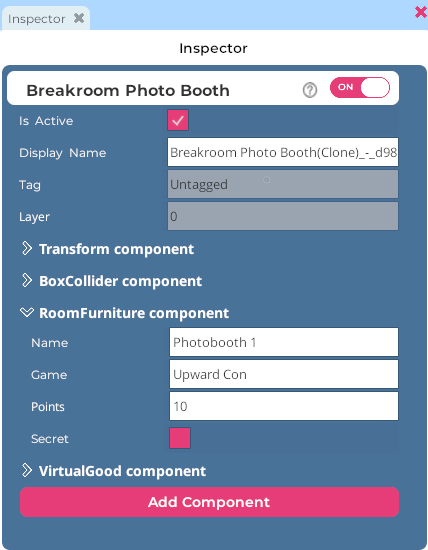
Pictured: The Inspector window for the Breakroom Games Photo Booth object.
After positioning the Breakroom Photo Booth object in your Region, you will need to edit its RoomFurniture component. The steps below are provided for easy reference.
- Open the Region Editor by clicking the Edit Region button in the top toolbar.
- Click the Objects Button to launch the Objects window.
- In the Objects window, locate the Breakroom Photo Booth object you want to edit. (Tip: You can use the search field at the top of the window to search for a specific object.) Click on the object name to launch the Inspector window.
- In the Inspector window, locate the RoomFurniture component. Expand this component by clicking the > arrow located to the left of its name.
- In the Game field, enter the name of the game that includes the photo booth activity.
- In the Name field, enter the name of the photo booth activity (this will be listed on the game Taskboard).
- In the Points field, enter the number of points you would like to award users for completing the photo booth activity (optional).
- Check the Secret option if you want to turn off the location particles and glow for the photo booth.
- Click the Save button to store your changes, and the Close button to exit the Region Editor.
- Click the Reload Game button on the appropriate Breakroom Games Taskboard object.
Customizing the Photo Booth object
By default, the Breakroom Photo Booth object includes two seats. This means that two users must sit on it and take a photo in order to complete the activity. You can make any photo booth a one-seater by following these steps.
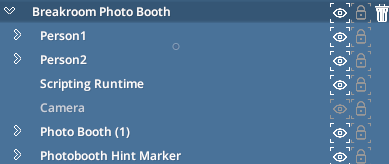
Pictured: A Breakroom Photo Booth object expanded in the Object window.
- Open the Region Editor by clicking the Edit Region button in the top toolbar.
- Click the Objects Button to launch the Objects window.
- In the Objects window, locate the Breakroom Photo Booth object you want to edit. (Tip: You can use the search field at the top of the window to search for a specific object.) Click the > arrow located to the left of the object name to expand it.
- Locate the Person 1 and Person 2 seats. To disable one of these, click the eye icon located to the right of its name.
- Click the Save button to store your changes, and the Close button to exit the Region Editor.
- Click the Reload Game button on the appropriate Breakroom Games Taskboard object.
Using a Photo Booth object
To successfully complete a photo booth activity, one or two users must click on the seat icons and take a snapshot using Breakroom's Snapshot feature.
Tour Camera
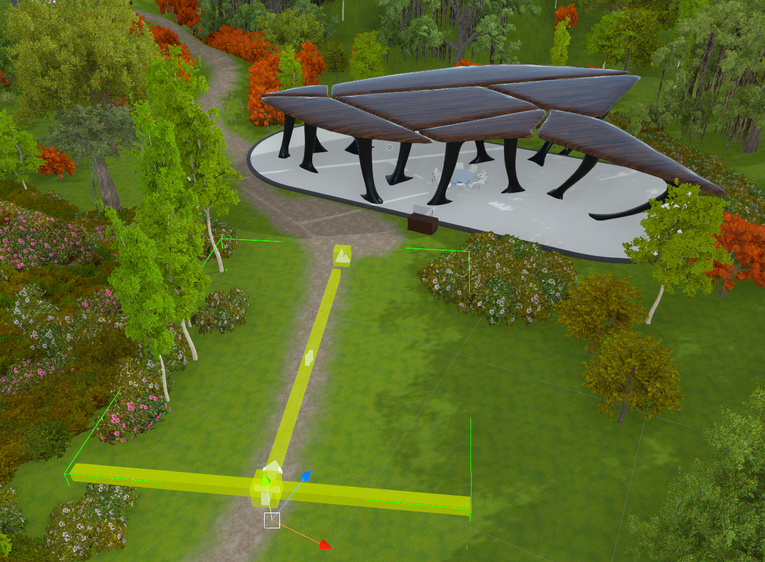
Pictured: The Breakroom Tour Cameras object set up within a Region.
Breakroom Tour Cameras can also be turned into an activity by entering any value into the object Game property. This encourages users to take your Region tour and learn more about your Breakroom World.
In your Inventory, you'll see the Breakroom Tour Cameras object represented by this icon: 
Setting up the Breakroom Tour Cameras
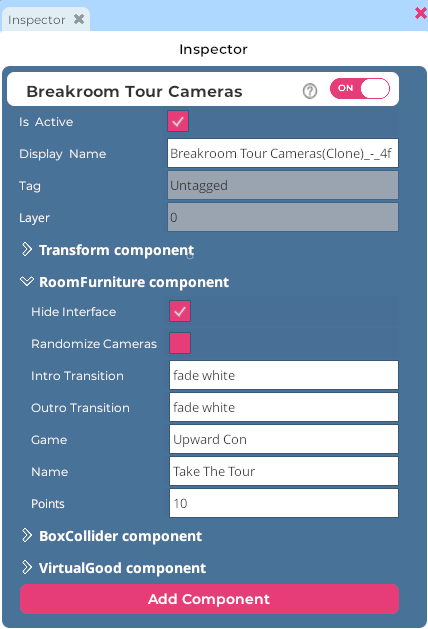
Pictured: The Inspector window for the Breakroom Tour Cameras object.
Our documentation includes detailed information about installing and editing the Breakroom Tour Cameras. After setting up your tour, you will need to edit the camera's RoomFurniture component to make it work with the Breakroom Games system. The steps below are provided for easy reference.
- Open the Region Editor by clicking the Edit Region button in the top toolbar.
- Click the Objects Button to launch the Objects window.
- In the Objects window, locate the Breakroom Tour Cameras object you want to edit. (Tip: You can use the search field at the top of the window to search for a specific object.) Click on the object name to launch the Inspector window.
- In the Inspector window, locate the RoomFurniture component. Expand this component by clicking the > arrow located to the left of its name.
- In the Game field, enter the name of the game that includes the tour activity.
- In the Name field, enter the name of the tour activity (this will be listed on the game Taskboard).
- In the Points field, enter the number of points you would like to award users for completing the tour activity (optional).
- Click the Save button to store your changes, and the Close button to exit the Region Editor.
- Click the Reload Game button on the appropriate Breakroom Games Taskboard object.
Using the Breakroom Tour Cameras
To complete the tour task, users will need to click the Take Tour button in the Start Here panel. Please note that activity requirements will not be met if users stop the tour prematurely.
Explorer
The Breakroom Games Explorer object is a generic activity that rewards players for walking, running, or flying a certain distance during the same login session in the same Region.
In your Inventory, you'll see the Breakroom Games Explorer object represented by this icon: 
Setting up the Explorer object
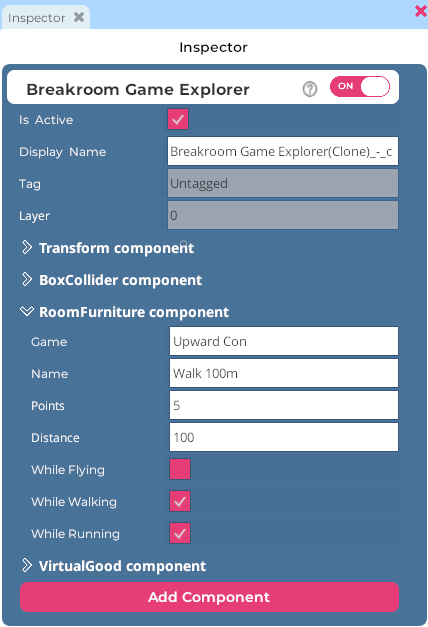
Pictured: The Inspector window for the Breakroom Games Explorer object.
After positioning the Breakroom Games Explorer object in your Region, you will need to edit its RoomFurniture component. The steps below are provided for easy reference.
As with all invisible system objects, we recommend editing the Transform component to place the Breakroom Games Reward object at 0,0,0. This keeps things tidy in your Region!
- Open the Region Editor by clicking the Edit Region button in the top toolbar.
- Click the Objects Button to launch the Objects window.
- In the Objects window, locate the Breakroom Games Explorer object you want to edit. (Tip: You can use the search field at the top of the window to search for a specific object.) Click on the object name to launch the Inspector window.
- In the Inspector window, locate the RoomFurniture component. Expand this component by clicking the > arrow located to the left of its name.
- In the Game field, enter the name of the game that includes the explorer activity.
- In the Name field, enter the name of the explorer activity (this will be listed on the game Taskboard).
- In the Points field, enter the number of points you would like to award users for completing the explorer activity (optional).
- In the Distance field, enter the number of meters you want users to cover during the explorer activity.
- Check the While Flying option if you want flight distance to count toward the explorer activity.
- Check the While Walking option if you want walking distance to count toward the explorer activity.
- Check the While Running option if you want running distance to count toward the explorer activity.
- Click the Save button to store your changes, and the Close button to exit the Region Editor.
- Click the Reload Game button on the appropriate Breakroom Games Taskboard object.
Using the Explorer object
To complete an explorer task, users simply need to walk, run, or fly the distance indicated by the Explorer object settings. Please note that if a user logs out before earning a reward, their progress toward that reward will not be saved (i.e. if a user walks 50/100 meters and logs out, they will start at 0 meters when they log in again). Any large abrupt movement will be treated as a teleport and the meters for it will not be calculated.
Sightseeing
The Breakroom Games Sightseeing object is a generic activity that allows players to be rewarded for visiting a certain number of unique breakout areas or voice zones. This activity requires that the conference system be set up in the same Region.
In your Inventory, you'll see the Breakroom Games Sightseeing object represented by this icon: 
Setting up the Sightseeing object
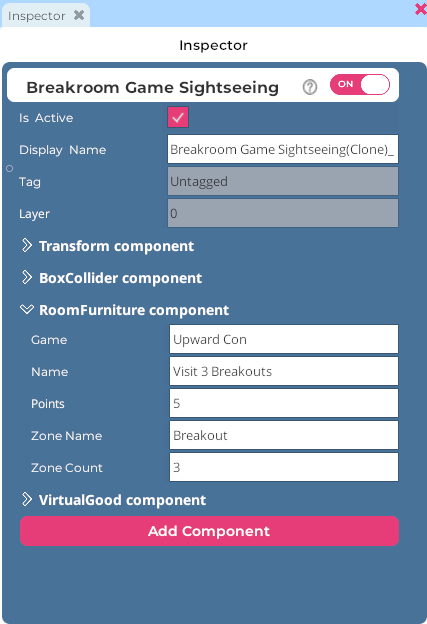
Pictured: The Inspector window for the Breakroom Games Sightseeing object.
After positioning the Breakroom Games Sightseeing object in your Region, you will need to edit its RoomFurniture component. The steps below are provided for easy reference.
As with all invisible system objects, we recommend editing the Transform component to place the Breakroom Games Reward object at 0,0,0. This keeps things tidy in your Region!
- Open the Region Editor by clicking the Edit Region button in the top toolbar.
- Click the Objects Button to launch the Objects window.
- In the Objects window, locate the Breakroom Games Sightseeing object you want to edit. (Tip: You can use the search field at the top of the window to search for a specific object.) Click on the object name to launch the Inspector window.
- In the Inspector window, locate the RoomFurniture component. Expand this component by clicking the > arrow located to the left of its name.
- In the Game field, enter the name of the game that includes the sightseeing activity.
- In the Name field, enter the name of the sightseeing activity (this will be listed on the game Taskboard).
- In the Points field, enter the number of points you would like to award users for completing the sightseeing activity (optional).
- In the Zone Name field, enter the zone name keyword you would like to count toward the sightseeing activity. (E.g. all zones that have Breakout in their name, all zones that have Pavilion in their name, etc. As long as the keyword appears somewhere in the zone name, the rest of the zone name doesn't matter.)
- In the Zone Count field, enter the number of zones you would like users to visit in order to complete the sightseeing activity.
- Click the Save button to store your changes, and the Close button to exit the Region Editor.
- Click the Reload Game button on the appropriate Breakroom Games Taskboard object.
Using the Sightseeing object
To complete the sightseeing activity, users need to visit the correct number of zones that meet the keyword criteria.
Trivia
The Breakroom Games Trivia object is a trivia minigame where a Quizmaster initiates questions that can then be answered by anyone in the Region. Points are awarded based on question difficulty.
In your Inventory, you'll see the Breakroom Games Trivia object represented by this icon: 
Setting up a Trivia object
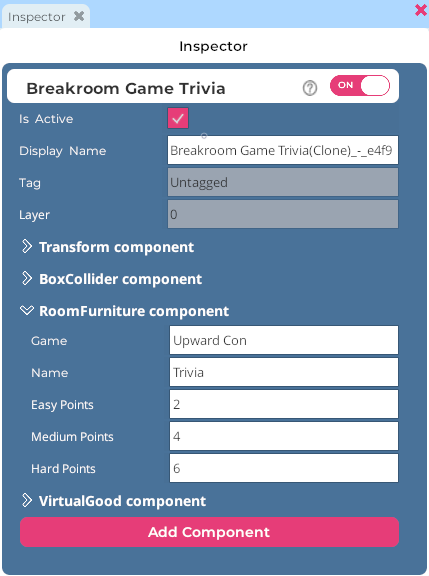
Pictured: The Inspector window for the Breakroom Games Trivia object.
After positioning the Breakroom Games Trivia object in your Region, you will need to edit its RoomFurniture component. The steps below are provided for easy reference.
- Open the Region Editor by clicking the Edit Region button in the top toolbar.
- Click the Objects Button to launch the Objects window.
- In the Objects window, locate the Breakroom Games Trivia object you want to edit. (Tip: You can use the search field at the top of the window to search for a specific object.) Click on the object name to launch the Inspector window.
- In the Inspector window, locate the RoomFurniture component. Expand this component by clicking the > arrow located to the left of its name.
- In the Game field, enter the name of the game that includes the trivia minigame.
- In the Name field, enter the name of the trivia minigame (this will be listed on the game Taskboard).
- In the Easy Points field, enter the number of points you would like to award users for correctly answering an easy question (optional).
- In the Medium Points field, enter the number of points you would like to award users for correctly answering a medium question (optional).
- In the Hard Points field, enter the number of points you would like to award users for correctly answering a hard question (optional).
- Click the Save button to store your changes, and the Close button to exit the Region Editor.
- Click the Reload Game button on the appropriate Breakroom Games Taskboard object.
Using a Trivia object
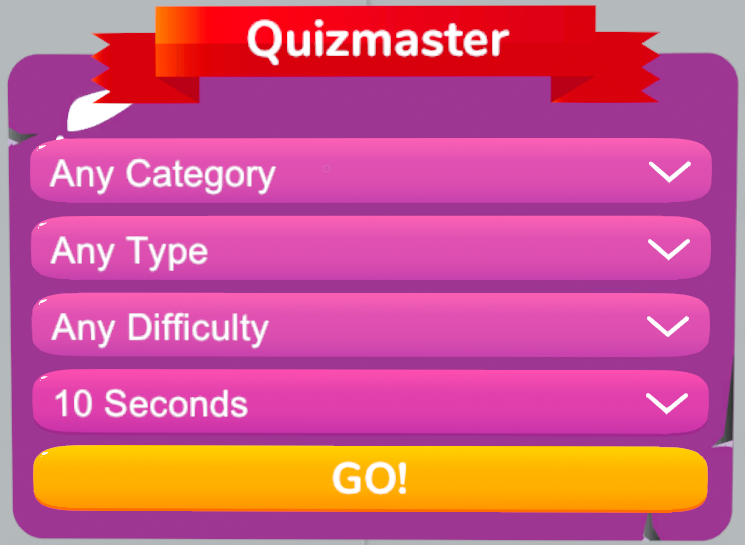
Quizmaster
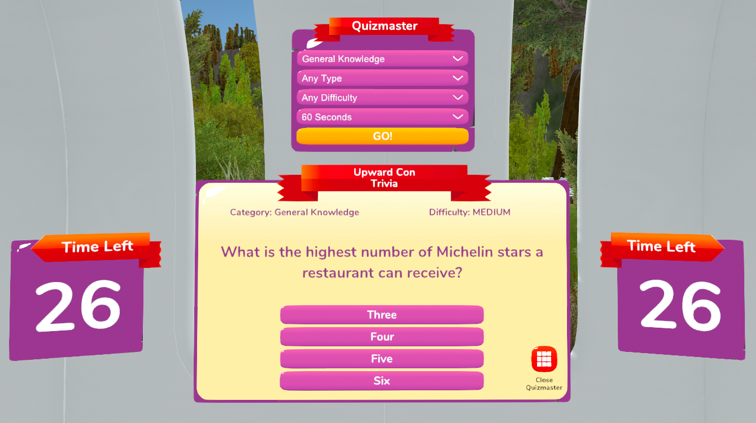
Any user with Region Moderator permissions or higher (hereafter referred to as the Quizmaster) can click the Open Quizmaster button on the Breakroom Games Trivia object. Doing so opens a panel where the Quizmaster can select:
- The trivia question category
- The question format
- The question difficulty
- How much time users have to answer the question
The Quizmaster can then click the GO! button to begin the trivia round. When the trivia game is over, clicking the Close Quizmaster button will dismiss the Quizmaster panel.
Trivia participants
Within the timeframe specified by the Quizmaster, all users are permitted to answer the active trivia question. Users must click on their preferred response, and will not have the ability to change their answer. All correct answers will be rewarded. This means that theoretically, a trivia game could end with everyone being a winner!
Sample Breakroom Games Region walkthrough
Now that we understand the different Breakroom Games system components and how they work together, let's take a look at some sample games set up in a Region.
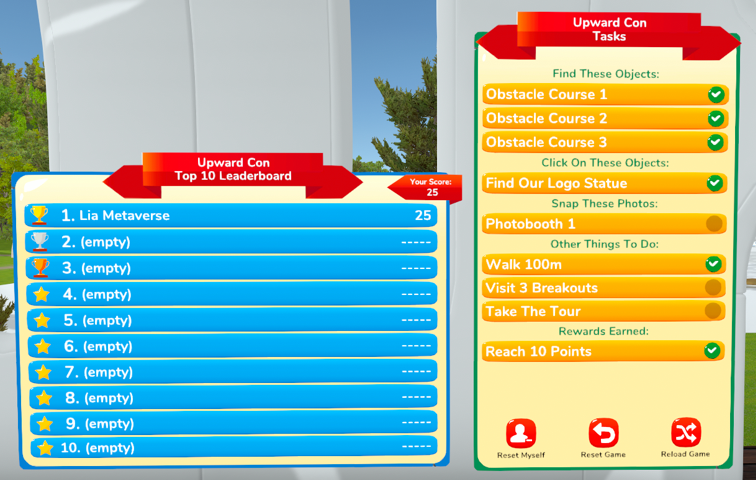
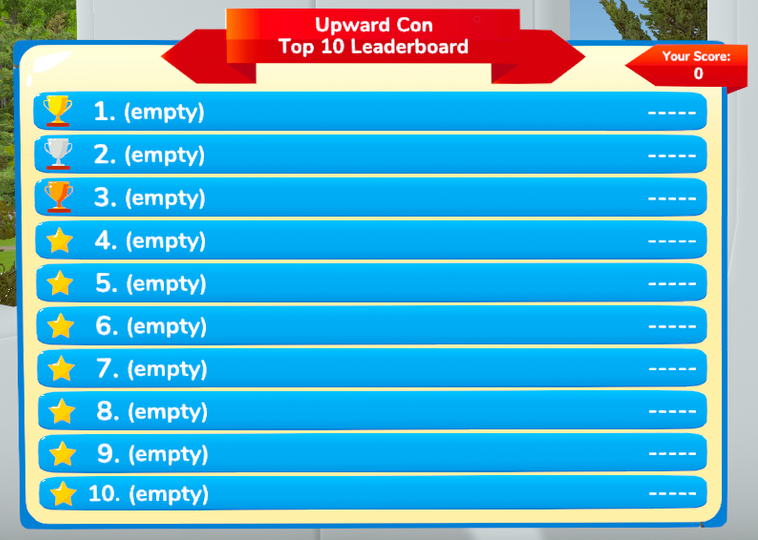
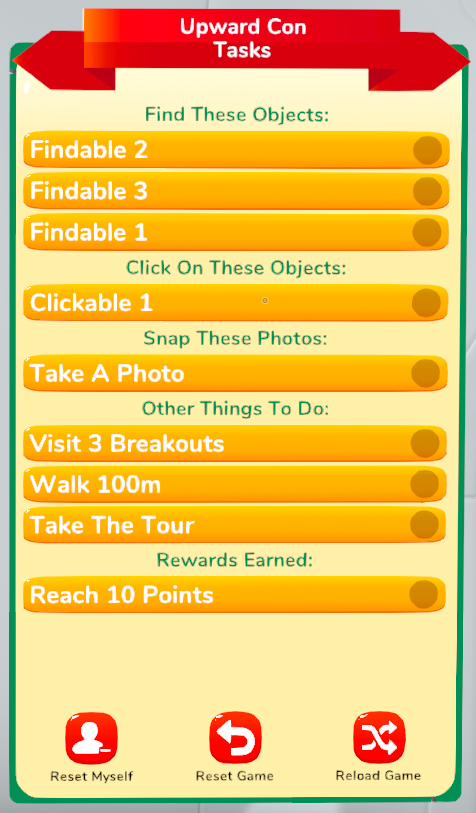
Here we see a Breakroom Games Leaderboard object and a Breakroom Games Taskboard object set up to track the same game (Upward Con). This game consists of an obstacle course, a single-item scavenger hunt, a photo booth, exploration activities, and a bonus reward for reaching 10 points.
When a user looks at the Leaderboard object, they will see the ten highest scores for the game. Their own score is displayed on the ribbon located in the top right-hand corner, even if their name doesn't appear in the top ten list.
All of the activity and minigame objects listed on the Taskboard object, as well as the associated Leaderboard object, have Upward Con specified as their object Game property. This game name is what ties the objects together, ensuring that they work as a unit.
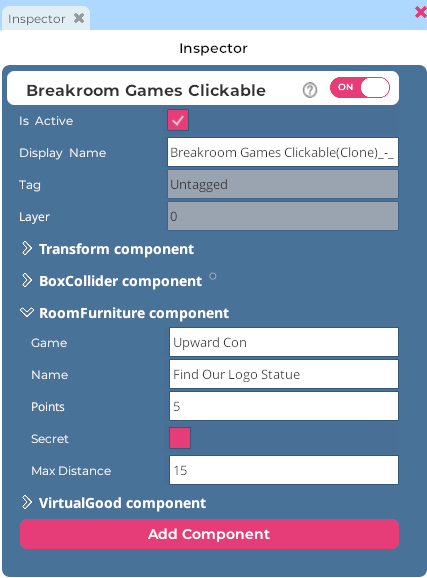
It is important to note that some Breakroom Games objects allow you to enter an activity name as well as a game name. Here you can see that for the statue clickable, the Game property is set to Upward Con. However, the Name property is set to Find Our Logo Statue. This activity name appears on the Taskboard, so users can more easily understand the steps they need to take to complete an activity.
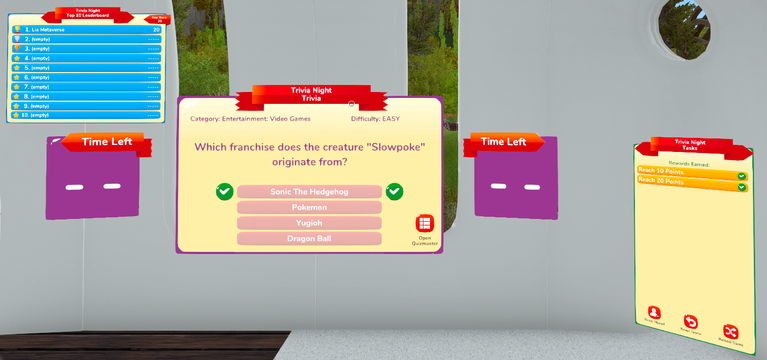
Meanwhile, we also have a trivia board set up in the same Region. Notice how the Breakroom Games Trivia object, as well as the Leaderboard and Taskboard objects, all have Trivia Night specified as their object Game property. This allows the objects to function together, and also sets this minigame apart as a separate game, with its own scoring and rewards system. Points earned in this trivia minigame will not appear on the Upward Con leaderboard, and vice versa.
On the Taskboard object, you can also see that we have set up two separate rewards just for the trivia game. This is accomplished by setting out multiple Breakroom Games Reward objects and editing their RoomFurniture component properties to meet your specifications.
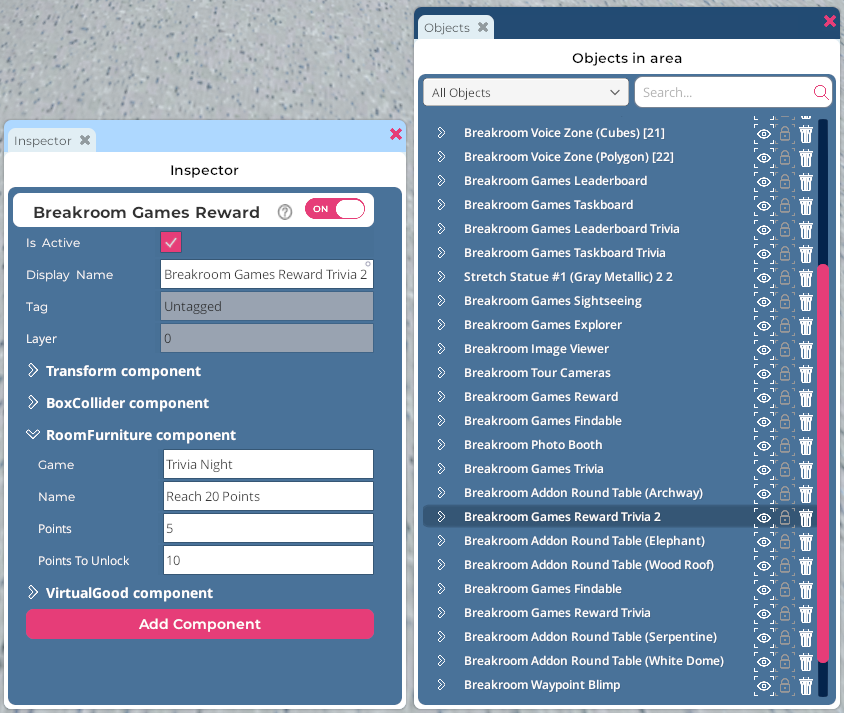
To help keep things organized, it's important to remember that you can customize any object's Display Name in the Inspector window. This can make it easier to locate objects in the Objects window. Here, for example, we can see that the two trivia rewards are named "Breakroom Games Reward Trivia" and "Breakroom Games Reward Trivia 2," respectively. The Leaderboard and Taskboard objects also have Trivia appended to their Display Names, making them easy to recognize.
Notice that both trivia Reward objects have their Game property set to Trivia Night, and both have been set up to award points for reaching a certain point threshold. This, of course, is completely optional, and rewards may simply be standalone achievements.