Region Editor best practices
Using the desktop app
For the best possible experience when positioning objects in your Regions, we recommend using the Breakroom desktop viewer. You can use Region Editor with World Stream—the functionality is the same. However, the desktop viewer offers faster feedback and is slightly smoother to use.
Positioning your camera
Region Editor avatar and camera commands
While using the Region Editor, you will most likely want to focus your camera on a particular object or area. When you open Region Editor, the camera will be in object mode by default. To instantly focus your camera on a particular object, click on the item in your Objects window, then move your cursor to a scene area and press the F key.

Highlighted: The location of the Avatar Move button.
Alternatively, you can click the Avatar Move button to switch to avatar mode. This gives you the ability to move your avatar through the Region while you work, with the camera following you. Click the button again to lock your avatar into place.
Fly cam
Fly cam is another useful way to explore your surroundings. To enable it, hold down your right mouse button (RMB). You can then use the A and D keys to pan from side, the R and C keys to pan up and down, and the W and S keys to zoom in and out. You can also orbit items in this mode by moving your mouse. The camera can be returned to its original, avatar-locked position by pressing the Esc key twice.
Latch cam
Latch cam allows you to choose a specific object as your current focus point. You can then move the camera around it using the commands detailed above. To "latch" your camera onto an object, hold down the Alt key and click on the object with your right mouse button (RMB).
Undo and Redo buttons

Highlighted: The location of the Undo and Redo buttons.
The Undo and Redo buttons in the Region Editor are comparable to the undo and redo buttons in a graphics editing application, and are designed to allow you to skip forwards and backwards in time for the current editing session. You can use the Undo button to correct mistakes in the moment—for example, if you rotate an object and decide you don't like how it looks, click the Undo button to restore it to its previous position. You can also undo your last step by pressing Ctrl + Z on your keyboard.
Selecting and editing multiple objects
To select items within a Region for editing, you can either click on the item itself or click on its name in the Objects window. To select multiple items at the same time, hold down the Ctrl key on your keyboard and click the items or item names you wish to edit.
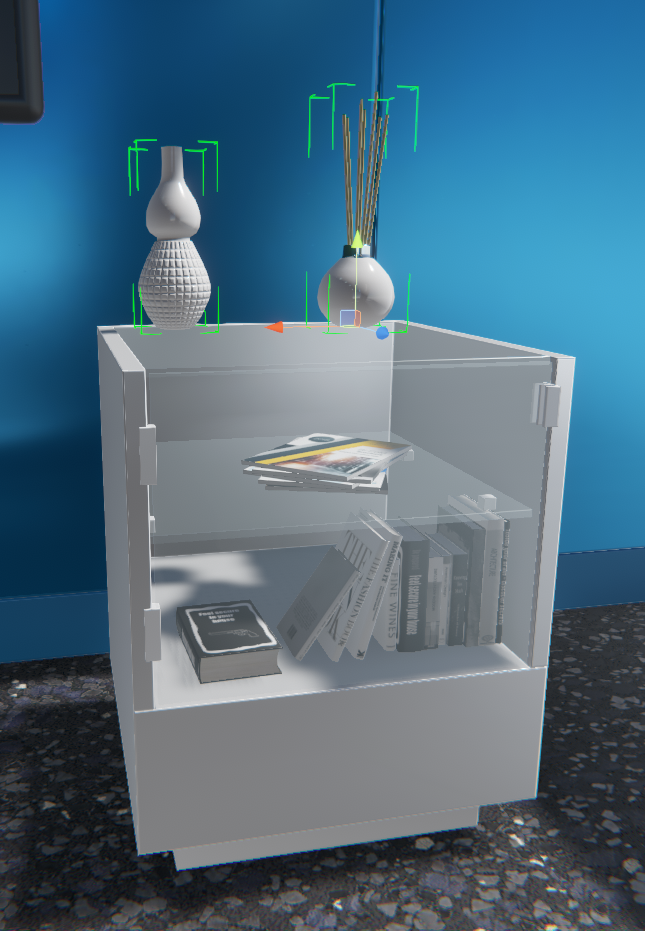
Pictured: Two items selected at the same time by holding down the Ctrl key.
When two or more items are selected at once, you can edit their position as a group using the Region Editor gizmos. They will move, rotate, and scale together.
You can also bulk-select items using the Objects window. To do so, click the first item in the series you would like to select. Then, while holding down the Shift key, click the last item in the series. This will highlight all of the objects at once.
Changing object Display Names
If you add multiple copies of any object to your Region, you will notice that every copy is identified by the same Display Name in the Objects window. By entering more descriptive object Display Names, you can make it easier to keep track of your items and locate them when needed.
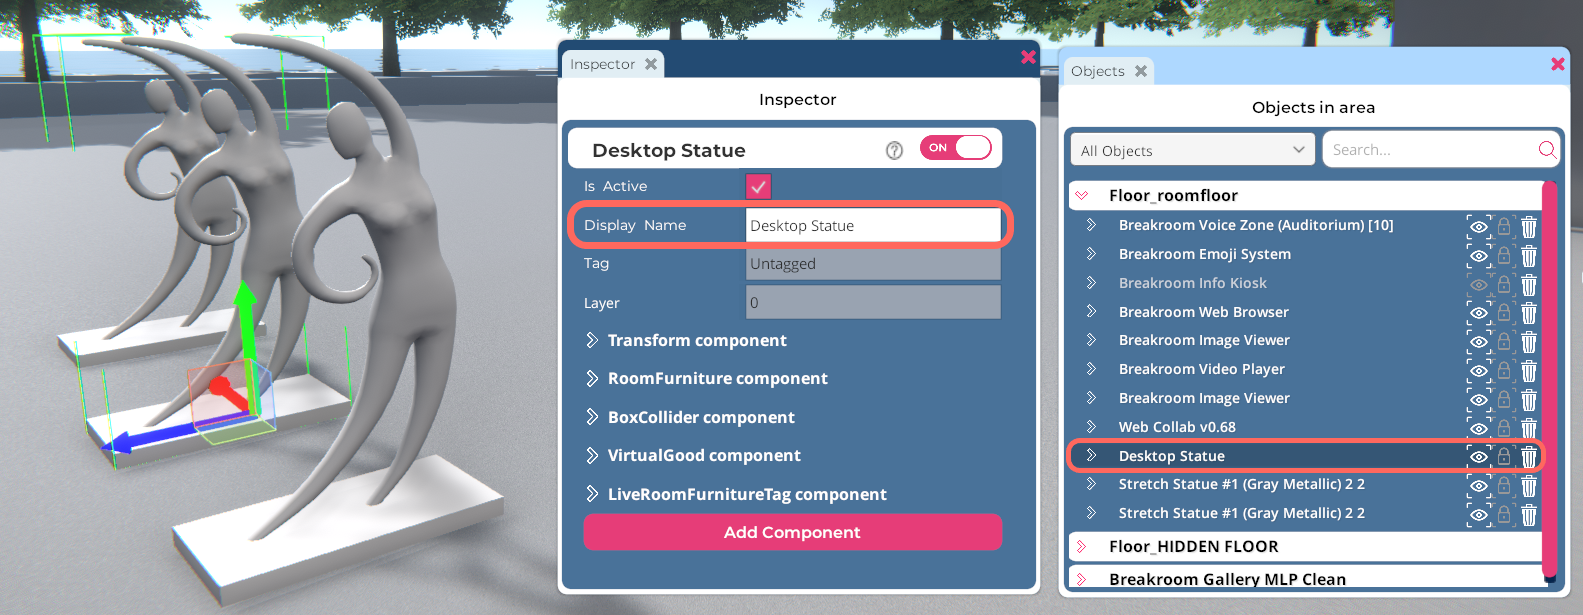
Pictured: A Region that contains three copies of the same item (Stretch Statue #1). The Display Name for one of these objects has been changed. By changing an object's Display Name, you can more efficiently locate and identify items.
To change the Display Name of an object, follow the steps below.
- Open the Region Editor by clicking the Edit Region button located in the top toolbar.
- Click the Objects Button to launch the Objects window.
- In the Objects window, locate the object you want to edit. (Tip: You can use the search field at the top of the window to search for a specific object.) Click on the object name to launch the Inspector window.
- In the Inspector window, locate the Display Name field. Enter the display name you want to use.
- Click the Save button to store your changes, and the Close button to exit the Region Editor.
You cannot change the Display Name of breakout area, voice zone, and voice zone furniture objects.
Changing Region templates
You can switch to another Region template from within the Region Editor. To do so, follow the instructions below.
- Navigate to the Region you want to change.
- Open the Region Editor by clicking the Edit Region button located in the top toolbar.
- Click the Inventory button to open the Inventory window.
- Along the left side of the Inventory window, you will see several category tabs. Click on the Region category.
- Click on the Region template item that you would like to use.
- Confirm the change by clicking the Swap Template button.
- Click the Save button to store your changes, and the Close button to exit the Region Editor.
When switching Region templates, all furniture objects you have set down and any custom changes you have made to the original Region will be erased. These lost changes cannot be recovered, so please consider this step carefully.
Giving Region editing permissions to other users
By making another user a Region Administrator, you can grant limited in-world editing permissions. Region Administrators can access the Region Editor for their assigned Region, as well as the moderator tools and the Region Information window. However, they will not be able to log in to your Dashboard.
Alternatively, you can appoint a Region Developer for any Region that you own. Region Developers have access to the Region Editor, and can decorate and modify the Region to which they are assigned. They do not occupy a Developer seat, and cannot upload content to your World.
To grant these advanced Region-level permissions, follow the steps below.
- Click on the mini map. (If not enabled, click on the Minimap button in the top toolbar.) This will open the Region Information window.
- Click on the Members tab, and then the Add Members button. This will open the "Add new members" dialog box.
- Use the search field to search for the user's name. When you find it, click the Add button.
- Once the user is added to the Region members list, check the box next to their name and then click on the Set Role drop-down menu. From this menu, select the permissions level you'd like to assign the user.
To revoke advanced Region-level permissions, follow steps 1-4 above, and select either the Member or Guest role. If you prefer, you can also remove the user from the members list entirely.
You should only assign Administrator or Developer status to trusted individuals who understand how to use the Breakroom tools. Changes made in the Region Editor may not be easy to revert.