Editing and moving objects
Overview
Breakroom's Region Editor is a powerful tool that helps you bring your Metaverse vision to life. On this page, you'll learn how to move, rotate, resize, and position virtual objects in order to customize your Breakroom World.
Getting started
In order to make changes to a virtual object in Breakroom, you'll first need to open the Region Editor and select that object. To do so, follow these steps.
- Navigate to the Region that contains the object you want to edit.
- Open the Region Editor by clicking the Edit Region button in the top toolbar.
- Click on the object you want to edit or click on that item's name in the Objects window.
This will highlight the object on your screen. You can switch your selected object within the Region Editor at any time. For additional information, please review our introduction to using the Region Editor and our Region Editor best practices.
Moving objects using the Region Editor
Movement
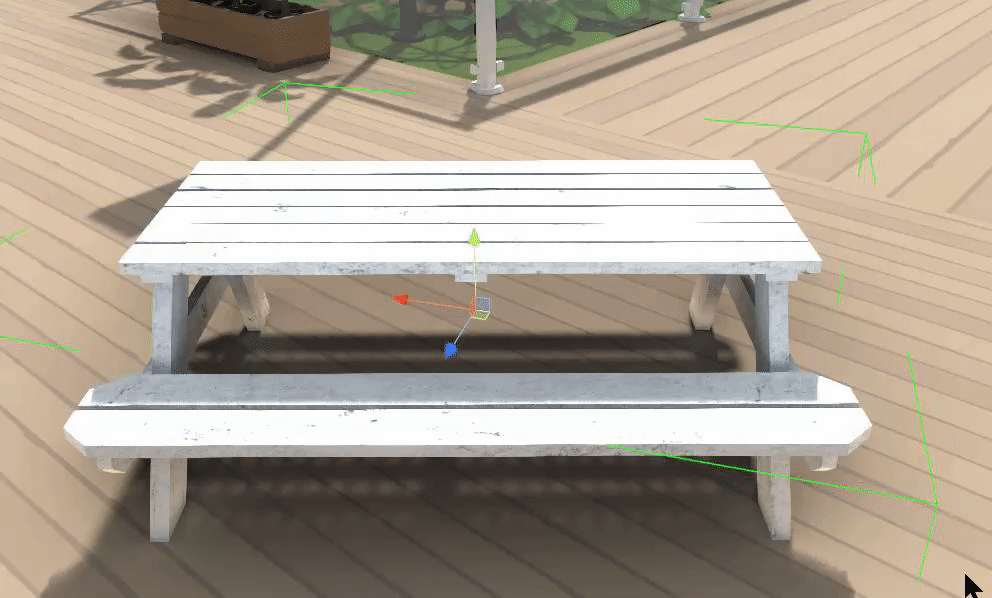
The movement gizmo is a tool that allows you to manually reposition items in your Region. In the image above, you can see the movement gizmo represented by a set of colorful arrows attached to the picnic table object.
To activate the movement gizmo while in the Region Editor, click the Move button located in the object editing tray, or press the Alt + W keys on your keyboard.
Once the movement gizmo is activated, you can move your chosen object using the steps below.
- To move the object along the X, Y, or Z axis, hover your cursor over the appropriate arrow. That arrow will turn yellow.
- Click on the arrow and hold down the left mouse button.
- With the arrow selected and the left mouse button held down, move your cursor to slide the object back and forth along your chosen axis.
- To set the object in place, release the left mouse button.
- To move the object along multiple axes simultaneously, click and hold on one of the squares located at the gizmo's root. You can then drag the object to your desired location.
You can also "free move" an object along a plane set at 90° to the current camera angle (as if you were "washing" the camera lens in front of you).
- Hold down the Shift key on your keyboard. A single highlighted box will appear at the root of the movement gizmo.
- Click on the box and hold down the left mouse button. Continue to hold down the Shift key.
- Use your cursor to freely position the object.
- To set the object in place, release both the left mouse button and the Shift key.
You can move objects quickly and easily using the "Move Object to Camera" button. This button will move any currently selected object to your camera's location. It's especially useful for changing camera angles in voice zones.
Rotation
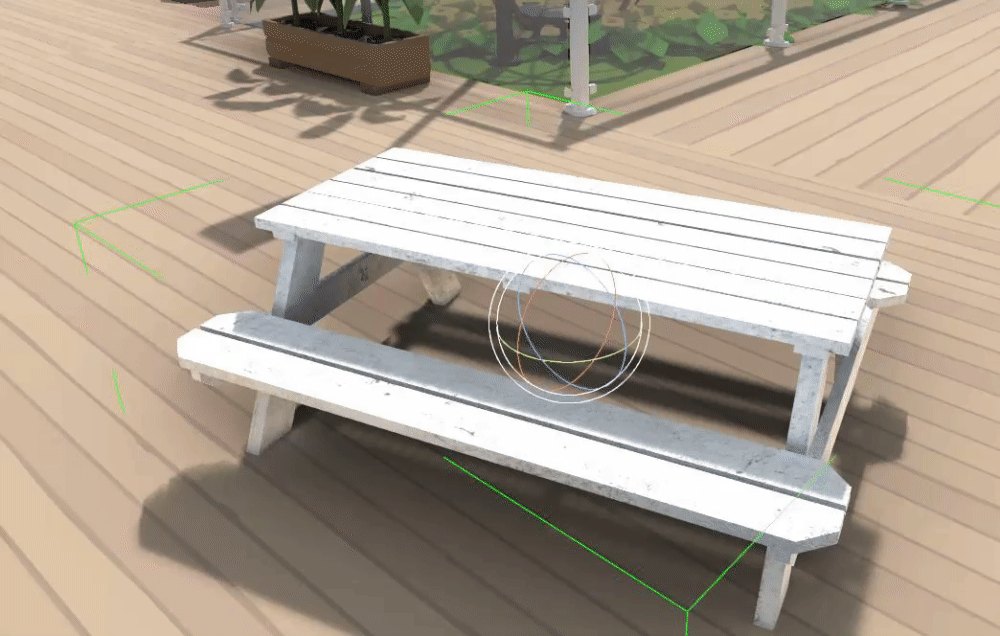
The rotation gizmo allows you to rotate an object around one or more axes. In the image above, you can see the rotation gizmo represented by a set of colorful rails attached to the picnic table object.
To activate the rotation gizmo while in the Region Editor, click the Rotate button located in the object editing tray, or press the Alt + E keys on your keyboard.
Once the rotation gizmo is activated, you can rotate your chosen object using the steps below.
- To rotate the object along the X, Y, or Z axis, hover your cursor over the appropriate colored rail. That rail will turn yellow.
- Click on the rail and hold down the left mouse button.
- With the rail selected and the left mouse button held down, move your cursor to rotate the object.
- To freeze the object in your desired position, release the left mouse button.
You can rotate the object on a plane facing your camera by manipulating the outer white rail instead of the colored rails, following the directions above.
Finally, you can "free rotate" an object along all three axes at once by clicking and holding on any part of the object itself, instead of the rails.
Scaling
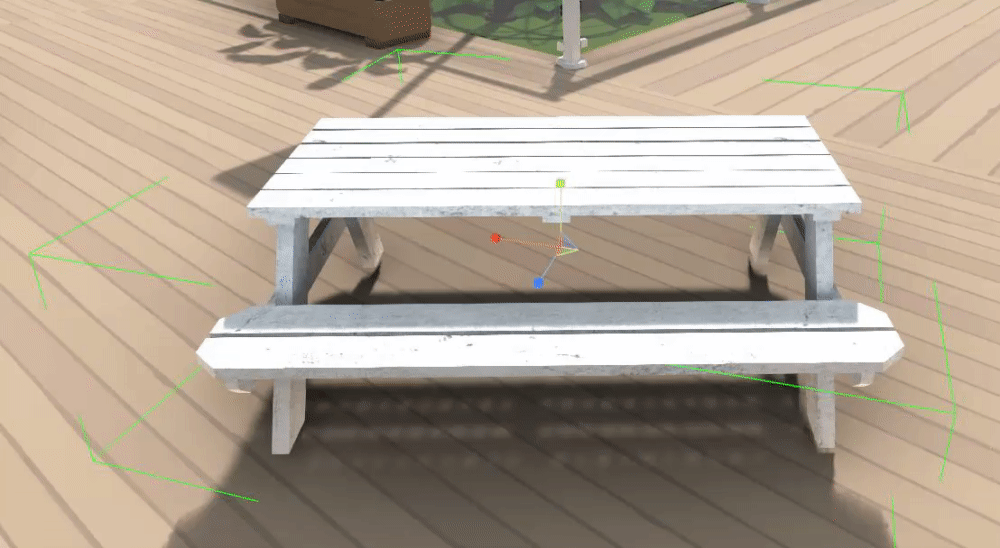
The scaling gizmo allows you to resize an object along one or more axes. In the image above, you can see the scaling gizmo represented by a set of colorful markers attached to the picnic table object.
To activate the scaling gizmo while in the Region Editor, click the Scale button located in the object editing tray, or press the Alt + R keys on your keyboard.
Once the scaling gizmo is activated, you can resize your chosen object using the steps below.
- To scale the object along the X, Y, or Z axis, hover your cursor over the appropriate axis marker. That marker will turn yellow.
- Click on the marker and hold down the left mouse button.
- With the marker selected and the left mouse button held down, move your cursor to scale the object.
- To finish scaling the object, release the left mouse button.
- To scale the object along multiple axes simultaneously, click and hold on one of the triangles located at the gizmo's root. You can then drag the object to your desired proportions.
You can also scale an object along all three axes at once. This will preserve the object's original aspect ratio/proportions, essentially allowing you to "embiggen" or "shrink" the object.
- Hold down the Shift key on your keyboard. A single highlighted box will appear at the root of the scaling gizmo.
- Click on the box and hold down the left mouse button. Continue to hold down the Shift key.
- Use your cursor to freely resize the object.
- To finish scaling the object, release both the left mouse button and the Shift key.
Editing the Transform component
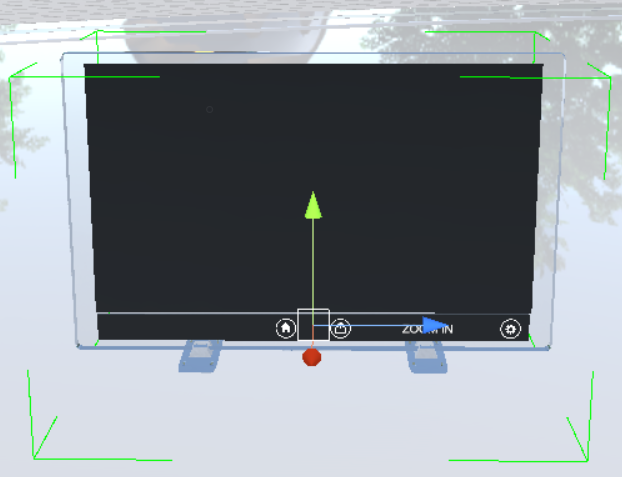
In some situations, it may be more efficient to move, rotate, or scale an object by editing its Transform component. By manually editing the values stored in an object's Transform component, you can move an object five meters along the X axis and rotate the same object by a precise number of degrees, all with just a few clicks.

Pictured: The Region Editor window, with a Breakroom Web Browser object selected. Its Inspector window is shown on the left.
To identify the values stored in an object's Transform component, follow these steps.
- Open the Region Editor by clicking the Edit Region button in the top toolbar.
- Make sure the Objects window is open by clicking the Objects button located on the bottom right.
- Locate the object you want to edit in the Objects window, and click on it. This will open the Inspector window for that object.
- Expand the Transform component in the Inspector window by clicking the > arrow located to the left.
- You will see three properties (Local Position, Local Euler Angle, and Local Scale). Each property contains three fields corresponding to the object's X, Y, and Z axes.
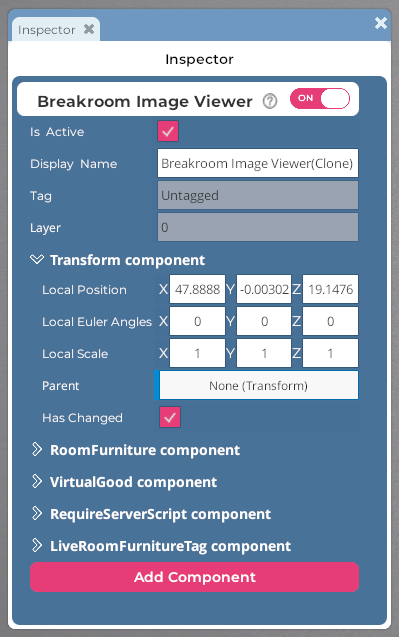
Pictured: An example Inspector window.
Changing an object's position
To change the position of an object, enter the updated location values (along the X, Y, or Z axis, or any combination of these). Then click the Save button located in the bottom right corner of the Region Editor.
Changing an object's rotation
To change the rotation of an object, enter the updated rotation values (along the X, Y, or Z axis, or any combination of these). Then click the Save button located in the bottom right corner of the Region Editor.
Changing an object's scale
To change the scale of an object, enter the updated scale values (along the X, Y, or Z axis, or any combination of these). Then click the Save button located in the bottom right corner of the Region Editor.
Using node mode
This section is currently under construction. If you have any questions that aren't answered here, please contact our Customer Success Team.
Using grid mode
You can activate grid mode for every object in your Region by clicking the Grid Mode button in the object editing tray, or by holding down the Ctrl key while actively manipulating an object. When you're in grid mode, you'll notice that object movement, rotation, and scaling will "snap" along an invisible grid instead of flowing smoothly. This is especially useful when moving items around a scene, allowing you to perform tasks like lining up chairs in neat rows with a minimum of effort.
In grid mode, movement "snap points" are set one meter apart from each other. Rotation "snap points" are set at 15° intervals.
Local mode vs. global mode
In the object editing tray, you can choose to orient your objects using either local mode or global mode. In local mode, objects will be moved, rotated, and scaled relative to their own axes.
Pictured: In local mode, the movement gizmo aligns with the width, length, and height of the object.
In global mode, object manipulation is accomplished relative to the layout of the Region.

Pictured: In global mode, the movement gizmo aligns with the cardinal directions of the region itself.
Both local and global mode have their uses. Combine global mode with grid mode to lay out a precise flower garden, or use local mode to randomly sprinkle rose petals along a pathway.
Center mode vs. mesh pivot mode
In the object editing tray, you can also toggle between two pivot points for your objects—center pivot and mesh pivot. All objects have a mesh pivot point, which is usually located at the object base (where an object might rest on the floor or on a table) or at a natural pivot point, such as the hinges of a door. Alternatively, an object's center point is normally located close to its center of mass, or the center of the bounding box that surrounds it.
The difference between these two points can sometimes be subtle, but it's still a useful distinction to keep in mind. The pivot point is where your movement, rotation, and scaling gizmos will appear in the Region Editor, and rotating an object from its center pivot point may lead to different results than rotating that same object from its mesh pivot point.